ios5.1.1
我在我自己iOS 5的机器上试了一下,也会报illegal instructions 4,但是我还没找到是什么问题,我建议2种解决方案:
- 升级到iOS 8;
- 用另一种方式来发com.iosre.rootdaemon.reboot,比如写个tweak或者App来post
会不会是使用sdk版本指定的问题,升级xcode5后只有iphoneos7.1.sdk
只有iOS 7.1应该是没问题的,SDK都是向下兼容的,我不知道是不是编译器的问题导致的
为什么我按照上面的步骤去做,结果dpkg-deb -c哪个deb包的时候依然不是root:wheel的呢,感谢好心人回答一下。
I have meet a problem in re-implement this project, I have done everything in the description, after I execute the following command in terminal(having already extracted the two file fauxsu and libfauxsu.dylib to $THEOS/bin/ ) :
sudo chmod +x /opt/theos/bin/fauxsu
sudo chmod +x /opt/theos/bin/libfauxsu.dylib
sudo chown root:wheel /opt/theos/bin/fauxsu
sudo chown root:wheel /opt/theos/bin/libfauxsu.dylib
------------------------------ terminal -------------------------------
when I make package, I found the .deb file’s privilege is still ~:staff ! like this:
drwxr-xr-x sigur/staff 0 2016-10-12 17:41 ./
drwxr-xr-x sigur/staff 0 2016-10-12 15:54 ./Library/
drwxr-xr-x sigur/staff 0 2016-10-12 15:54 ./Library/LaunchDaemons/
-rw-r–r-- sigur/staff 355 2016-10-12 15:52 ./Library/LaunchDaemons/com.sigur.iosred.plist
drwxr-xr-x sigur/staff 0 2016-10-12 17:41 ./usr/
drwxr-xr-x sigur/staff 0 2016-10-12 17:41 ./usr/bin/
-rwxr-xr-x sigur/staff 132560 2016-10-12 17:41 ./usr/bin/iOSREd
------------------------------ terminal -------------------------------
Where is my problem!
执行一下ls -l /opt/theos/bin/ | grep faux看看输出是什么;
然后重新执行make package,用dpkg-deb -c看看新生成的deb
问题已经解决!原因是在El Capitan之后,mac 系统文件修改权限加入了系统完整性保护(System Integrity Protection,其目的是为了阻止系统文件,包括auvaltool,被修改,这是在El Capitan之后才有的一个新特性)所以需要先关闭这个功能之后,执行上面的 sudo chmod 语句才会有效,具体关闭方式是
重启电脑 并按住Command+R,进入recovery分区,之后从菜单栏中选择工具(Utilities)->终端(Terminal),之后在终端中输入csrutil disable; reboot 再回车即可。
以上是我的解决方式,有不对的地方还望指正!
3 个赞
我没有关闭这个特性,也可以啊!我是10.12的系统
我的是10.11.6的系统,你的csrutil status 状态是enable的吗?我重新开启这个功能时,再创建一个项目,并 sudo chmod 文件权限,发现 make package 出来的 deb文件还是是 :/staff 的
FunMaker-MBP:~ snakeninny$ csrutil status
System Integrity Protection status: enabled.
这个我也不清楚是什么原因,不过我通过我的这种方式设置文件权限之后,再将 make package 出来的deb文件安装到手机运行,文件能够正常运行,但不能接收到通知,只返回了一个0,执行命令如下
iphone:~ root# ps -e | grep iosree
126 ?? 0:04.77 /usr/bin/iosree
1641 ttys005 0:00.01 grep iosree
iphone:~ root# cycript -p SpringBoard
cy# np = @encode(unsigned int()(char const))(dlsym(RTLD_DEFAULT, "notify_post))
&(extern “C” unsigned int notify_post(char const*))
cy# np(“com.sigu.iosree”)
0
cy#
不知道是哪儿出了问题?
如果你能够把每一步操作的细节和结果都贴出来,而不是想这样只丢一个结论出来,想必有人会愿意帮你分析分析的
具体的步骤是跟着您上面写的一步一步来做的,
adongMacBook-Pro:iosCode chenzhidong$ nic.pl
第一步,创建tool:
NIC 2.0 - New Instance Creator
[1.] iphone/activator_event
[2.] iphone/application_modern
[3.] iphone/cydget
[4.] iphone/flipswitch_switch
[5.] iphone/framework
[6.] iphone/ios7_notification_center_widget
[7.] iphone/library
[8.] iphone/notification_center_widget
[9.] iphone/preference_bundle_modern
[10.] iphone/tool
[11.] iphone/tweak
[12.] iphone/xpc_service
Choose a Template (required): 10
Project Name (required): iOSREd
Package Name [com.yourcompany.iosred]: com.adong.iosred
Author/Maintainer Name [陈志东]: adong
Instantiating iphone/tool in iosred/…
Done.
第二步,修改.mm的代码,这个就不贴了;
第三步,创建.plist文件,并填写里面的内容,然后移到/Layout/Library/LaunchDaemons/目录:
adongMacBook-Pro:iosred chenzhidong$ touch com.adong.iosred.plist
adongMacBook-Pro:iosred chenzhidong$ chmod 644 com.adong.iosred.plist
adongMacBook-Pro:iosred chenzhidong$ mkdir -p ./Layout/Library/LaunchDaemons/
adongMacBook-Pro:iosred chenzhidong$ mv com.adong.iosred.plist ./Layout/Library/LaunchDaemons
第五步,就是make package打包,然后dpkg-deb查看包内容;
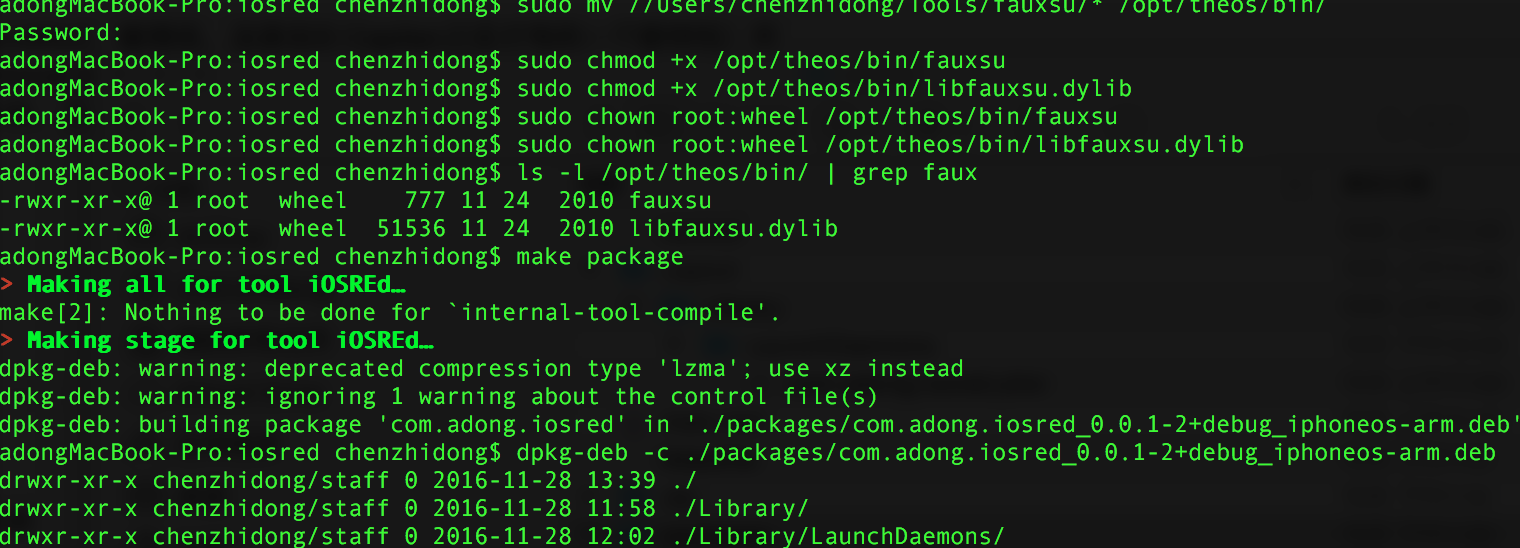
第六步,从给的那个链接上下载fauxsu,然后解压后将里面的2个文件拷贝到/opt/theos/bin目录下,然后提权,而且ls -l /opt/theos/bin/ | grep faux查看,显示提权是成功的,已经是root权限,上面已经截过图了:
adongMacBook-Pro:iosred chenzhidong$ sudo mv //Users/chenzhidong/Tools/fauxsu/* /opt/theos/bin/
Password:
adongMacBook-Pro:iosred chenzhidong$ sudo chmod +x /opt/theos/bin/fauxsu
adongMacBook-Pro:iosred chenzhidong$ sudo chmod +x /opt/theos/bin/libfauxsu.dylib
adongMacBook-Pro:iosred chenzhidong$ sudo chown root:wheel /opt/theos/bin/fauxsu
adongMacBook-Pro:iosred chenzhidong$ sudo chown root:wheel /opt/theos/bin/libfauxsu.dylib
adongMacBook-Pro:iosred chenzhidong$ ls -l /opt/theos/bin/ | grep faux
-rwxr-xr-x@ 1 root wheel 777 11 24 2010 fauxsu
-rwxr-xr-x@ 1 root wheel 51536 11 24 2010 libfauxsu.dylib
第七步,就是再次make package打包,然后dpkg查看,发现打出的新包,还是和原来一样的staff权限,而不是和你上面写的那样变成了root/wheel权限的。
就这么几步了,除最后一步出来的结果没有变成root权限,其他步骤的结果确定都是一致的,不知道哪里有问题?
1 个赞
正解,谢谢
请问,问题解决了没?我的问题跟你一个样
我也是,请问有方法了吗