Prologue
把之前在内网写的文章分享下.
原链接在这里 From UEFI Reversing to Xnu Kernel Debug · Issue #41 · jmpews/NoteZ · GitHub
0x1: 内核探析之路连载
本系列将会分为几篇文章, 主要研究/解析对象是 XNU 内核, 期望达到的目的是介绍一些 Kernel 相关知识(包括 x86/x86_64/ARM64), 并(预计)最终实现 iOS-Kernel-Debugger or iOS-Kernel-Manipulator
0x0: 内核探析 之 <固件(UEFI)逆向到内核(XNU)启动高级调试>
0x1: 内核探析之路 之 [内核初始化] or [ 内存管理, 进程管理] or [中断, 陷阱, 异常] (待定)
0x2: iOS-Kernel-Debugger Refer Ian Beer (@i41nbeer) (待定)
0x3: iOS-Kernel-Manipulator (待定)
0x2: 简介:
常用的内核调试, 通常依赖于 Kernel 内置的 debugger 支持, 比如 XNU 需要设置 boot-args 里开启 debug, 之后通过 kdp 远程挂载正在等待的远程 Kernel. 这种方式在双机调试的时候很有用处, 但是这种调试依赖于 Kernel 支持, 也就说无法从 Kernel 的第一条指令开始调试.
对于需要在实模式就开始进行调试的可以借助 bochs, qemu, 前两种大多数情况下属于 emulator, VMware 则需要依赖于宿主 CPU. 因此虽然都直接在 vm 启动时就开启调试. 还是有很大区别的, 比如对于 bochs 和 qemu 会直接拦截 #DB 而不管 Guest 下的 IDT, 但是对于 VMware 则依赖于 Guest 的 IDT, 这将在下文存在一个很大的坑.
这里使用 VMware, 并没有使用 qemu or bochs, 但 qemu 在对 Linux Kernel Debug 的场景使用非常多.
由于在 Guest VM 启动时进行调试, 可能会认为应该直接进入 kernel, 但是这里没有, 而是进入 UEFI 固件, 因为 XNU 不是采用传统的 BIOS 引导, 所以才有了下文的关于 EFI 的分析.
0x3: 前置知识
- x86/x86_64 Architecture Manual 相关知识, 例如 GDT, IDT 的相关知识, 保护模式(PE, protected-mode)下分页机制(Paging)相关.
- 熟练阅读 x86/x86_64 汇编, 分清 AT&T 与 intel 两种 assembly syntax.
- IDA 的使用, 下文在分析过程有很多需要对 IDA 分析的无符号固件进行手动符号化, 但是具体的步骤没有赘述, 需要读者有这方面的能力.
- UEFI 相关知识
- 文章涉及比较多的固件逆向
本文也感谢 @0xAA55 @任工黑 等 Windows 内核/虚拟化大佬, 在关键的问题的一同讨论.
也感谢 @乾越 在关键问题给出的一些建议.
0x1: VMware 调试环境配置
Tips: VMware + GDB 的调试文章比较多这里就不详细赘述了.
0x1: 安装 macOS 10.12.6
0x2: 下载 KDK
根据 macOS 下载 KDK.
0x3: 配置 development Kernel
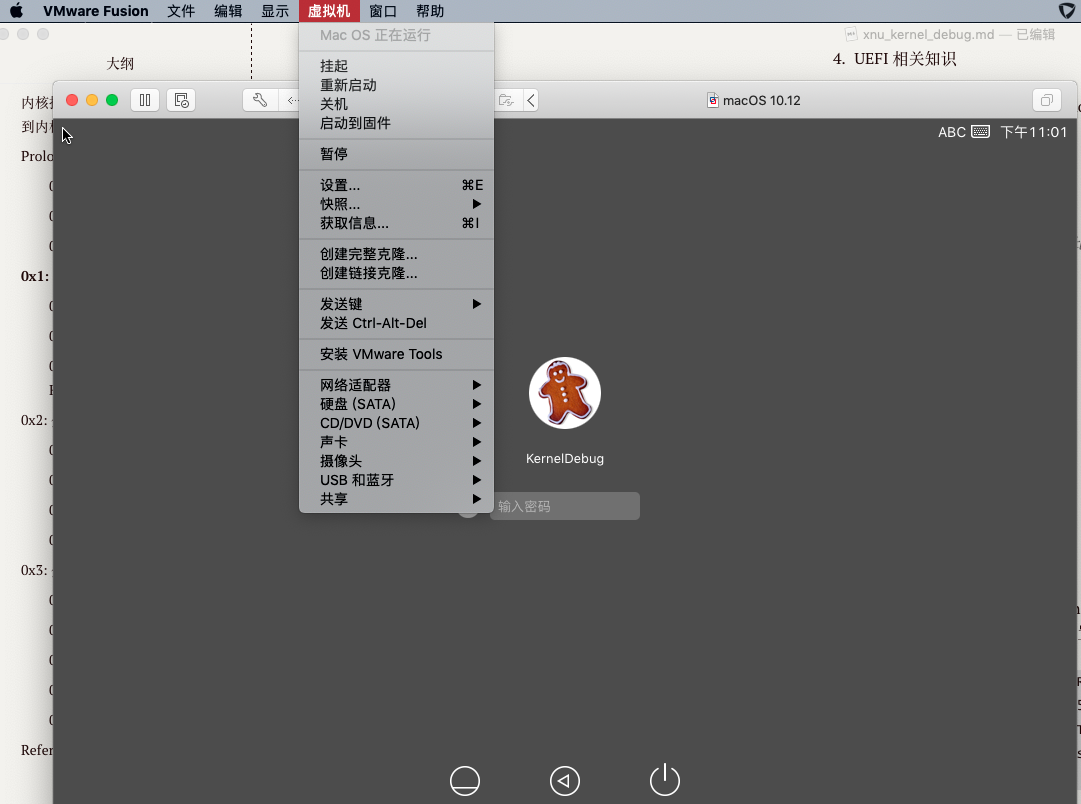
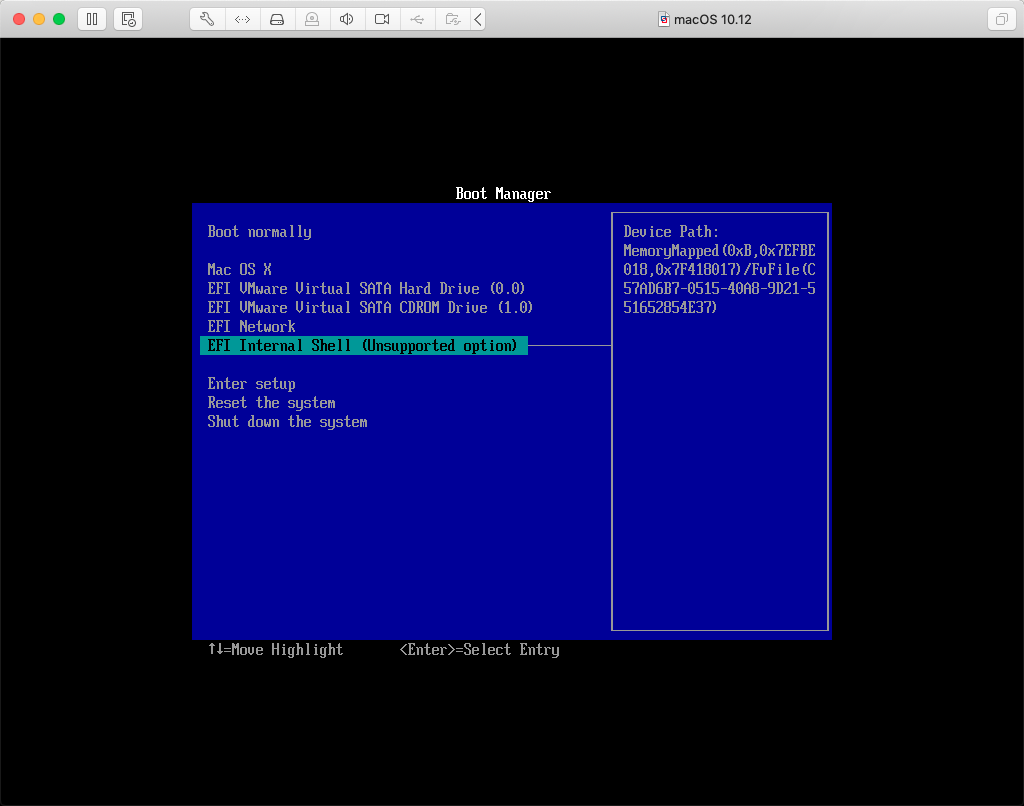
首先需要进入到 recorvery-mode 关闭 SIP(System Integrity Protection), 这里有两种方法可以在 VMware 进入 recorvery-mode
- 从 VMwar 进入
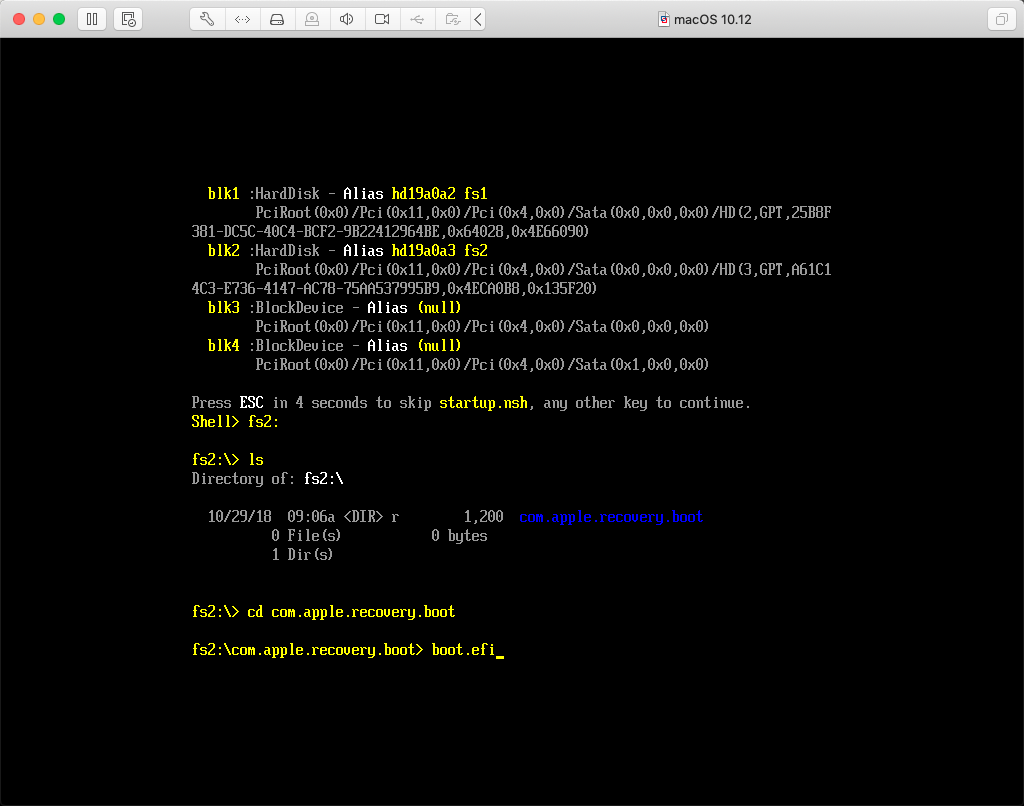
recorvery-mode进行如下步骤, 首先选择<启动到固件>, 之后按照如下进入recorvery-mode的boot.efi. Enter Setup -> Boot from a file -> Recorvery File Option
这里在关闭 SIP 之后, 将 KDK 里的 kernel.development 移动到 /System/Library/Kernels, 之后使用 kextcache 将 kernel 和 kexts 共同 link 成 PrelinkedKernel, 添加启动参数 nvram boot-args="-v, 这里并没有像很多文章那里增加 -v debug=0x141 kext-dev-mode=1 kcsuffix=development 之类的参数, 因为首先这里不是通过 kdp 调试, 其次读者也可以在下文发现, 即使不指定参数固件也会首选 deveopment 后缀的 PrelinkedKernel.
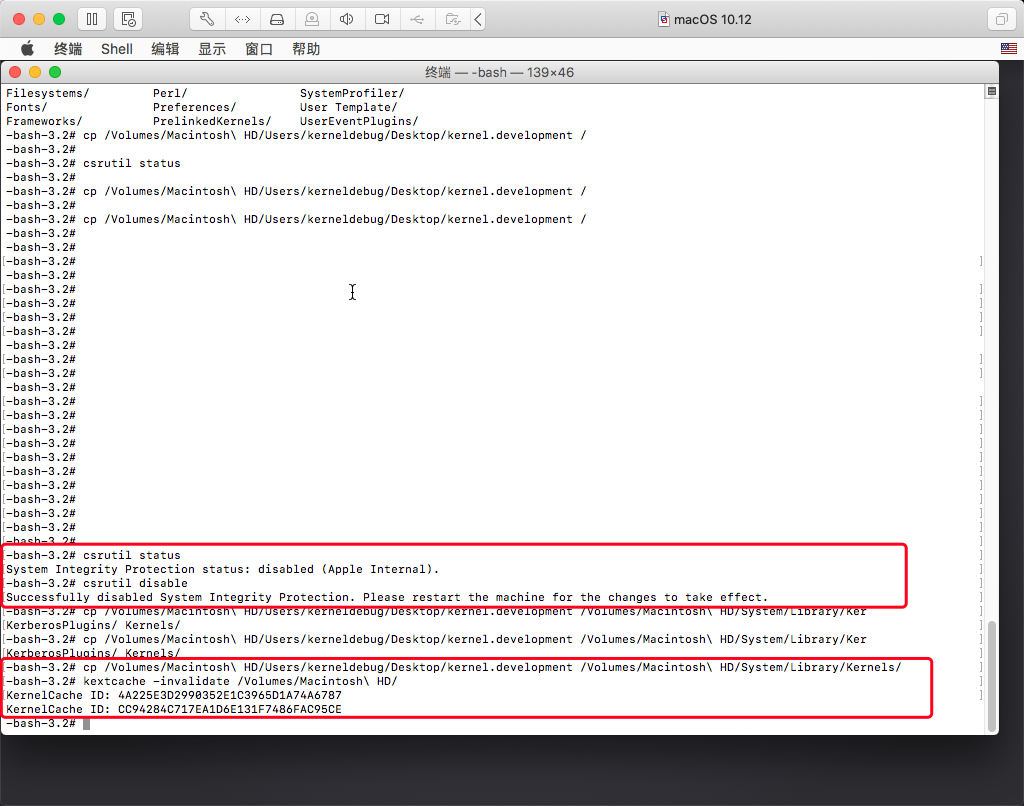
如果成功将会看到有 prelinkedkernel.develpment 存在
![]()
0x4: 开始调试
调试使用 VMware Fusion(也有使用 Win 下的 VMware), 编辑已安装虚拟机目录下的 macOS 10.12.vmx 文件, 增加以下配置.
debugStub.listen.guest64 = "TRUE" # 本地调试
debugStub.port.guest64 = "55555" # 调试端口
debugStub.hideBreakpoints = "TRUE" # 使用硬断
bios.bootDelay = "3000" # bios 延迟启动
monitor.debugOnStartGuest64 = "TRUE" # 在启动时停止
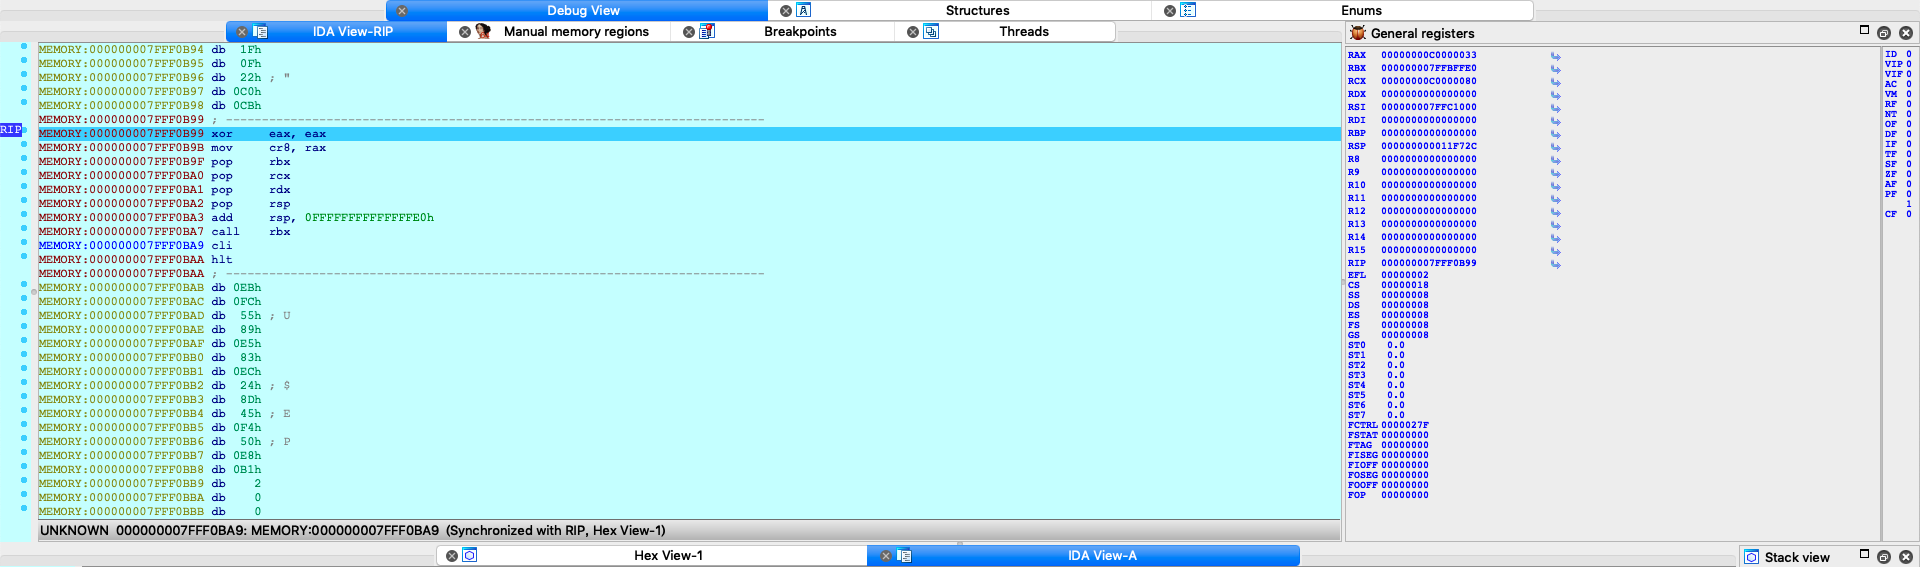
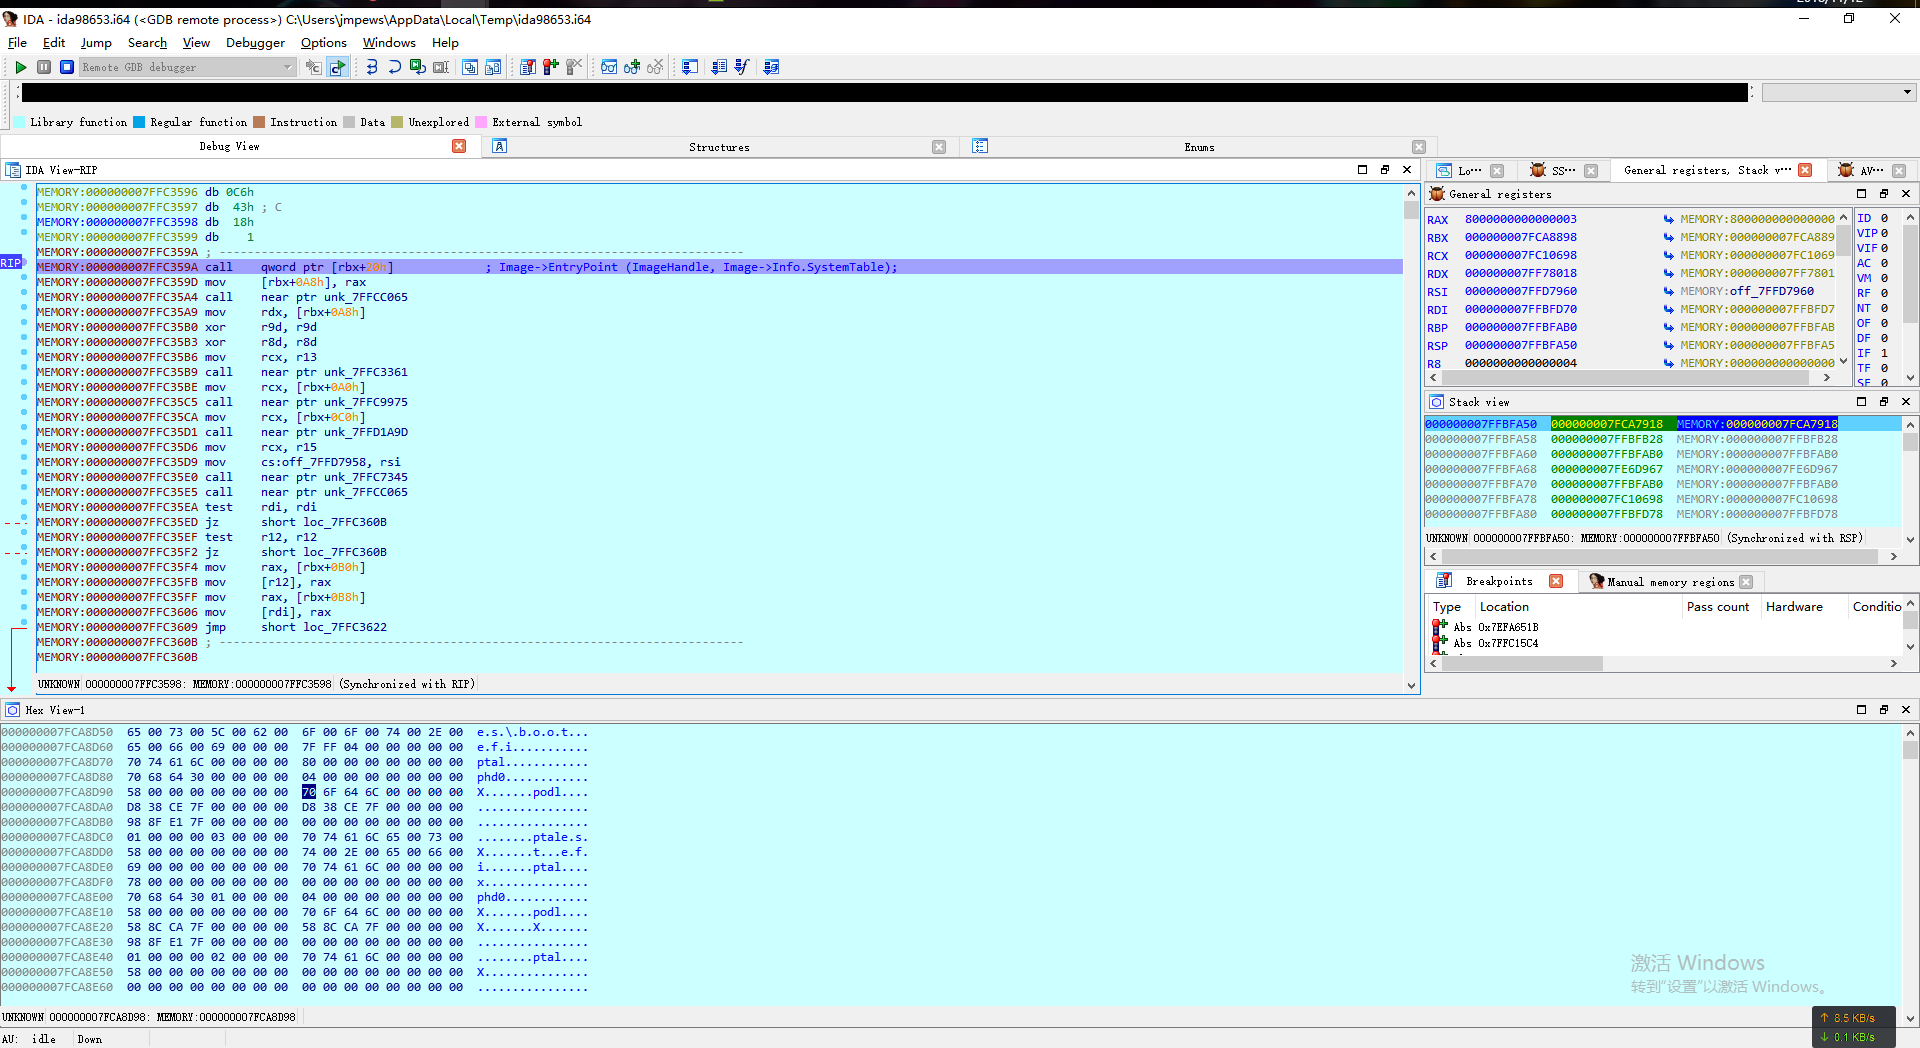
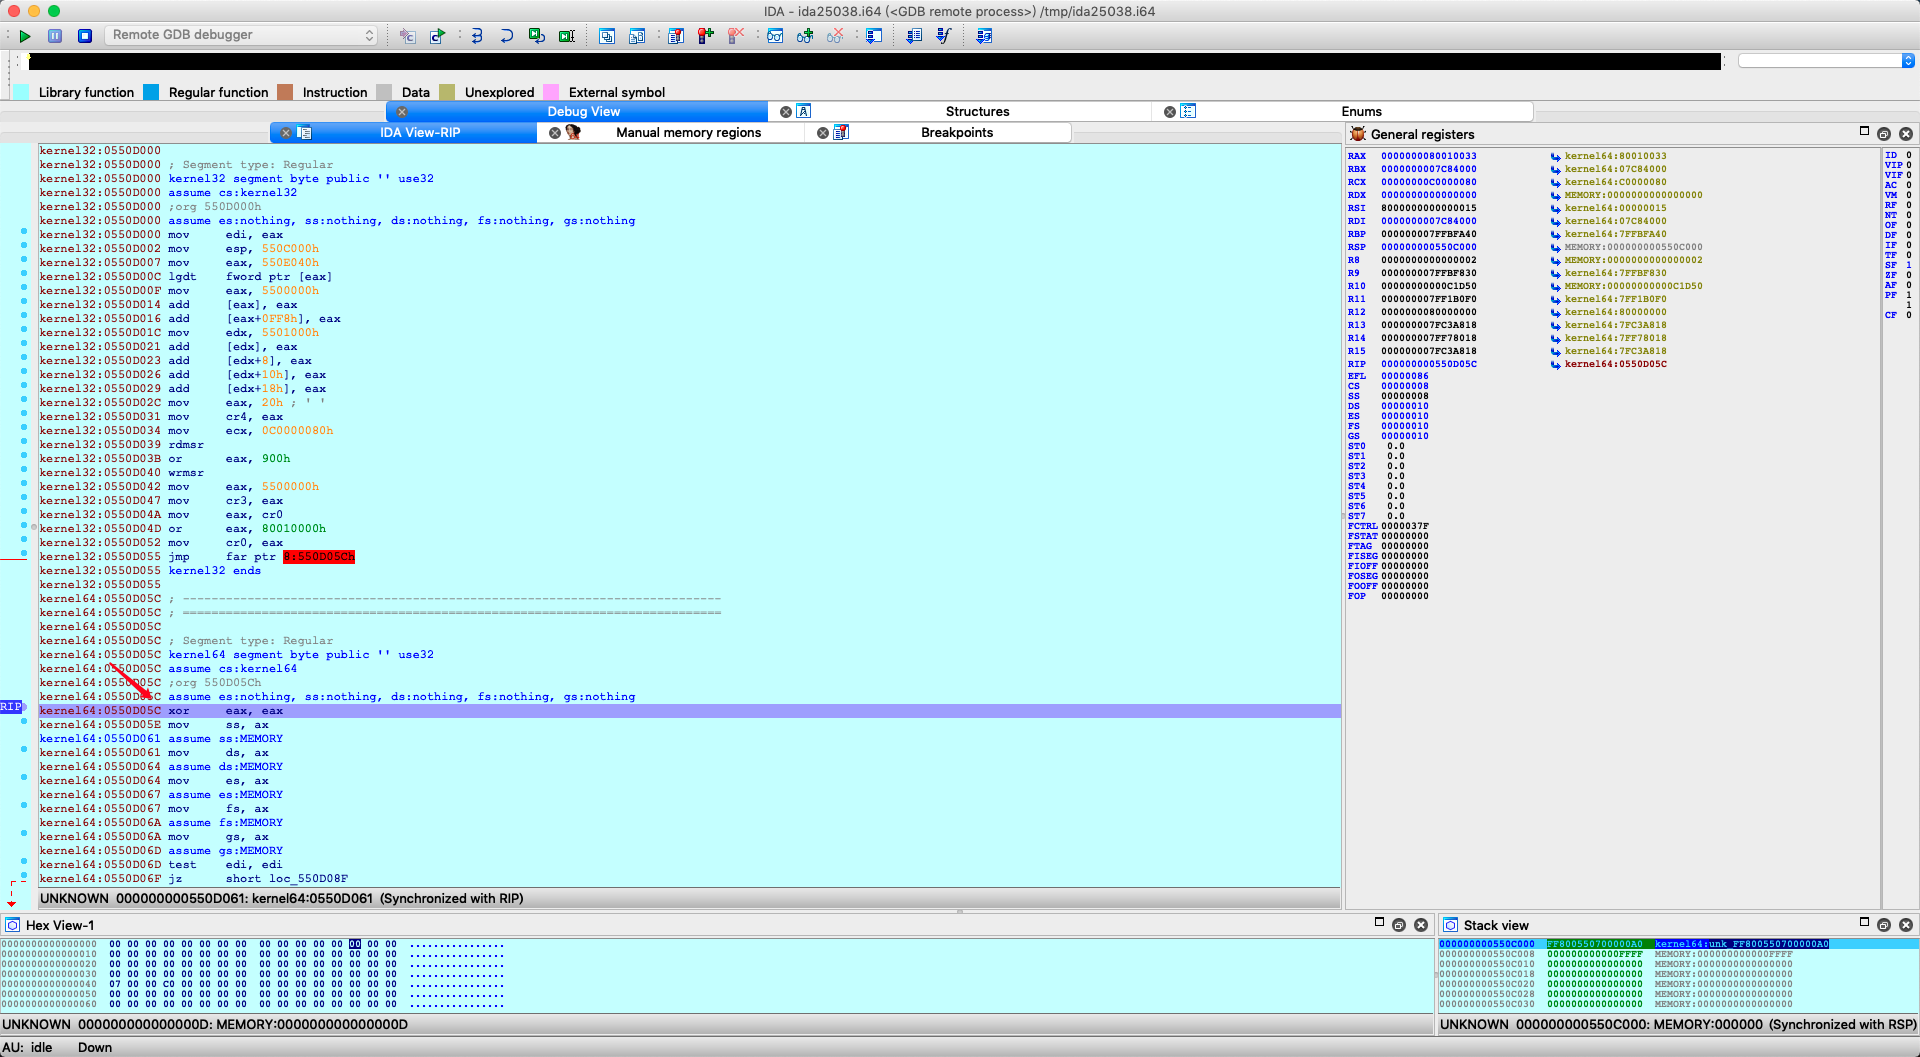
使用 IDA 的 Remote GDB debugger attach 去挂载 localhost:55555 , 我们在如下的地址断下.
0x2: 分析 EFI64.rom
Tips: 由于是基于 EDK2 开发的固件, 所以很多函数即使没有符号, 依然可以根据特征去定位到很多 EDK2 中函数, 所以以下 IDA 中的"注释", 请根据汇编自行对照 EDK2 中函数自行添加.
0x0: EFI 前言
UEFI 与 Legacy BIOS 两种引导方式.
Legacy BIOS 分析起来还是很简单的, BIOS 加电跳到 0x7C00 开始执行 MBR 一段指令, 然后这段 real-mode 下的 MBR 指令会加载磁盘下一阶段的启动代码, 整体来说分起来简单, 但是限制也比较多, 详细不赘述.
这里主要分析 UEFI 相关, EDK2 由 intel 支持的 UEFI 开发 toolkit.
文档请参考 https://edk2-docs.gitbooks.io/edk-ii-build-specification/content/
UEFI 固件的通常启动流程 https://edk2-docs.gitbooks.io/edk-ii-build-specification/2_design_discussion/23_boot_sequence.html#23-boot-sequence, 这里会主要关注 Drive Execution Environment (DXE) 和 Boot Device Selection (BDS) 这两个流程.
DXE: 从 PEI 切换过来, 此时已经初始化完基本支持环境, 并且处于 64-bit 执行环境, 开始加载并初始化 gRT, gBS, 一些关键 Dxe Driver 模块, 以及包含一些关键函数 例如后面要即将要说到的比较核心的 CoreImageLoad, CoreImageStart, CoreDispatcher.
BDS: 在 DxeCore 最后阶段切换过来, 并且不会返回, 在此阶段最后找到平台对应的用于引导 Kernel 的 EFI Driver 比如 macOS 下的 /System/Library/CoreServices/boot.efi, 跳到其 Entry 入口开始执行.
EDK2 中对文件读取提供两个 EFI_SIMPLE_FILE_SYSTEM_PROTOCOL_GUID 和 LOAD_FILE_PROTOCOL_GUID Protocol, 默认 EFI 会使用 EFI_SIMPLE_FILE_SYSTEM_PROTOCOL_GUID 如果失败则使用 LOAD_FILE_PROTOCOL_GUID, 对于文件的具体打开函数实现在 HfsPlusDxe 中
0x1: 分析定位
分析: 对于如上断点位置, 没有头绪也没有符号, 所以首先确定这是哪个 binary, 所以可以往下翻一翻去找有没有特征字符串, 通过一些字符串去判断.
通过搜索分析发现这是 应该是一个 使用 edk2 开发的 EFI 固件程序, 所以直接到 VMware Fusion 目录里搜一下有没有 rom 相关的固件.
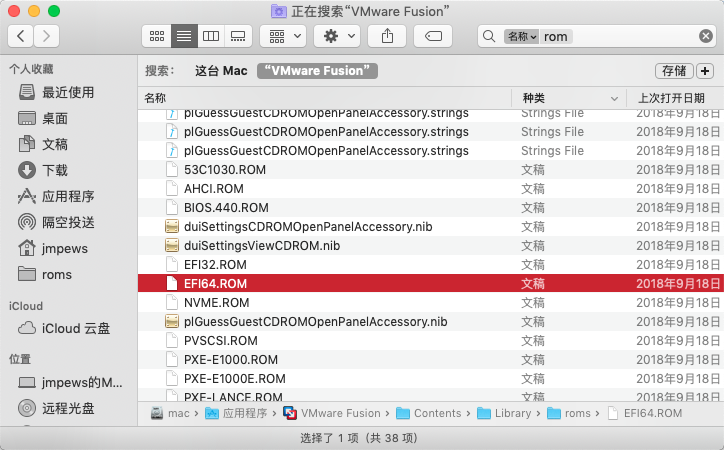
这里的有很多固件(额外提一下, BIOS.440.ROM 是 BIOS 引导使用的固件) , 这里猜想是 EFI64.ROM, 既然是固件先扔到 binwalk 里跑一下.
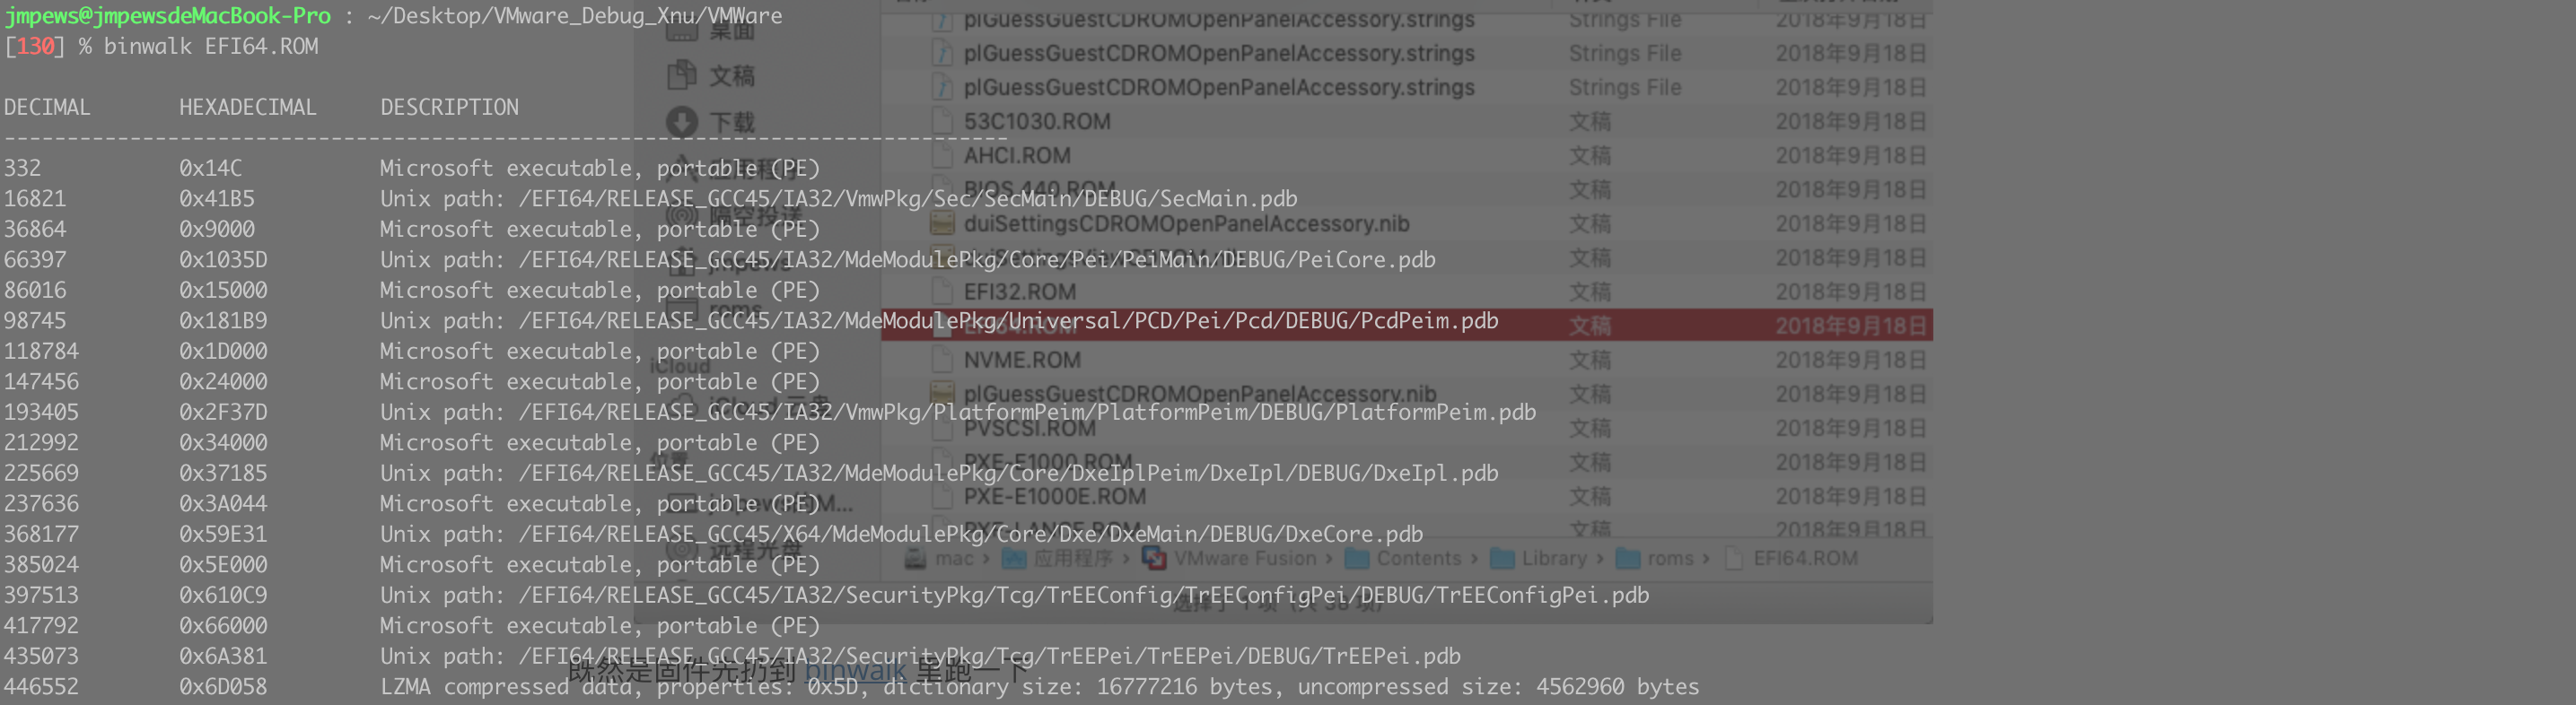
典型的 EFI 固件结构, 几个 PE 类型的 EFI application, 最后还有一个 LZMA compressed data, 按理说之后应该通过 binwalk 等工具从 offset 开始提取 binary 进行分析. 这里直接使用 UEFITool 进行分析, uefi-firmware-parser 也是一个不错的工具.
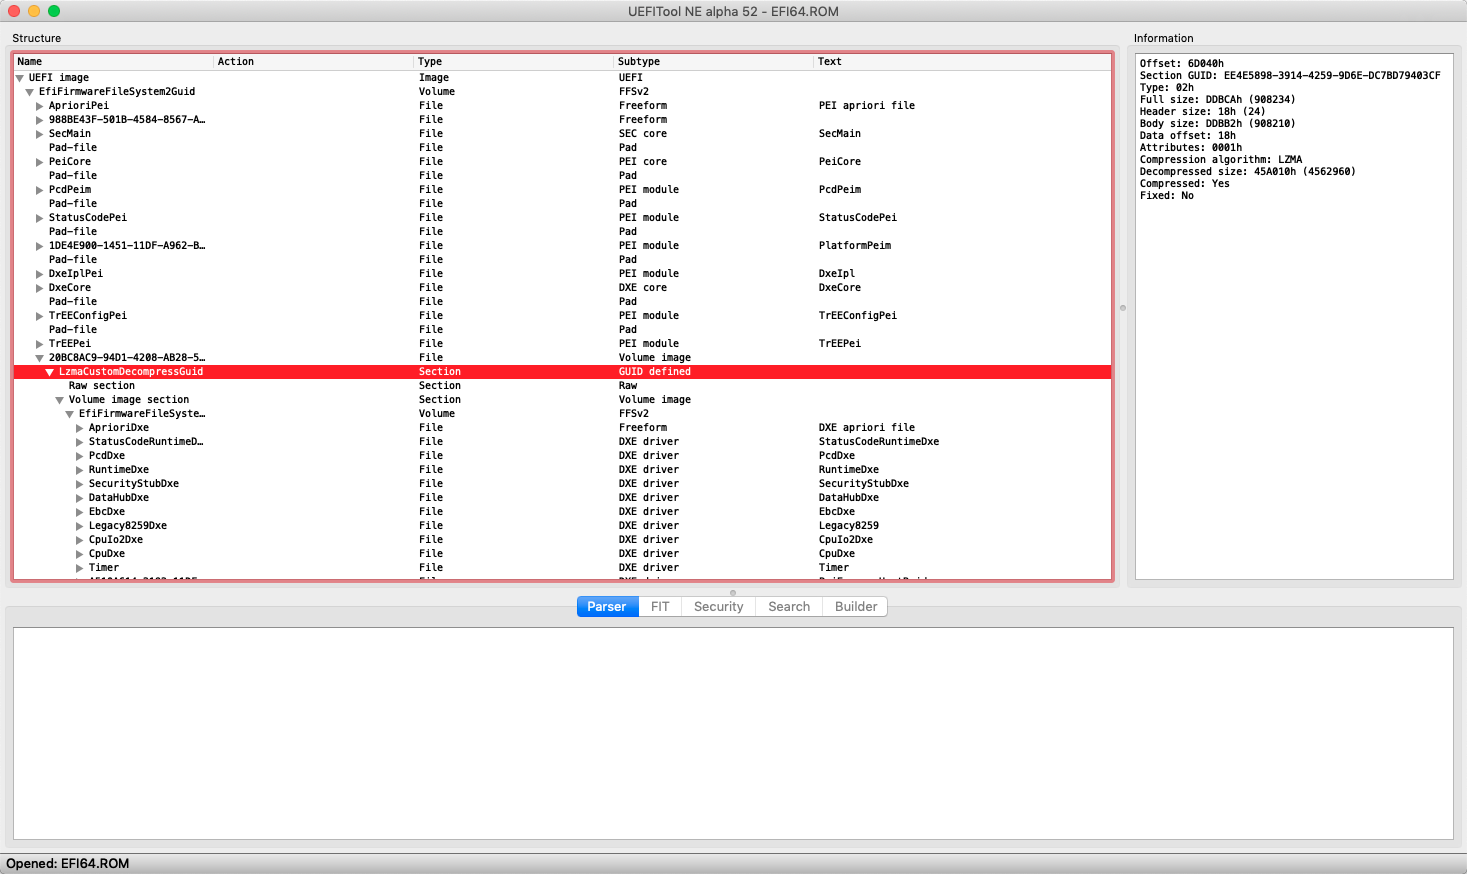
这里直接把 DxeCore 和 BdsDxe, HfsPlusDxe 这几个关键的 EFI Driver 提取出来.
0x2: 分析 DexCore
这里需要先做两个工作
- 在 IDA 进行 Program Rebase
- 对 DxeCore 进行部分关键函数符号化, 包括但不限于
DxeMain,CoreDispatcher,CoreLoadImage,CoreStartImage
这里先对 DexCore 进行 Rebase
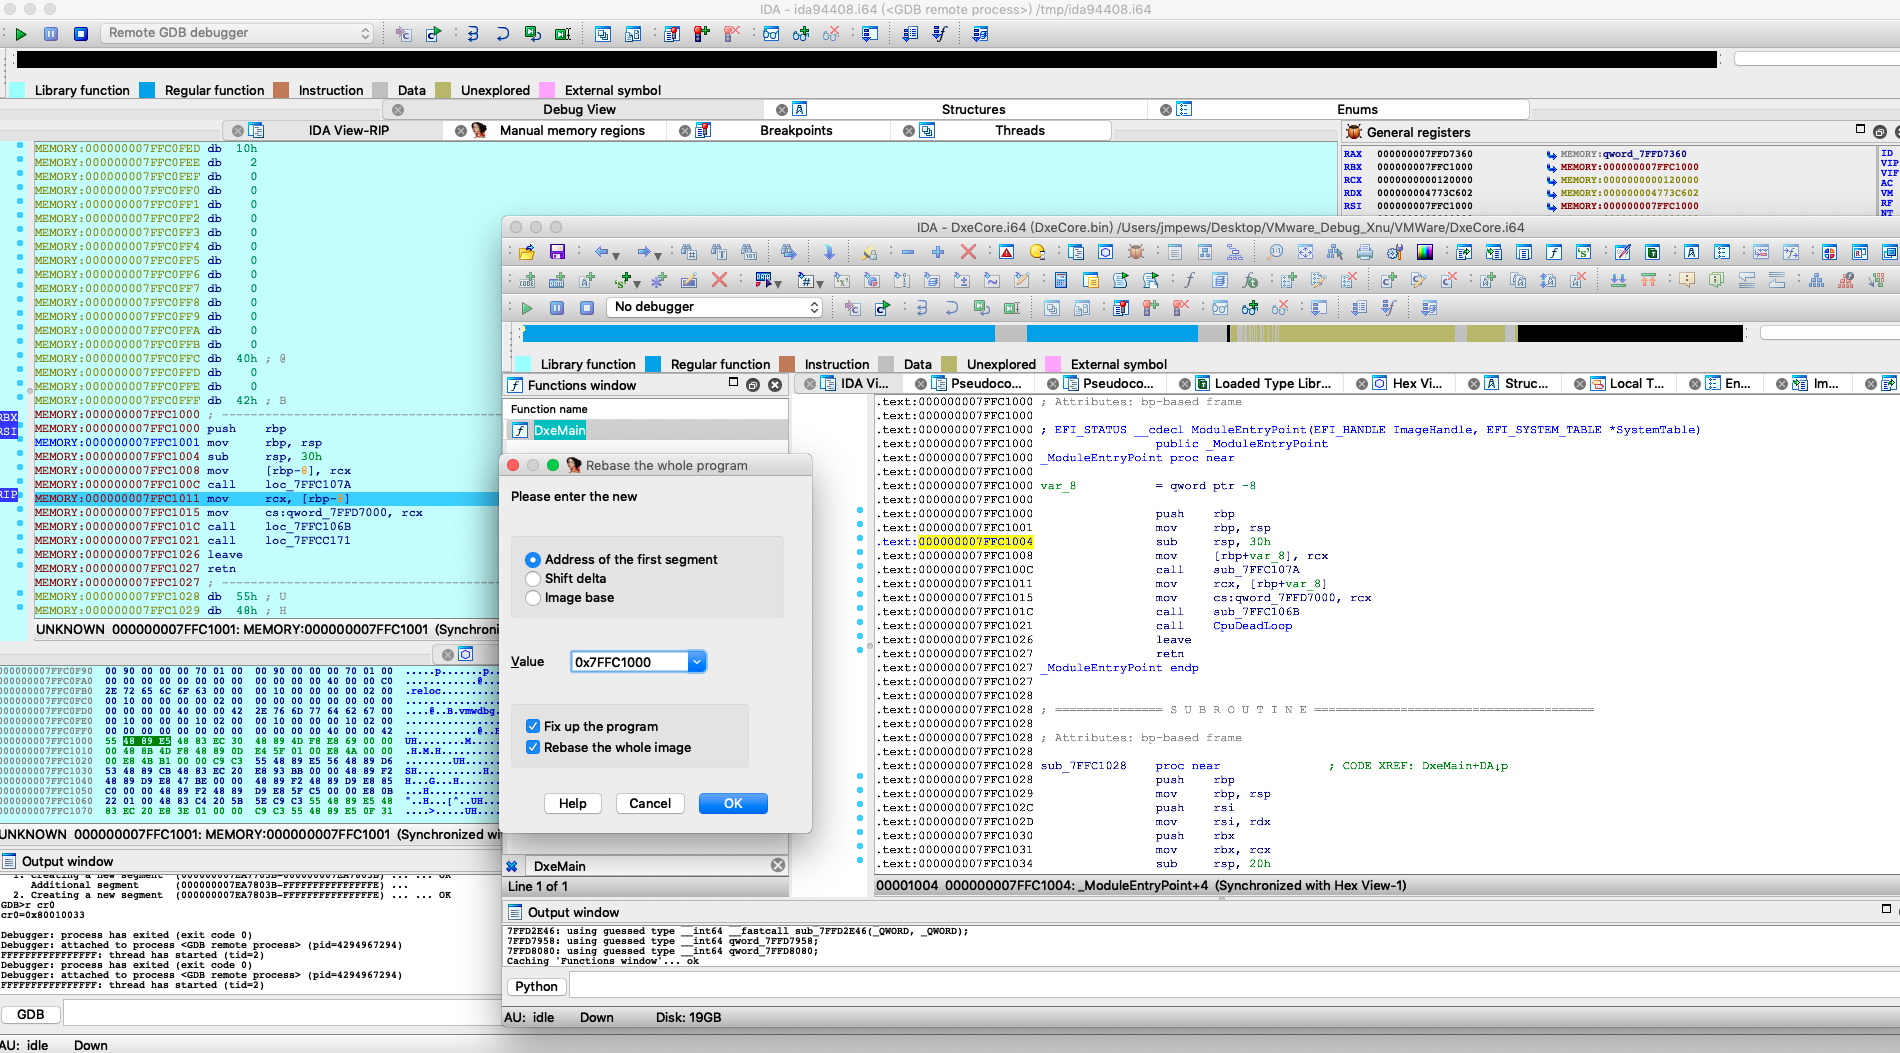
之后对 DxeCore 的 gBS, gRT, DxeMain, CoreDispatcher, CoreLoadImage, CoreStartImage 进行定位符号化, 并确定进入 BdsEntry 的指令地址.
这里具体定位和符号化的过程, 不会进行具体介绍, 大致是先确定 gBS, gRT, 之后利用 log 字符串的特征, 定位 CoreLoadImage, CoreStartImage.

对应的 IDA-GDB 调试器如下
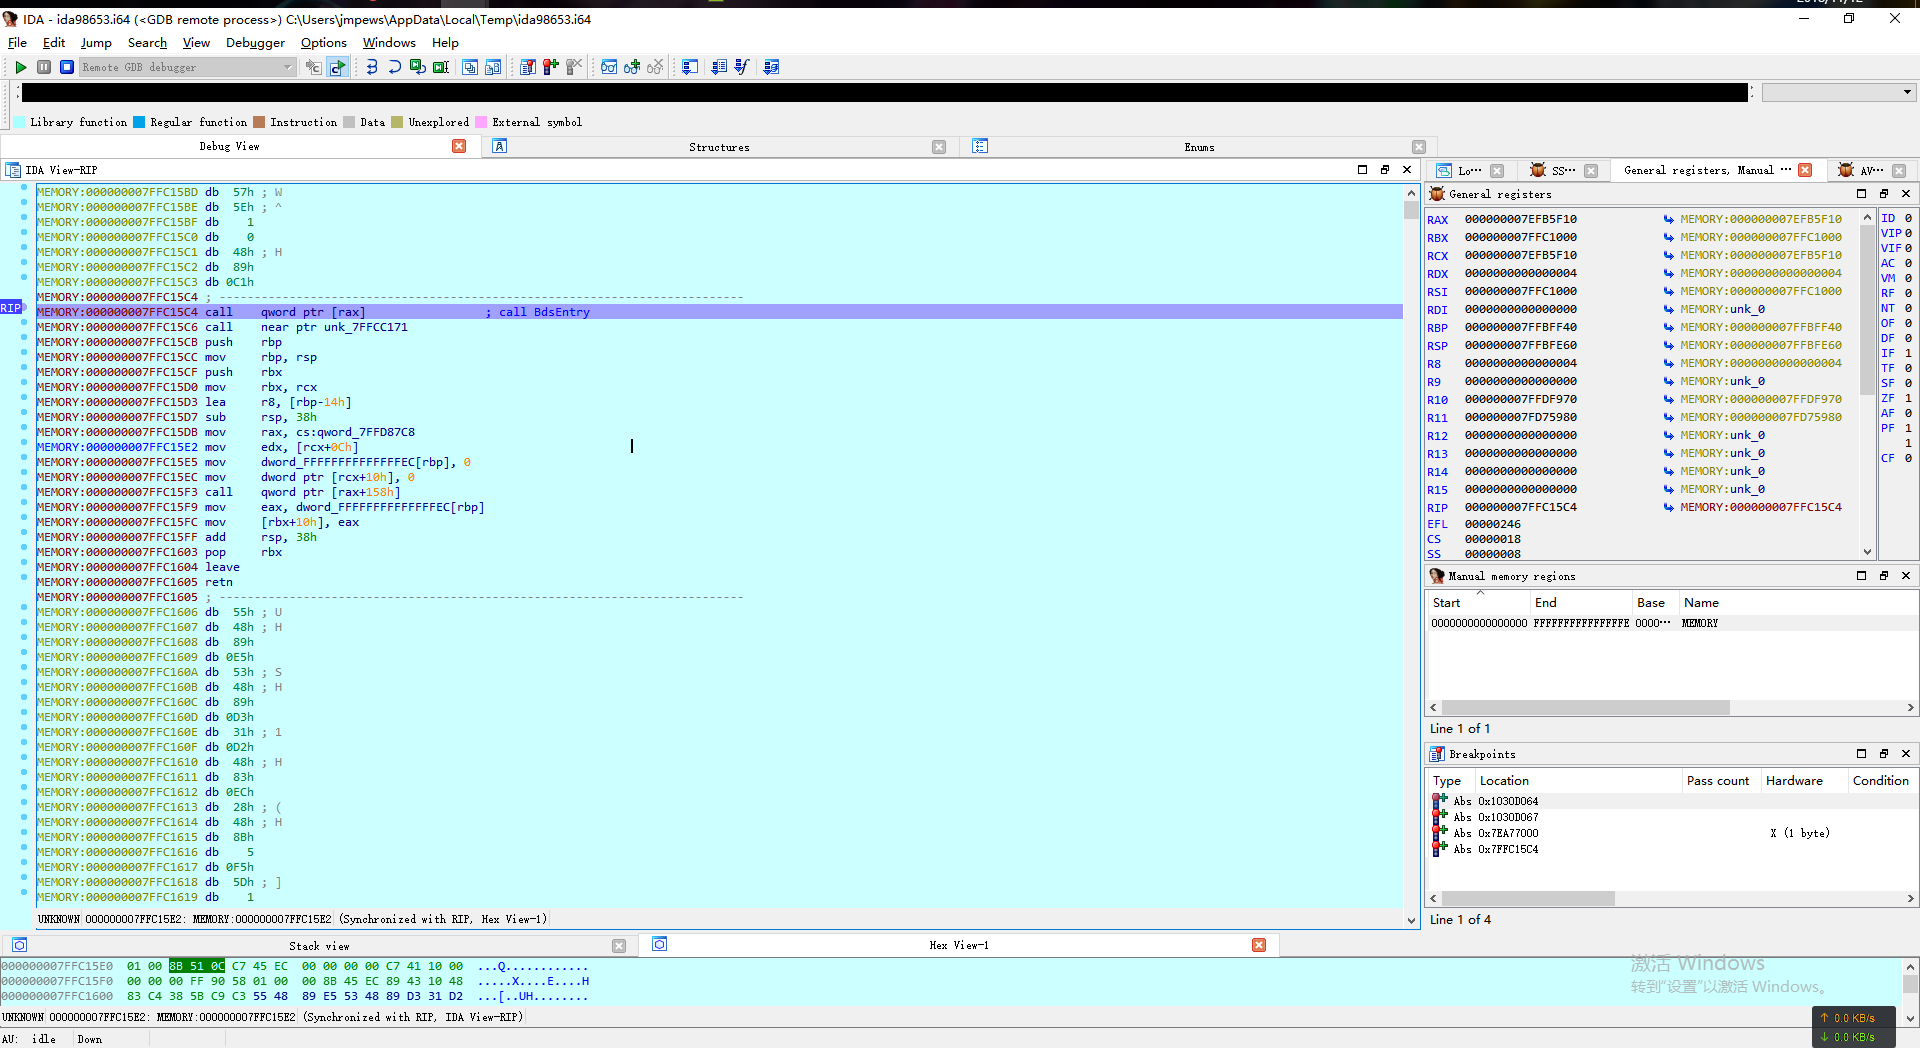
从这里开始断点进入 BdsDxe Driver PE 的 BdsEntry 函数内.
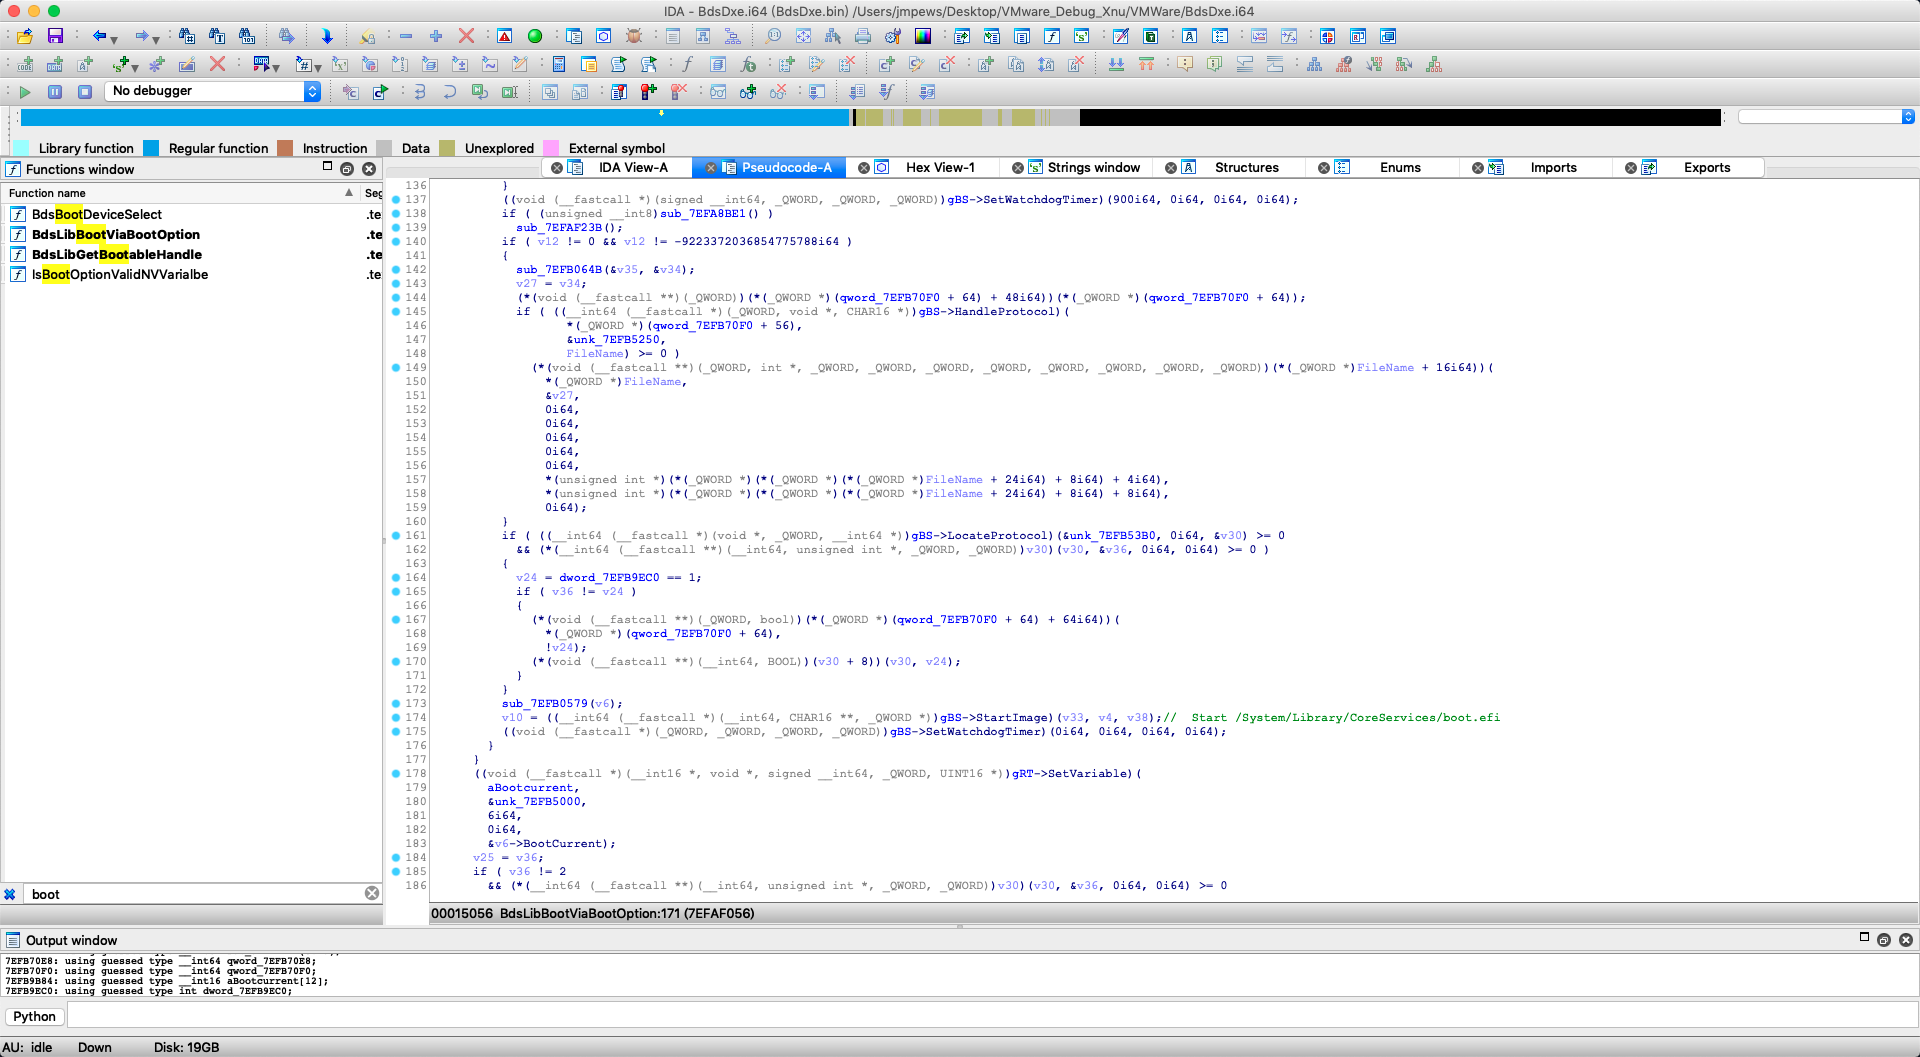
0x3: 分析 BdsDxe
这里需要先做两个工作
- 在 IDA 进行 Program Rebase
- 对 BdsDxe 进行部分关键函数符号化, 包括但不限于
BdsEntry,BdsBootDeviceSelect,BdsLibBootViaBootOption
通过分析 EDK2 源码, 可以发现, BdsDxe 加载平台特定 boot.efi 的流程为 BdsEntry -> BdsBootDeviceSelect -> BdsLibBootViaBootOption -> CoreLoadImage -> CoreStartImage, 最终转移控制权给 /System/Library/CoreServices/boot.efi
经过手动对上述符号定位和注释, 如下图.
通过对 FileDevicePath 函数进行定位断点可以辅助观察加载地址.
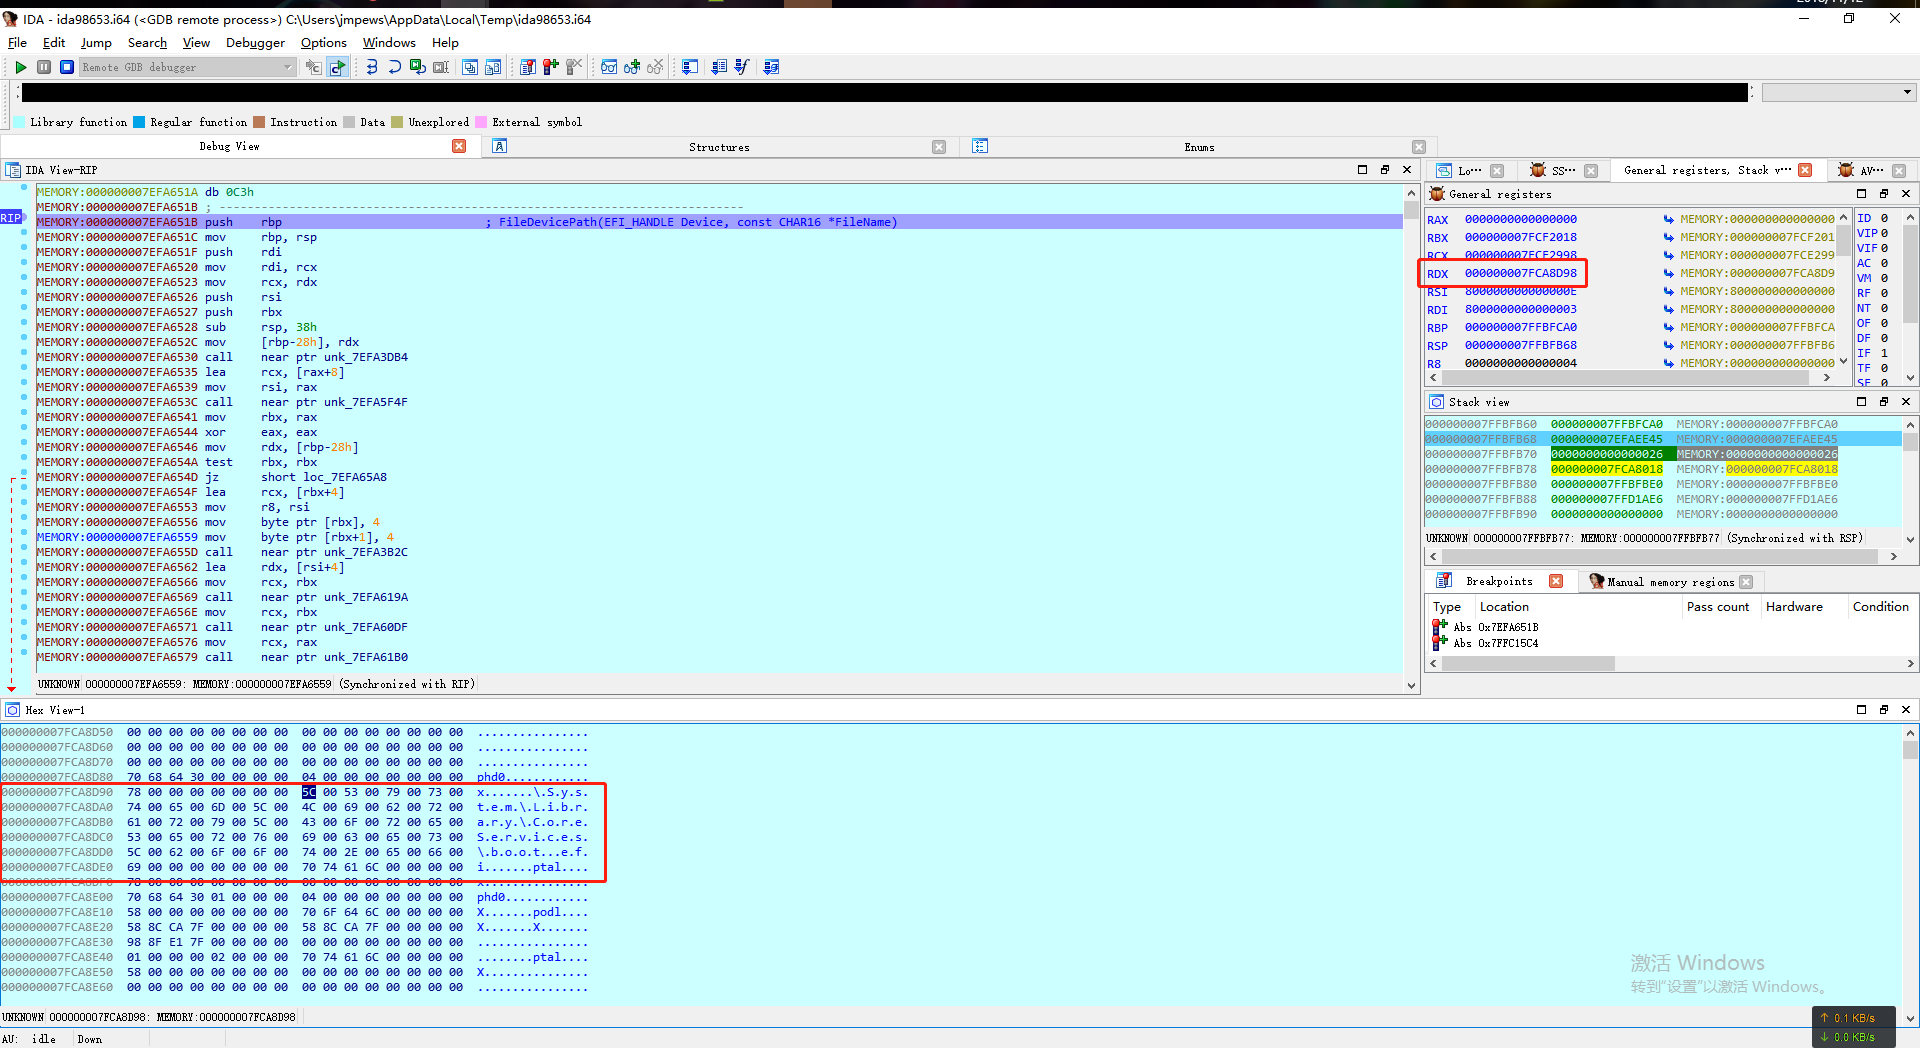
现在可以断点在 CoreStartImage 函数中 Image->EntryPoint (ImageHandle, Image->Info.SystemTable);. 具体指令地址还需读者去判断.
从此开始进入 boot.efi 的分析阶段
0x3: 分析 boot.efi
Tips: boot.efi 是平台特定的 EFI Driver(application), 由 EFI 固件加载, 并且不会再返回. 主要作用是加载 Kernel, 并将控制权移交给 KernelEntry.
0x0: 分析定位
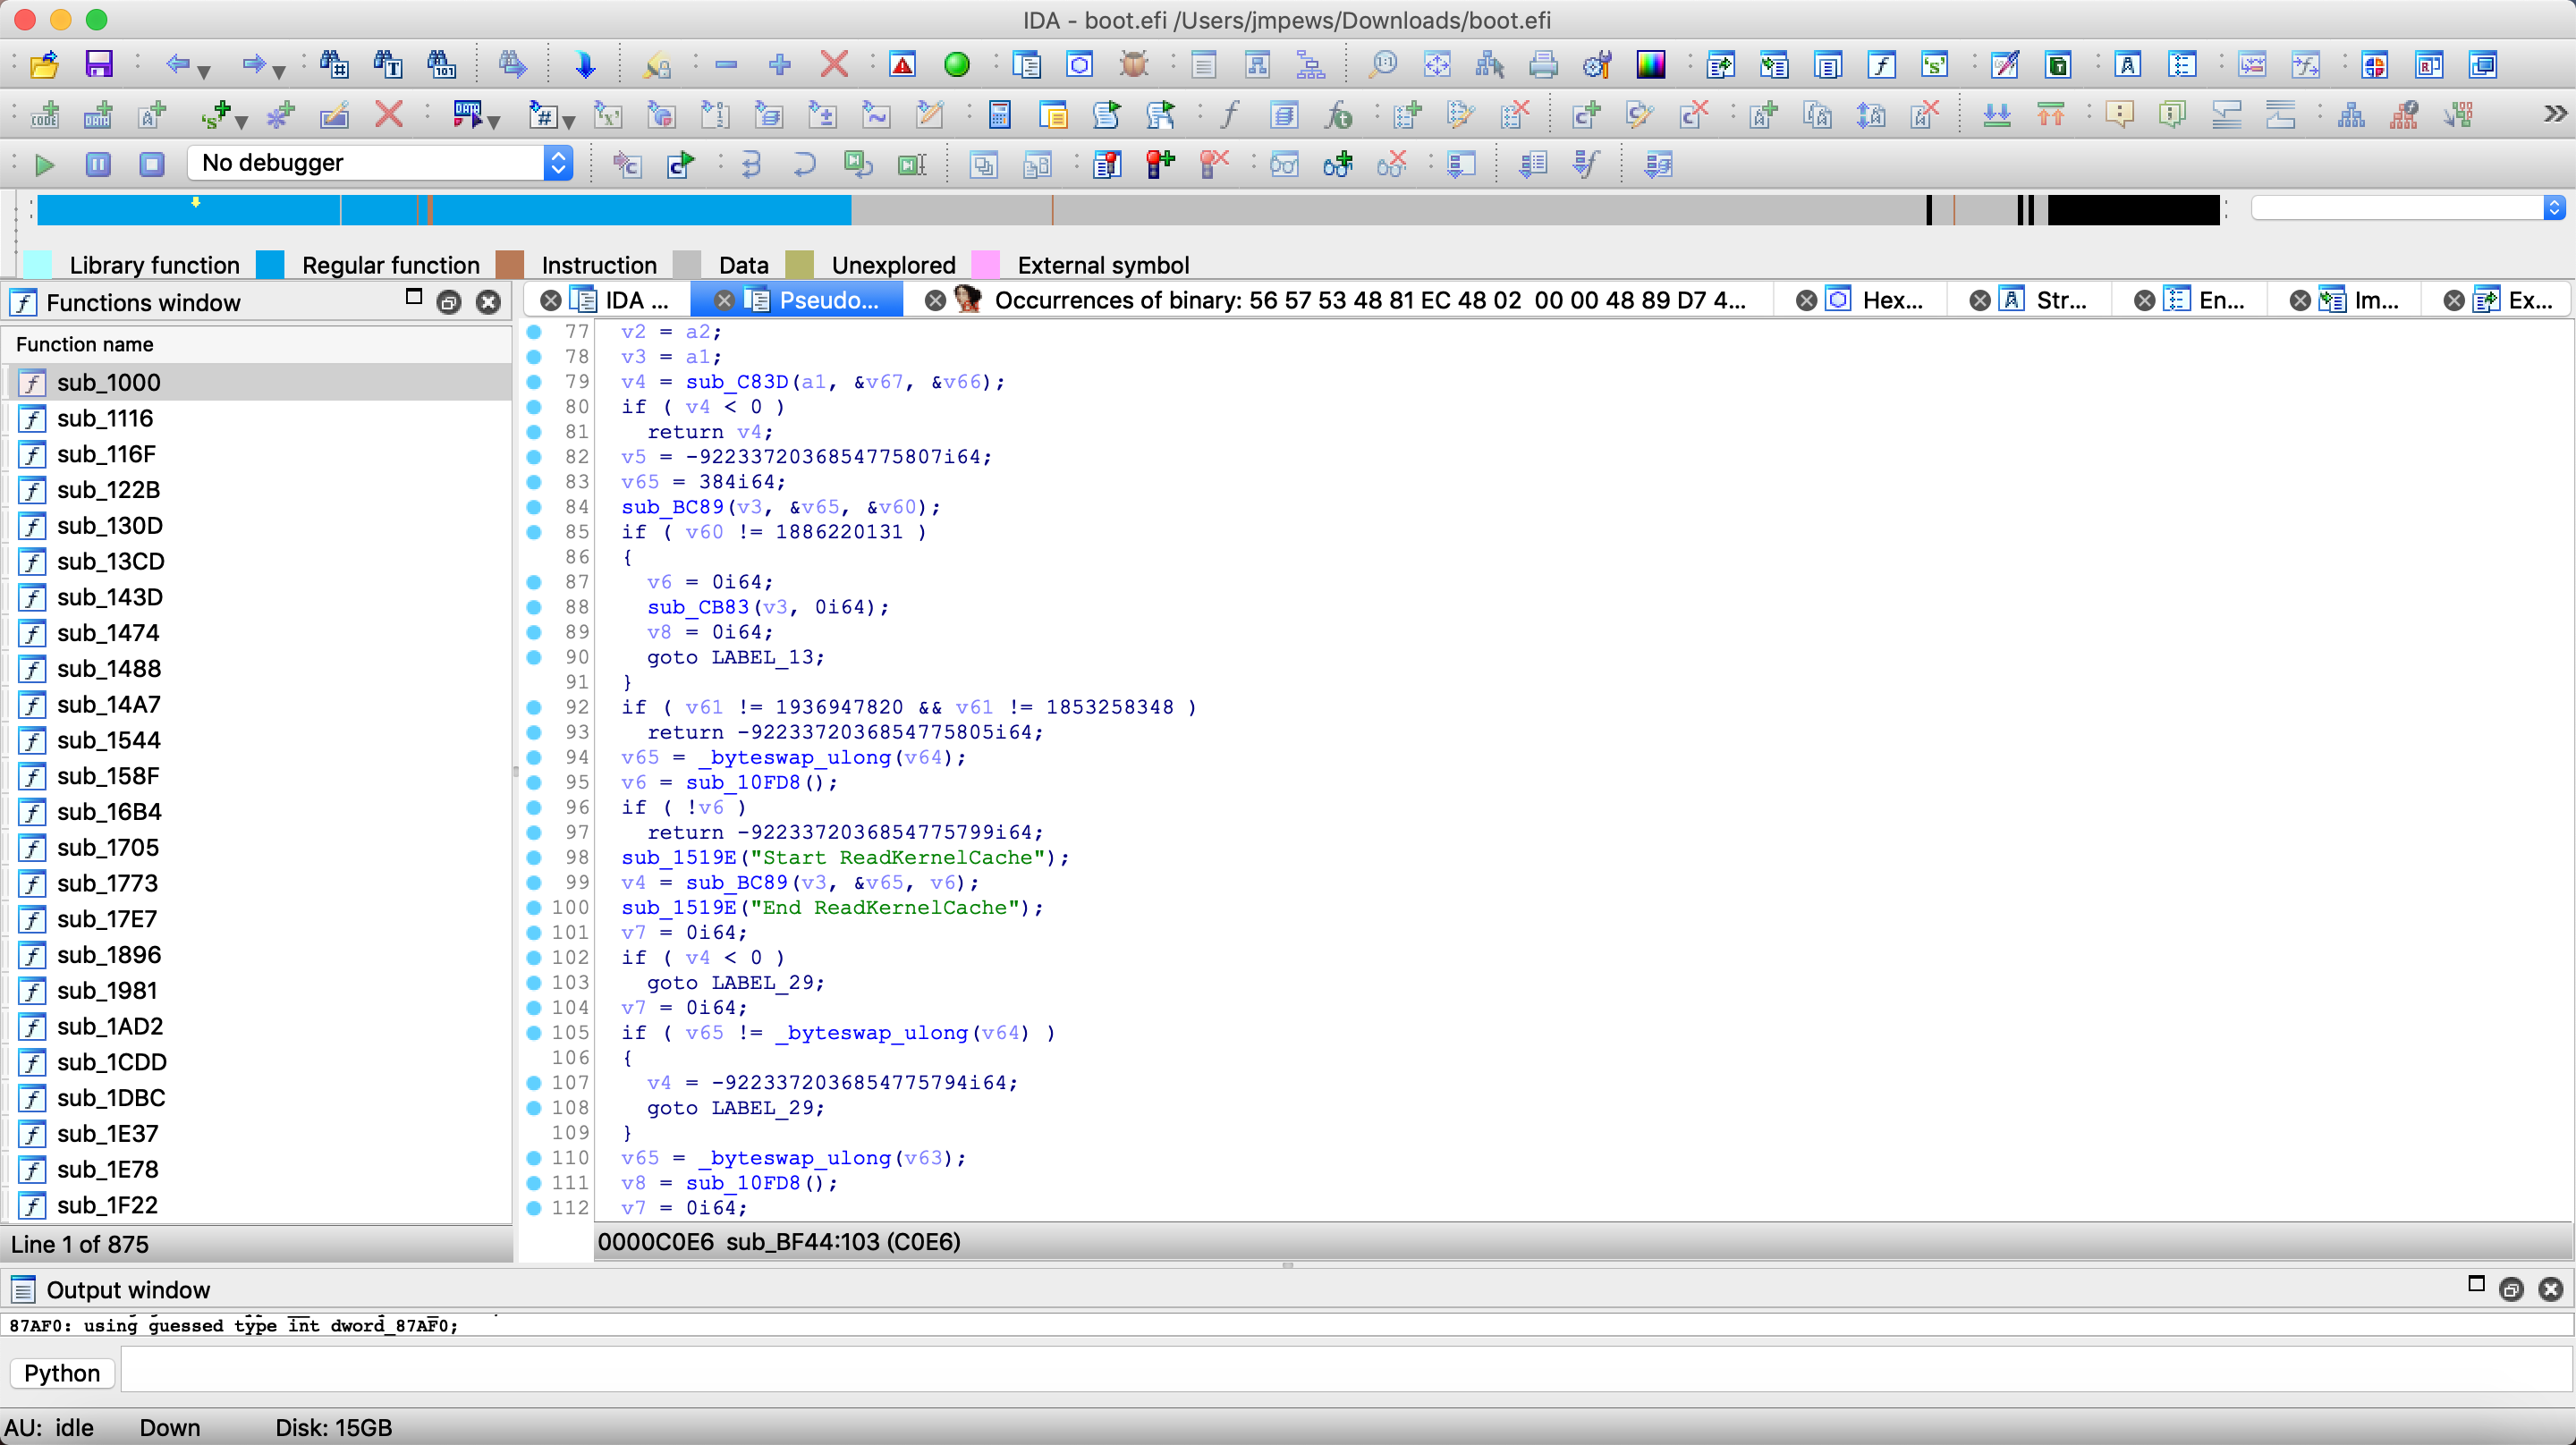
直接从 /System/Library/CoreServices/boot.efi 拿到, 扔到 IDA 里, 可以发现 boot.efi 存在部分调试 log 信息.
0x1: 不正经分析
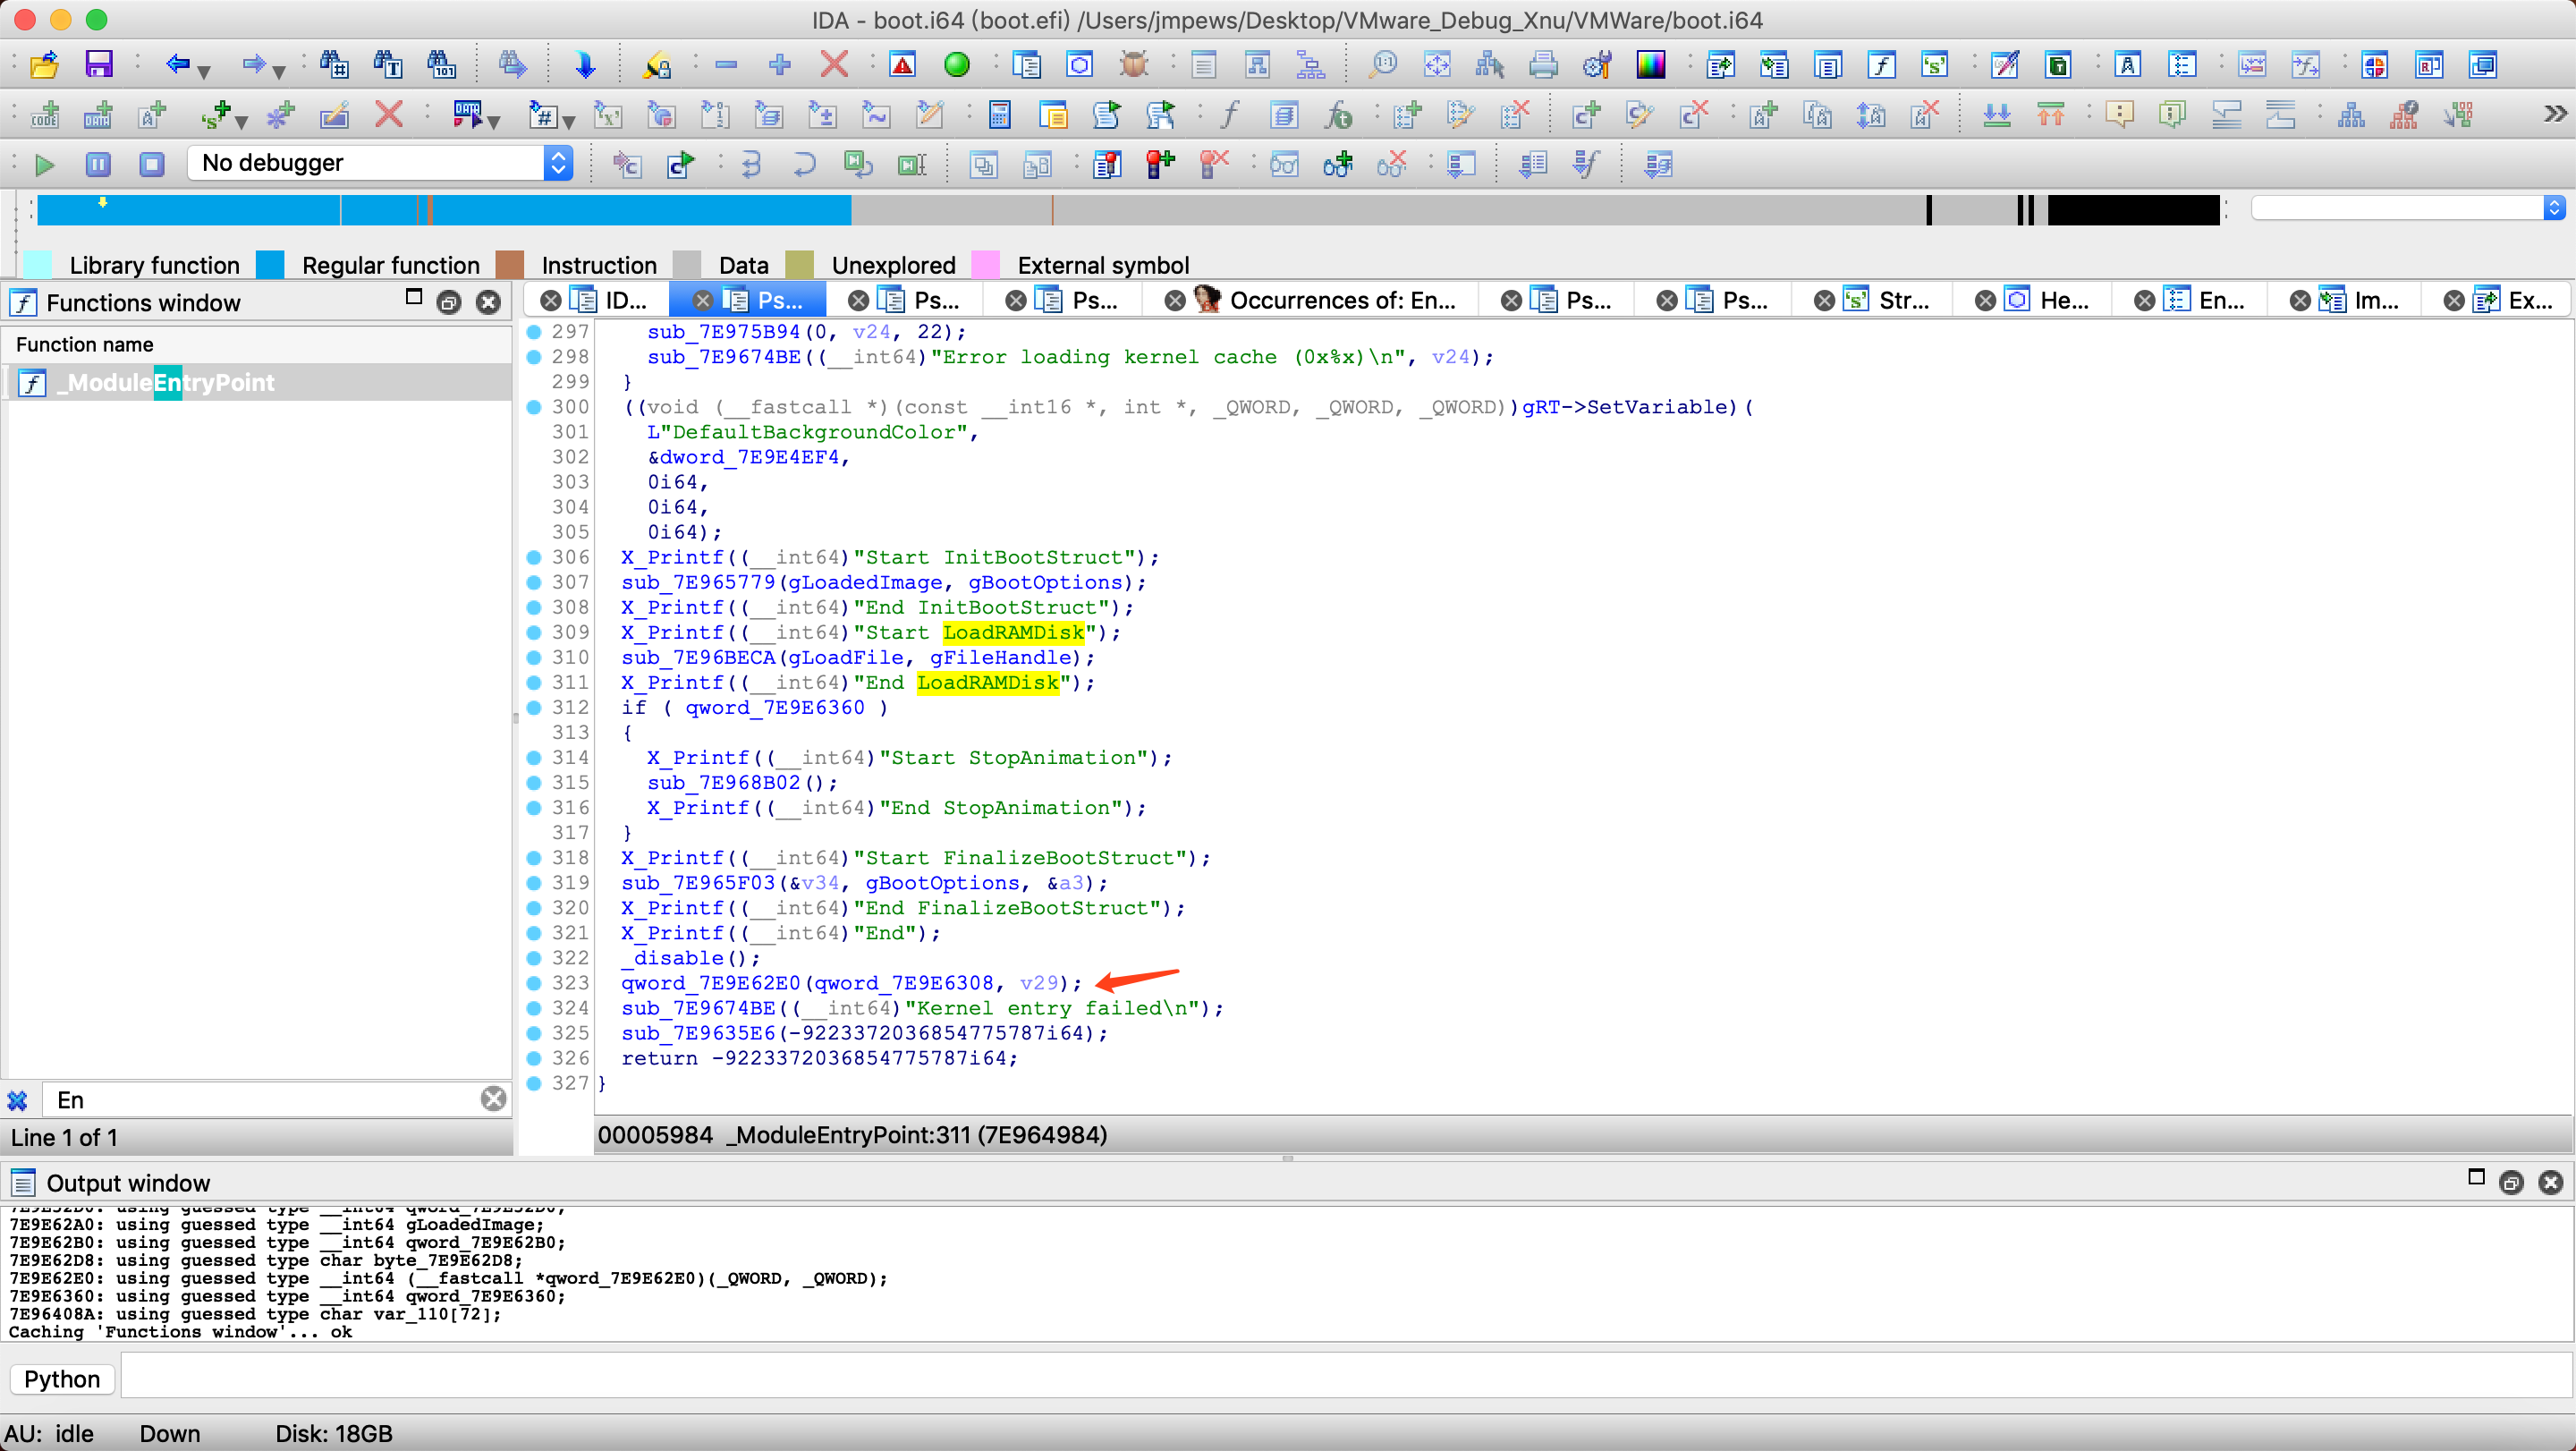
通过猜想 + 阅读 <*OS Internals>, 判断大致流程为加载 kernel, 并在最后阶段转移控制权给 KernelEntry, 直接在 Entry 入口往下翻就行, 可以很明显有个全局变量来保存加载 kernel 到内存空间的 entry 入口, 直接断点继续跟进调试即可.
0x2: 正经分析
首先需要处理几件事情
- 符号化所有的 EFI GUID, 通过
gBS->LocateProtocolgBS->HandleProtocol可以帮助我们定位很 GUID 对应的数据结构. - 定位并符号化
gRT,gBS, - 定位
EFI_SIMPLE_FILE_SYSTEM_PROTOCOL_GUID和LOAD_FILE_PROTOCOL_GUID, 这两个 Protocol 将在将在文件读取时使用.
在对 EFI GUID 进行符号化时, 可以使用 ida-efitools 或者 ida-namer, emmmm, 这两个插件都点小问题, 手动修一下就行, 并且
- 这里只包含通用的 EFI GUID, 对于 APPLE 相关的 GUID 是缺少的, 可以参考 Clover EFI bootloader 手动添加关于 APPLE 的 GUID, 具体参考 cloverefiboot-code/CloverPkg.dec,
- ida-efitools 里的 GUID 少于 ida-namer 所以需要读者手动做一下合并调整.
都是 IDA Python 插件, 请读者自行修复, 这里就不展开了.
对于 gRT 和 gBS 的定位和符号化, 直接跟踪 EFI_STATUS __cdecl ModuleEntryPoint(EFI_HANDLE ImageHandle, EFI_SYSTEM_TABLE *SystemTable) 入口函数的两个参数的 DFG 即可.
0x3: Load PrelinkKernel
这里有读者会有疑问为什么不是 /System/Library/Kernels/kernel.develoment 而是 /System/Library/PrelinkedKernels/prelinkedkernel.development, 可是前文明明将 KDK 中的 kernel.development 移动到了 /System/Library/Kernels/ 目录中, 其实是由于 kextcache 的原因. 具体的 tool 请参考 kext_tools.
kextcache 会将 kexts 和 kernel 共同 link 成 PrelinkedKernel, 具体在内核加载时如何解压 PrelinkedKernel 将在将在下文讲解.
尝试获取读取文件的 Protocol 处理函数, 处理 boot-args .
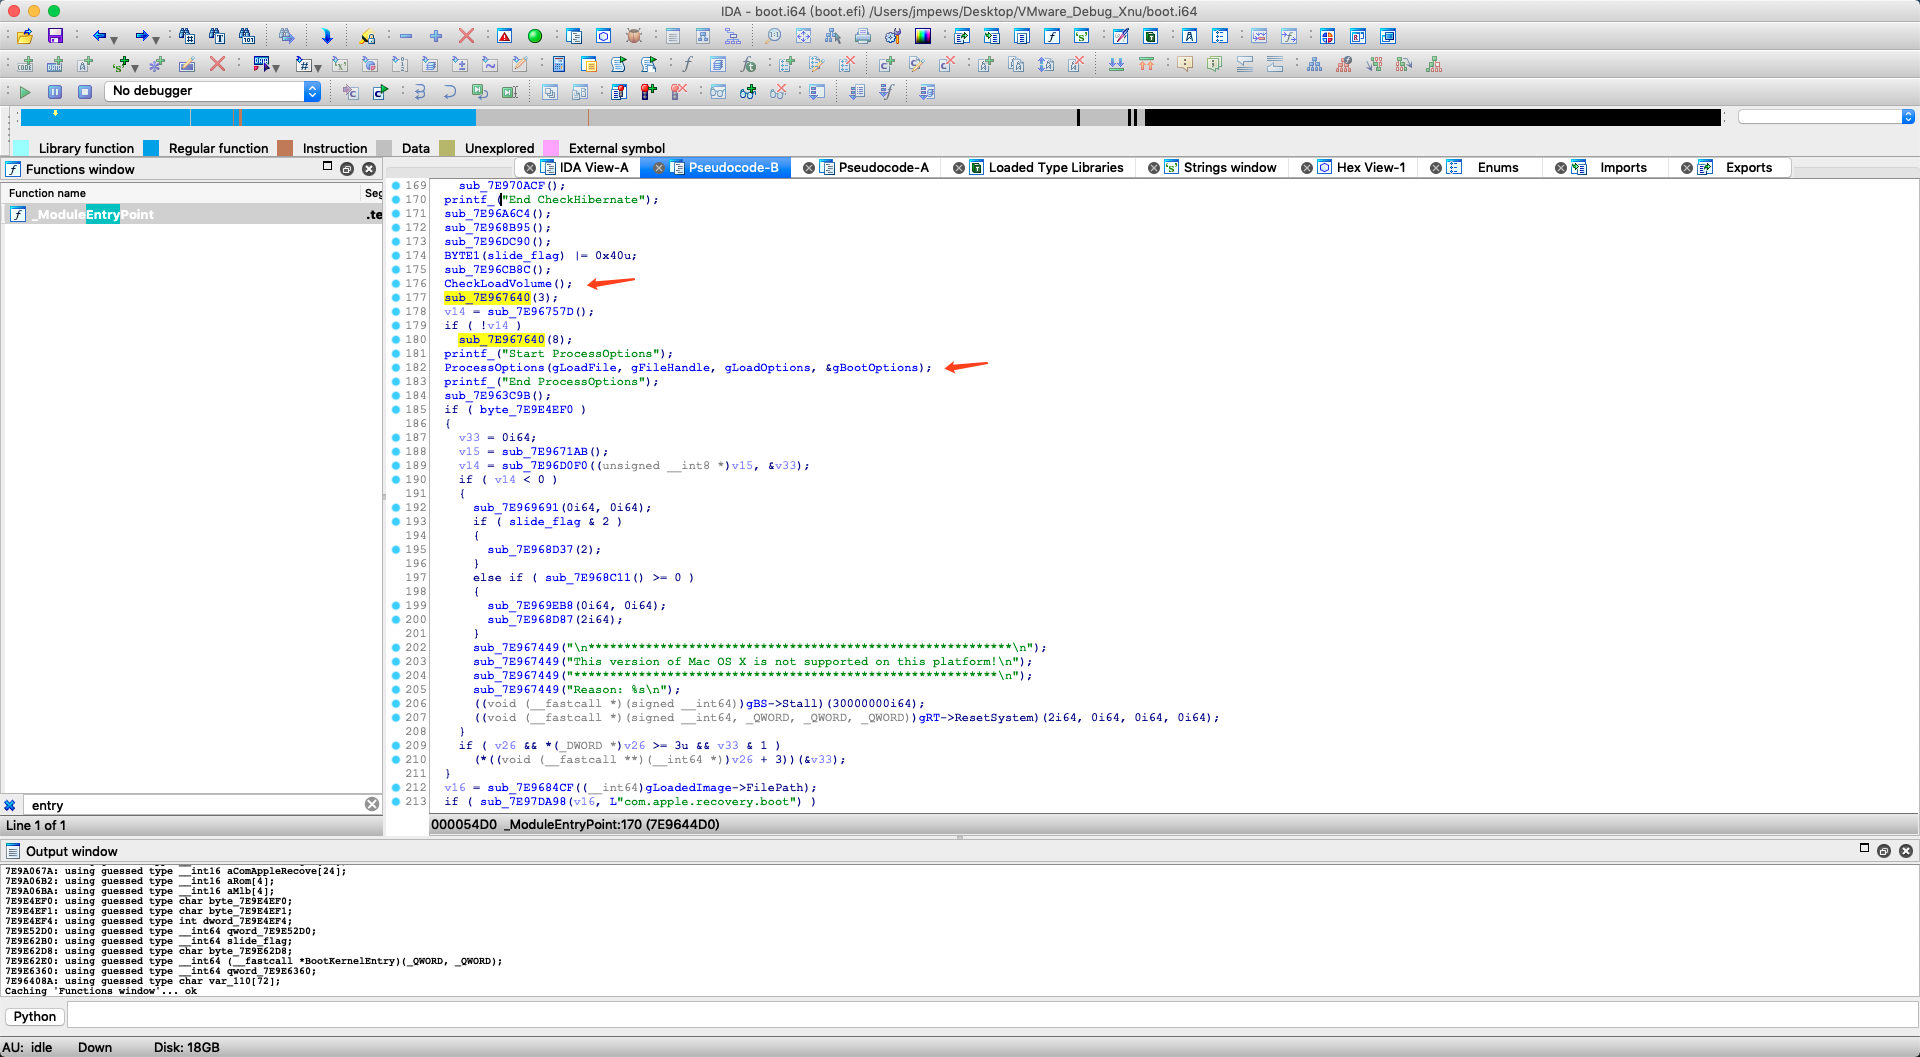
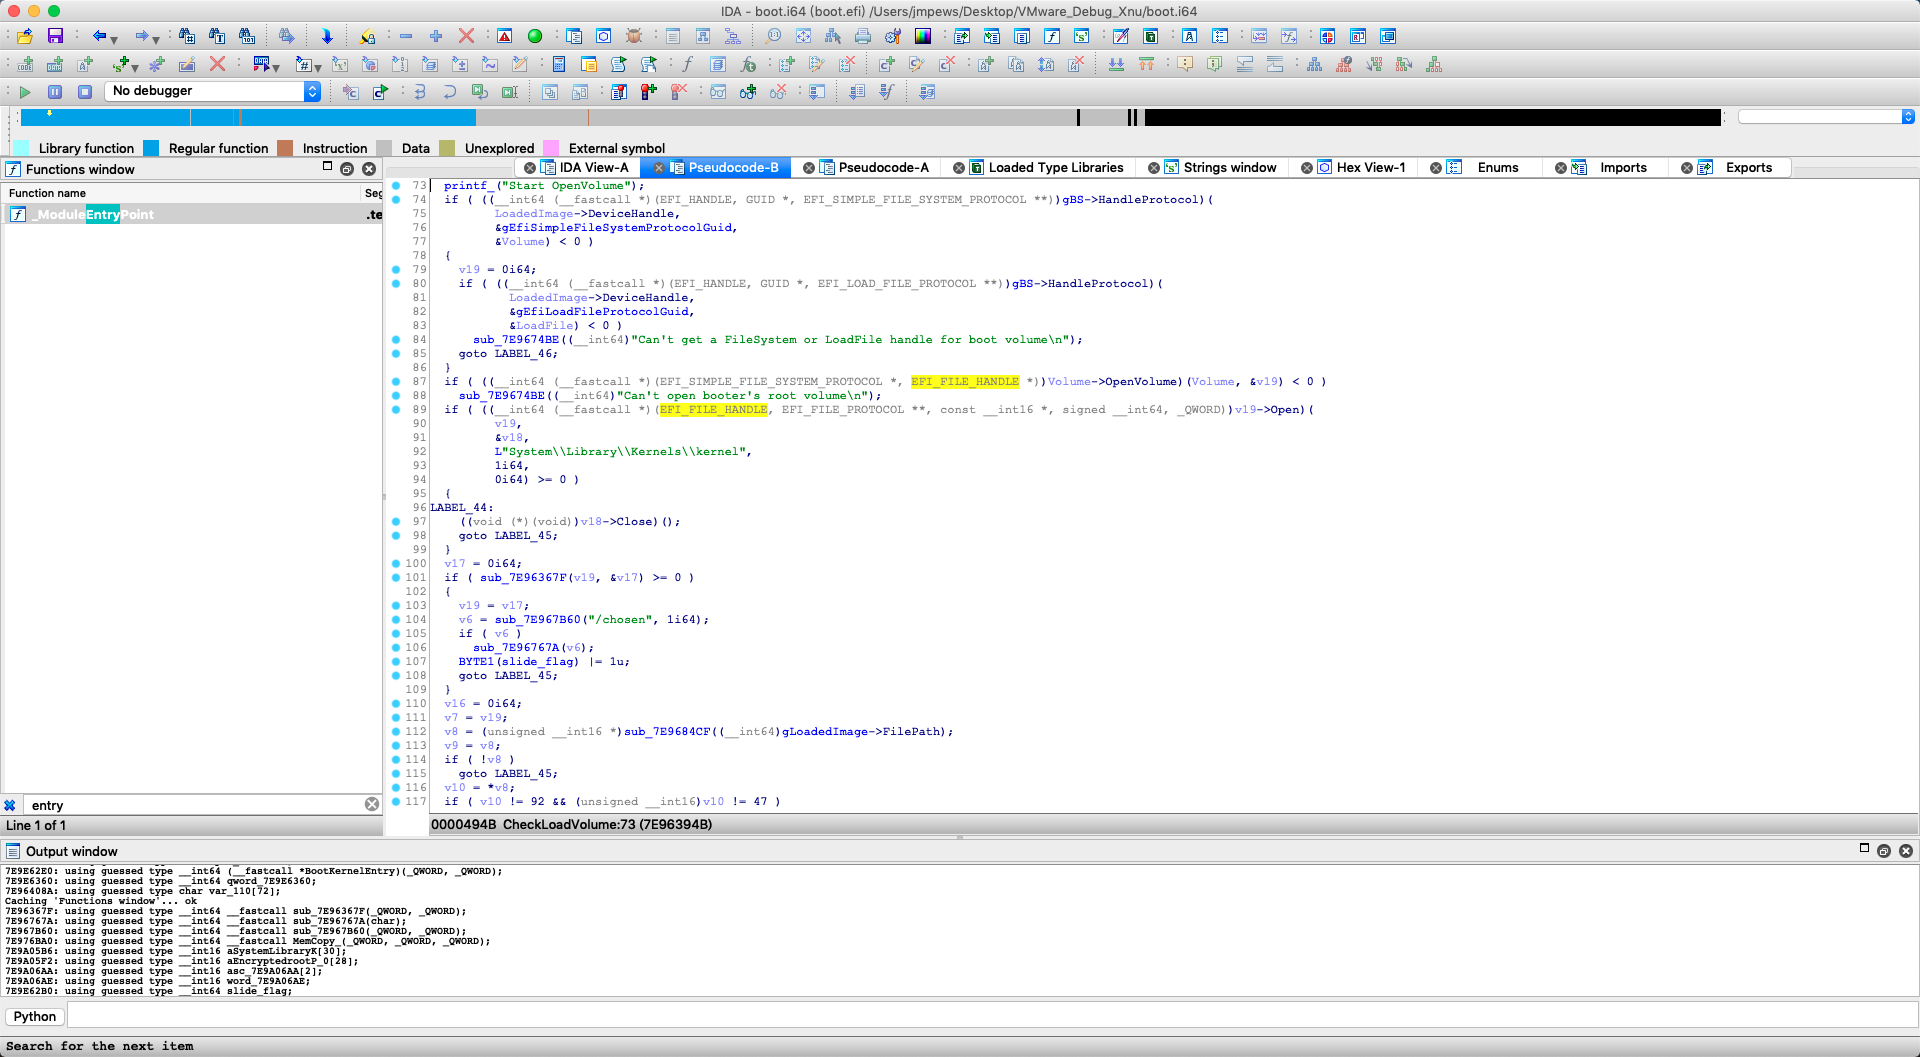
尝试能否打开 Volume, 并读取 kernel 文件, 如果不能则会去检查 EncryptedRoot.plist.wipekey 等配置.
在经过上面过程的 Initialization , 进入关键的加载解析 PrelinkedKernel,
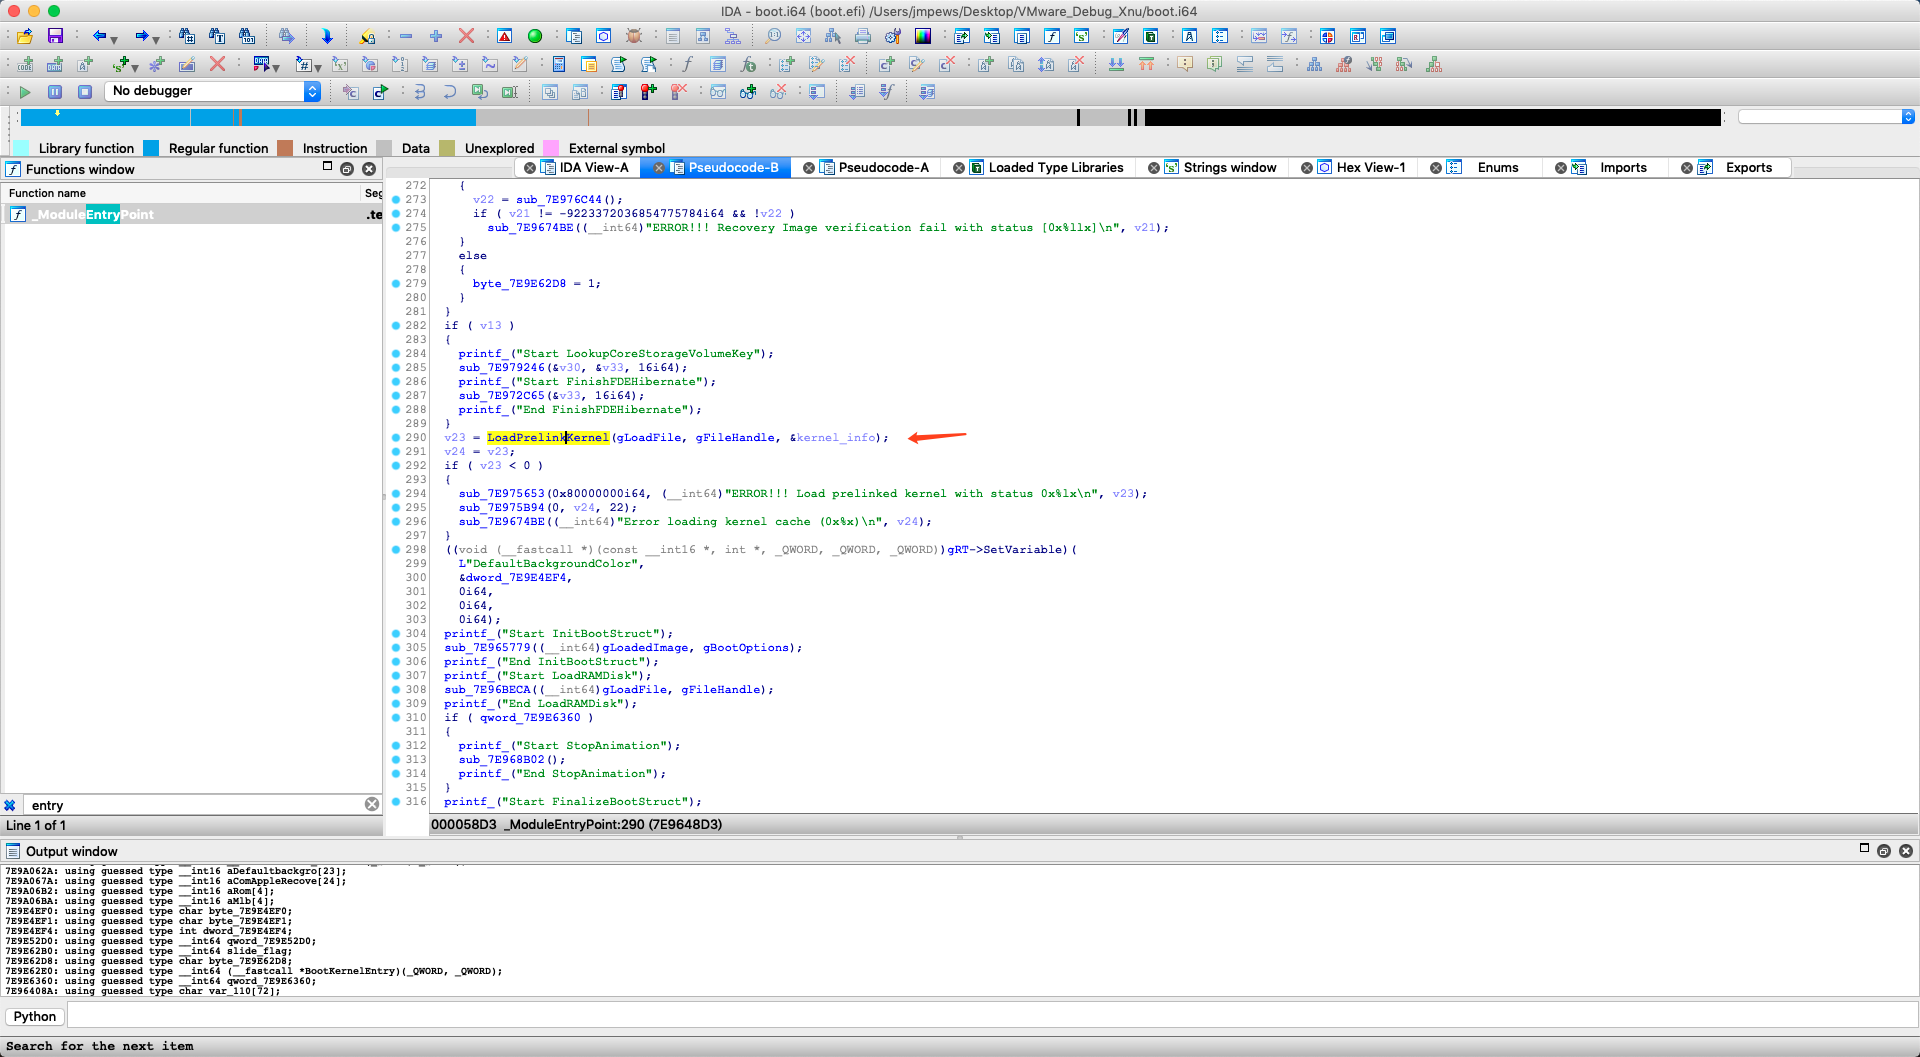
同时这里也可以看到这里使用了 boot-args 里的 kcsuffix 参数. (这里其实并不存在 sprintf_x 这个符号, 只是个人对函数功能判断认为它其实实现的是 spritnf 的功能)

首先这里会根据 PrelinkedKernel 的 filepath, 初始化 kernel_load_info 中的 EFI_FILE_HANDLE.
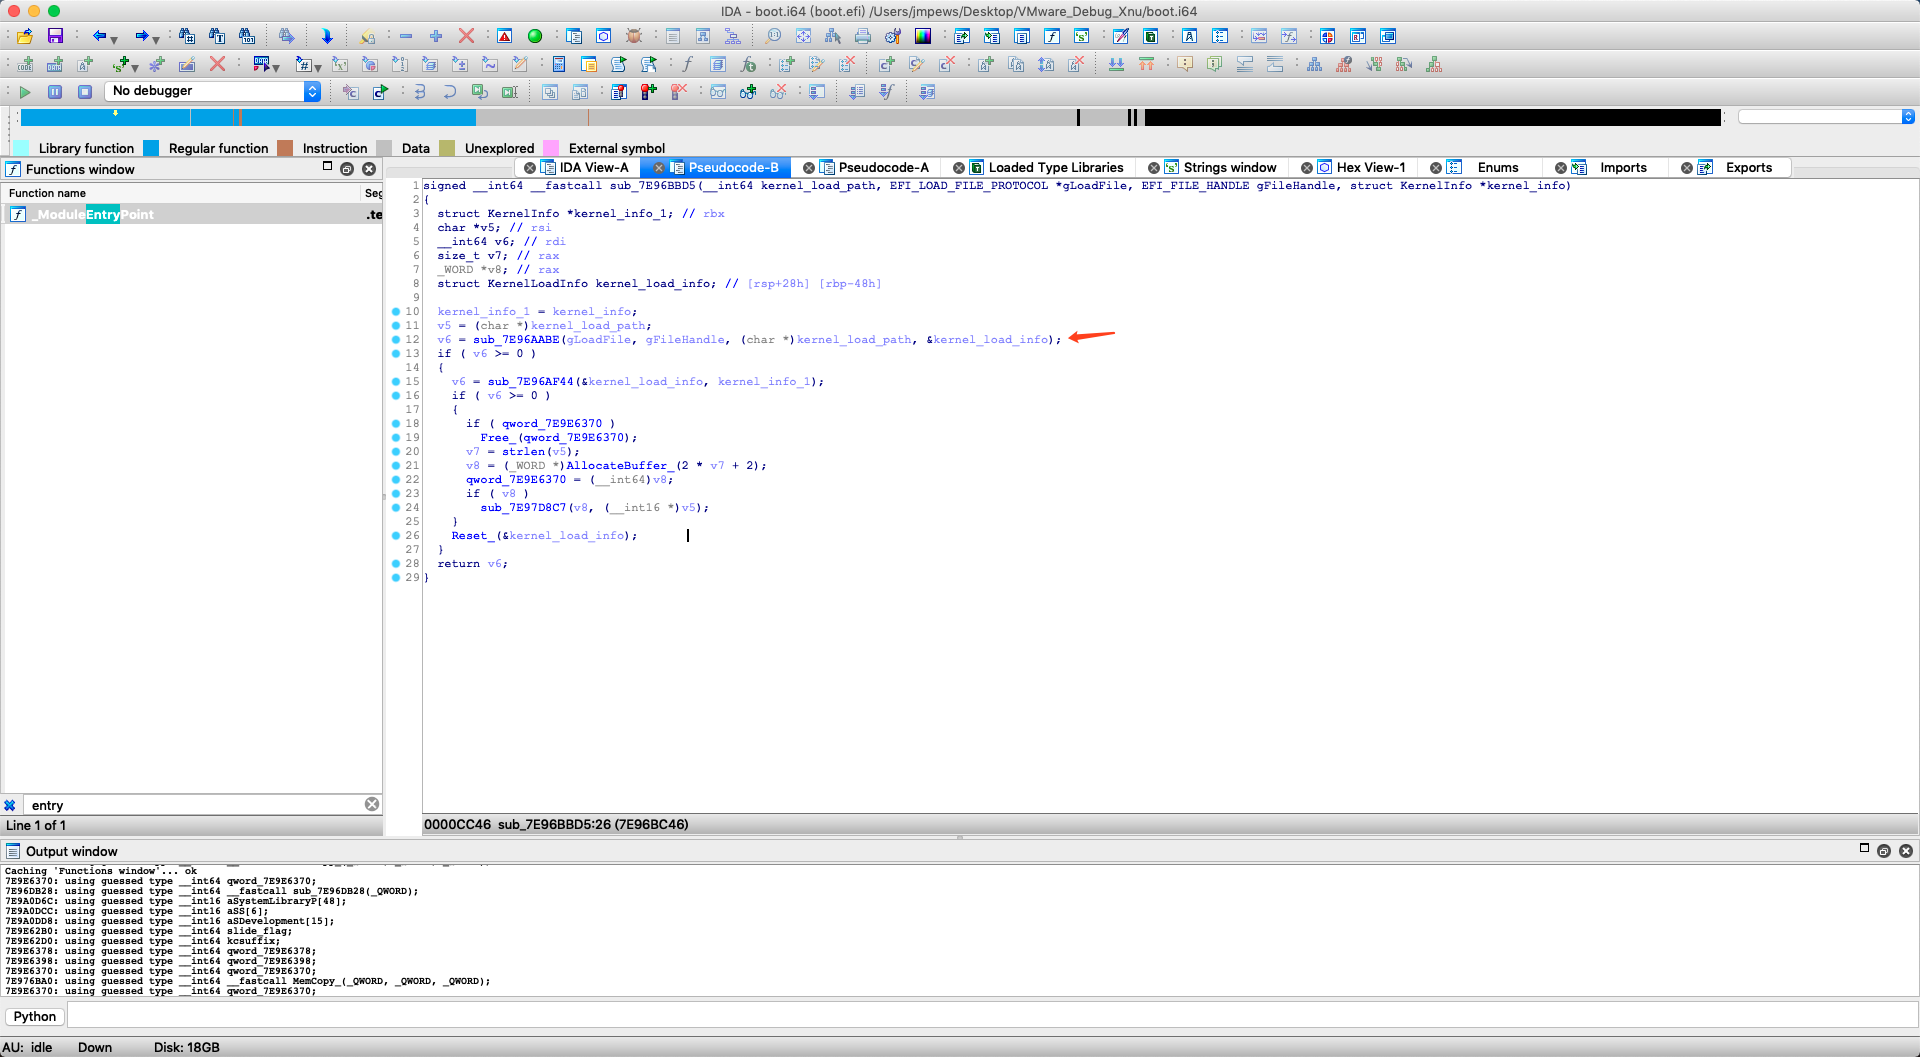
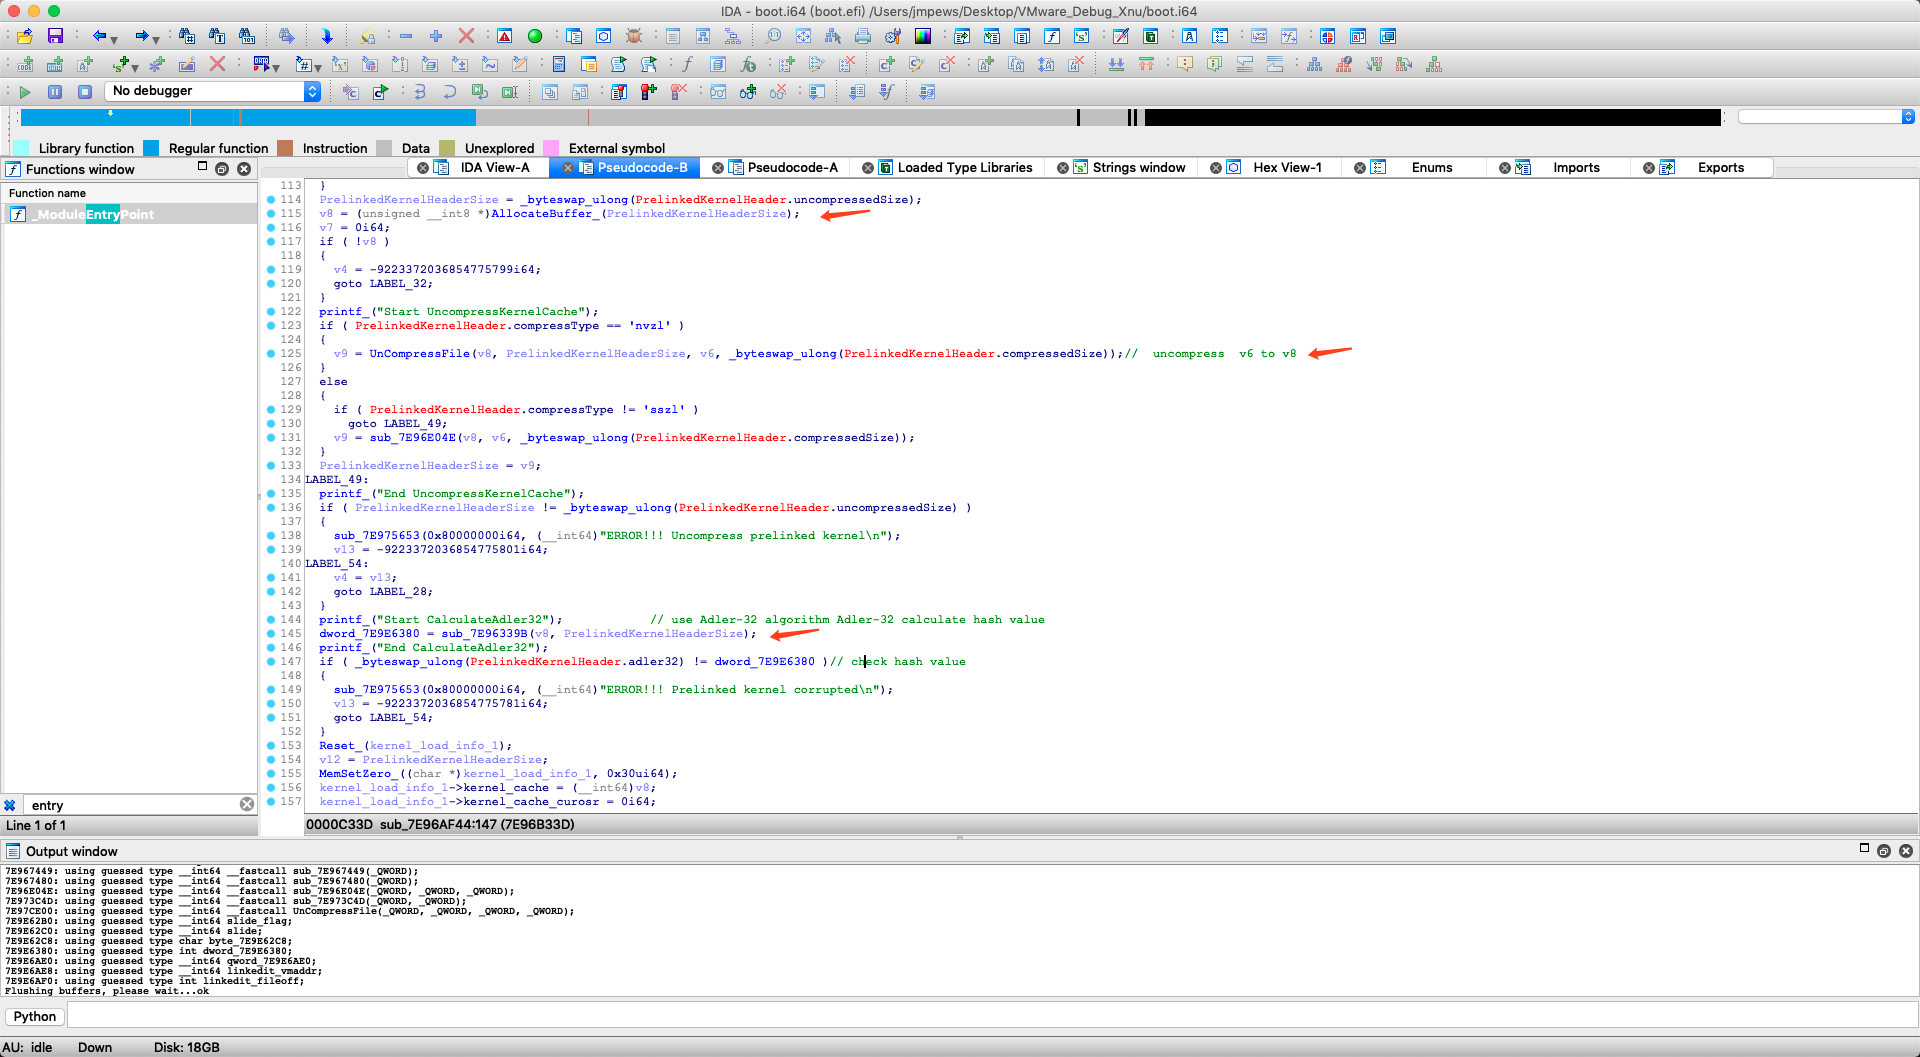
真正解析 PrelinkedKernel 是在 sub_7E96AF44 函数中.
但是无法直接对这一段伪代码进行分析, 需进行符号还原, 部分还原结果如下.
sub_7E96AF44 前半部分的关键点.
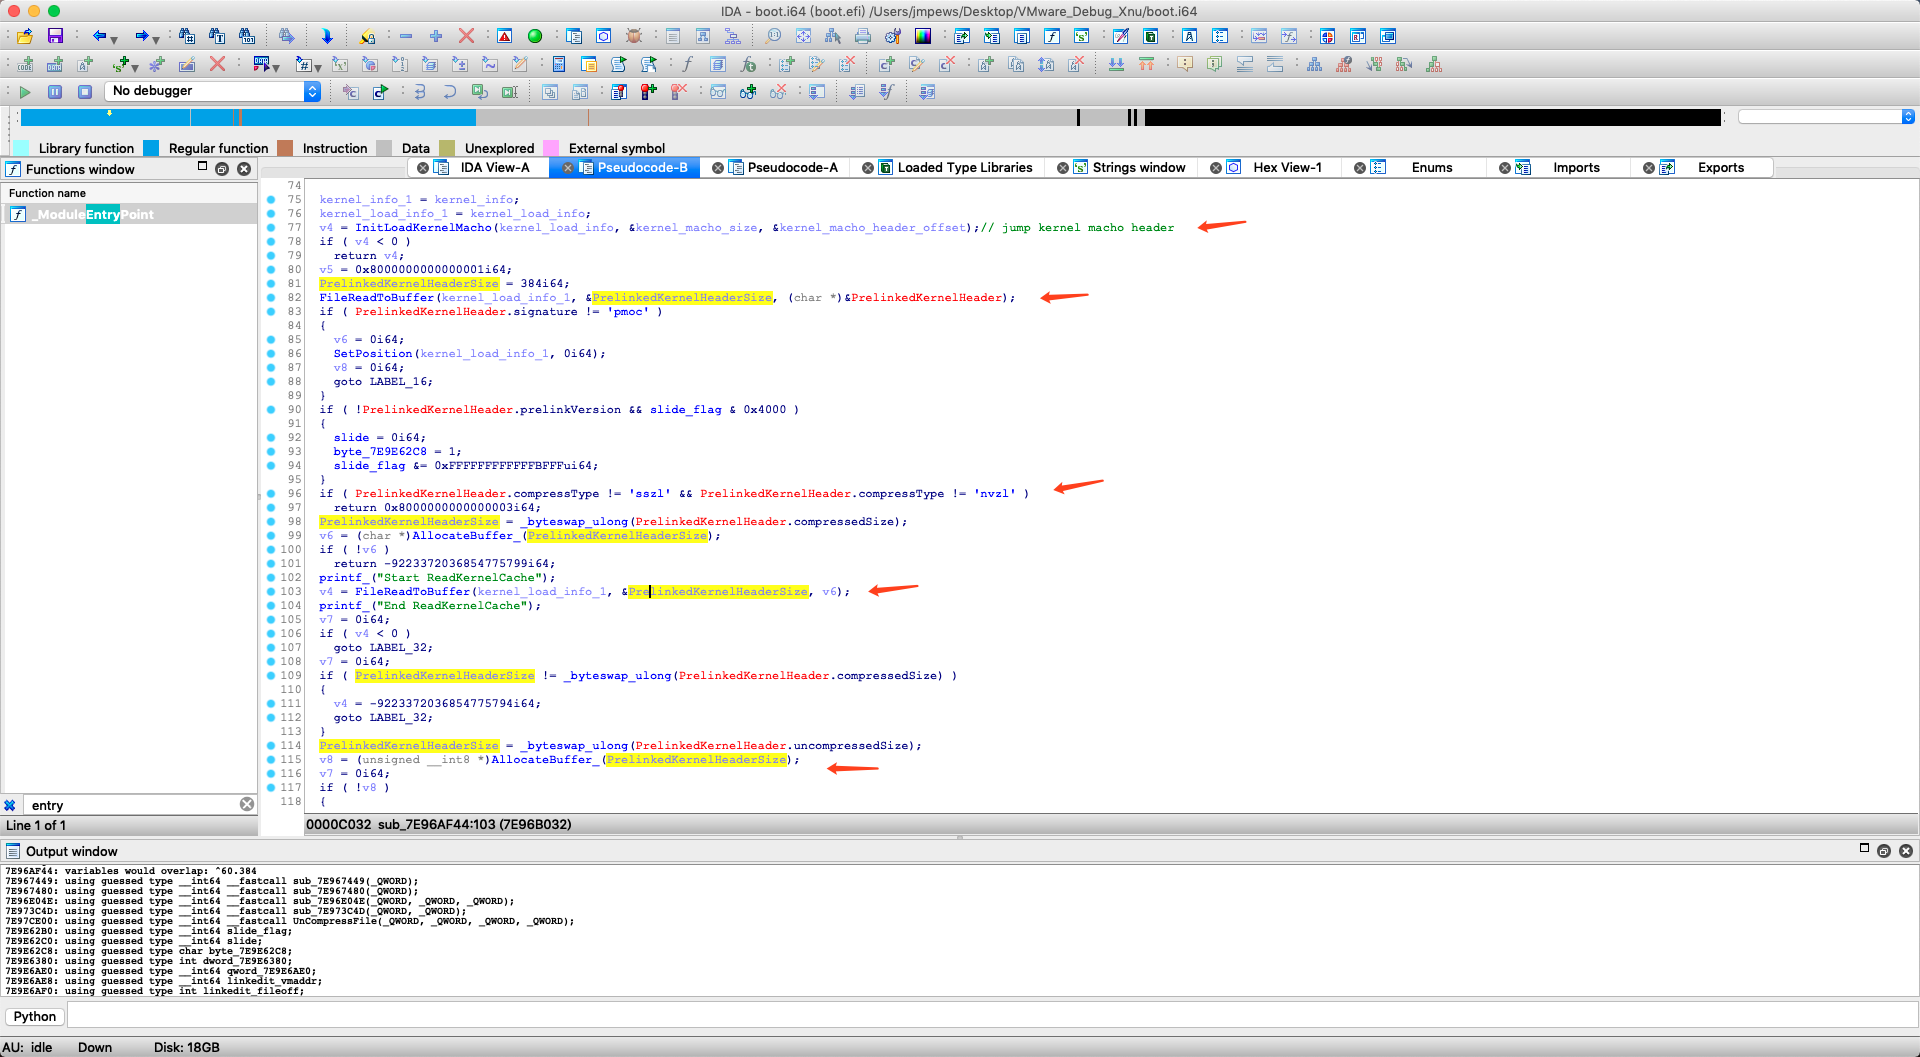
InitLoadKernelMacho 函数中部分关键处理点.
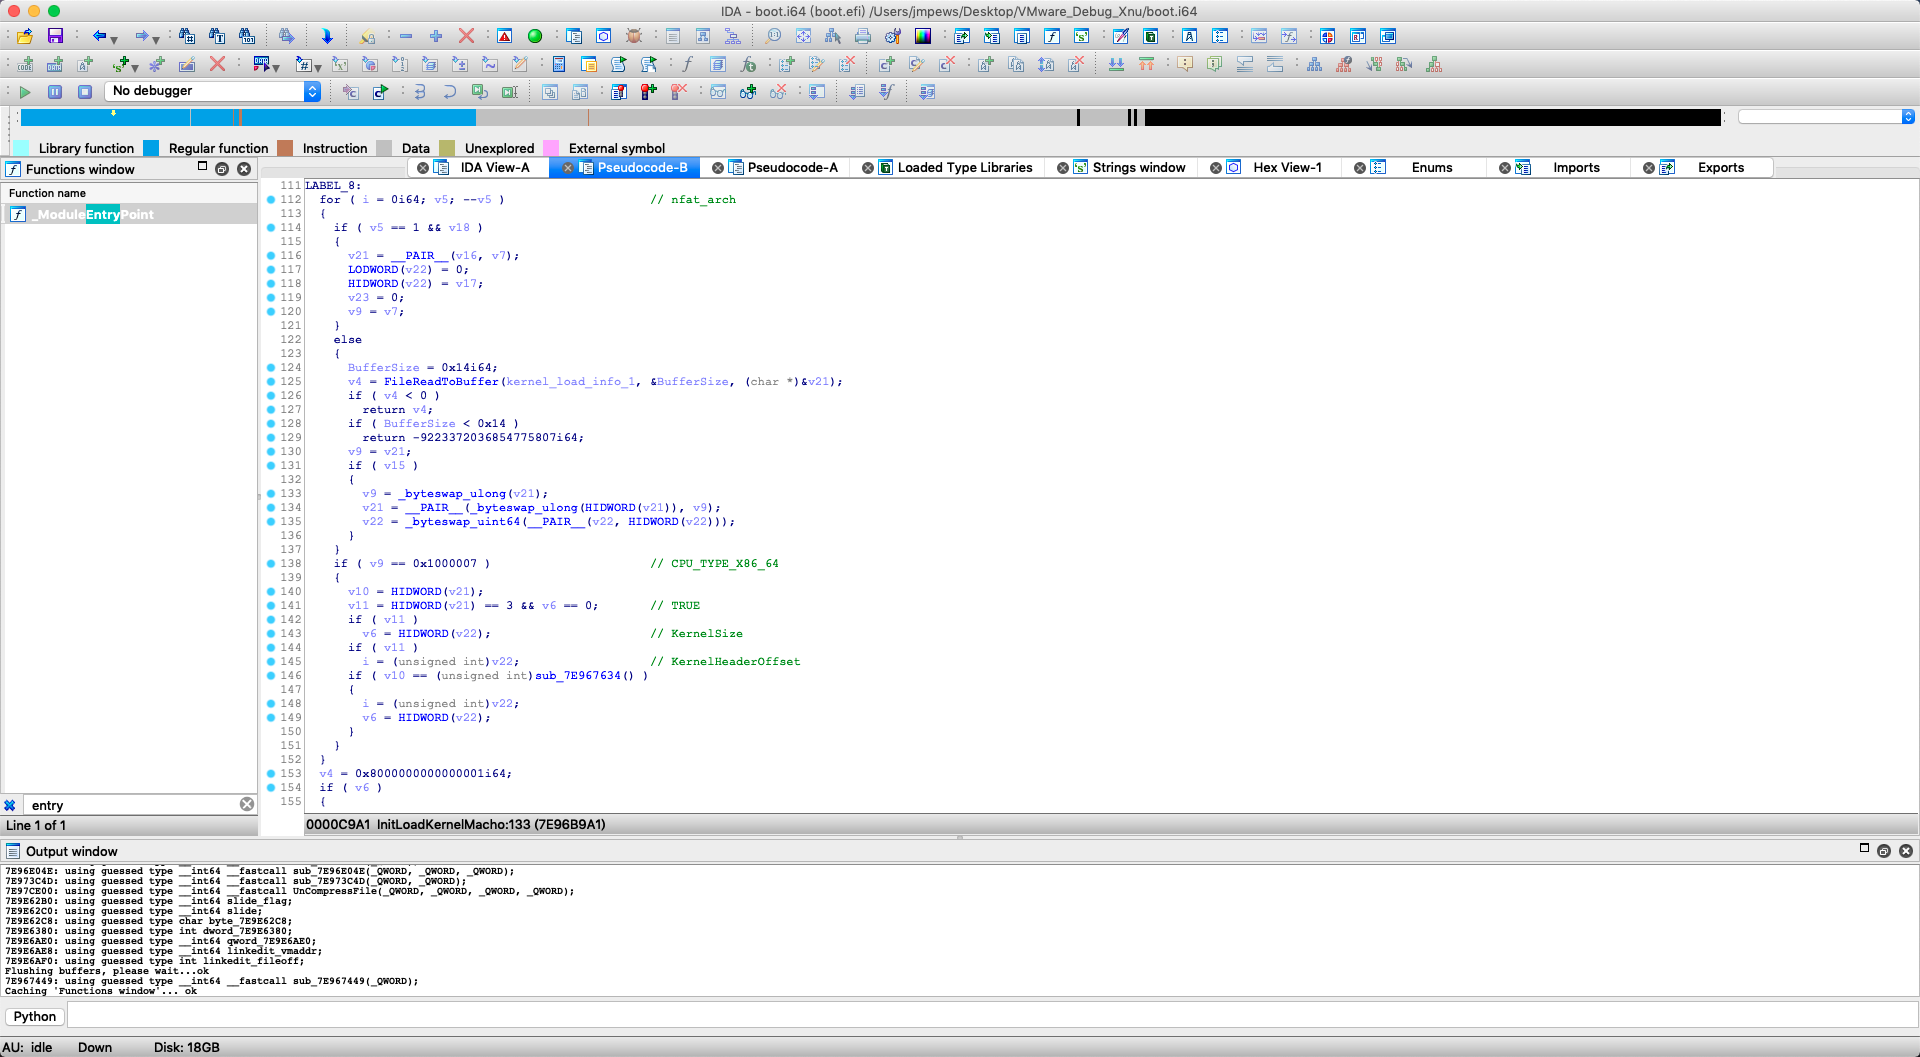
关键的点已经在途中标出. 这里先说下 PrelinkedKernel 的文件结构. 开头是标准的 fat 结构.
struct fat_header {
	uint32_t	magic;		/* FAT_MAGIC */
	uint32_t	nfat_arch;	/* number of structs that follow */
};

struct fat_arch {
	cpu_type_t	cputype;	/* cpu specifier (int) */
	cpu_subtype_t	cpusubtype;	/* machine specifier (int) */
	uint32_t	offset;		/* file offset to this object file */
	uint32_t	size;		/* size of this object file */
	uint32_t	align;		/* alignment as a power of 2 */
};
但是每个 fat_arch 对应的并不是 mach_header 而是 prelinked_kernel_header.
// prelinkVersion value >= 1 means KASLR supported
typedef struct prelinked_kernel_header {
    uint32_t  signature;
    uint32_t  compressType;
    uint32_t  adler32;
    uint32_t  uncompressedSize;
    uint32_t  compressedSize;
    uint32_t  prelinkVersion;
    uint32_t  reserved[10];
    char      platformName[PLATFORM_NAME_LEN]; // unused
    char      rootPath[ROOT_PATH_LEN];         // unused
    char      data[0];
} PrelinkedKernelHeader;
通过对 prelinked_kernel_header 进行 uncompress 后, 才获取到 mach_header.
这里总结下上面的过程.
- 在
InitLoadKernelMacho中通过EFI_FILE_HANDLE, 读取PrelinkedKernel的fat_header. - 读取
PrelinkedKernelHeader判断signature与compressType - 读取
compressedSize大小的CompressedKernelCache到CompressedKernelCacheBuffer中 - 分配
uncompressedSize大小Buffer, 对CompressedKernelCacheBuffer进行uncompress操作, 解压至Buffer. - 使用
Adler-32算法进行完整性校验.
在获取到标准 kernel macho buffer, 同样做一些判断比如 macho 对应的 magic, arch 等, 具体如下图.
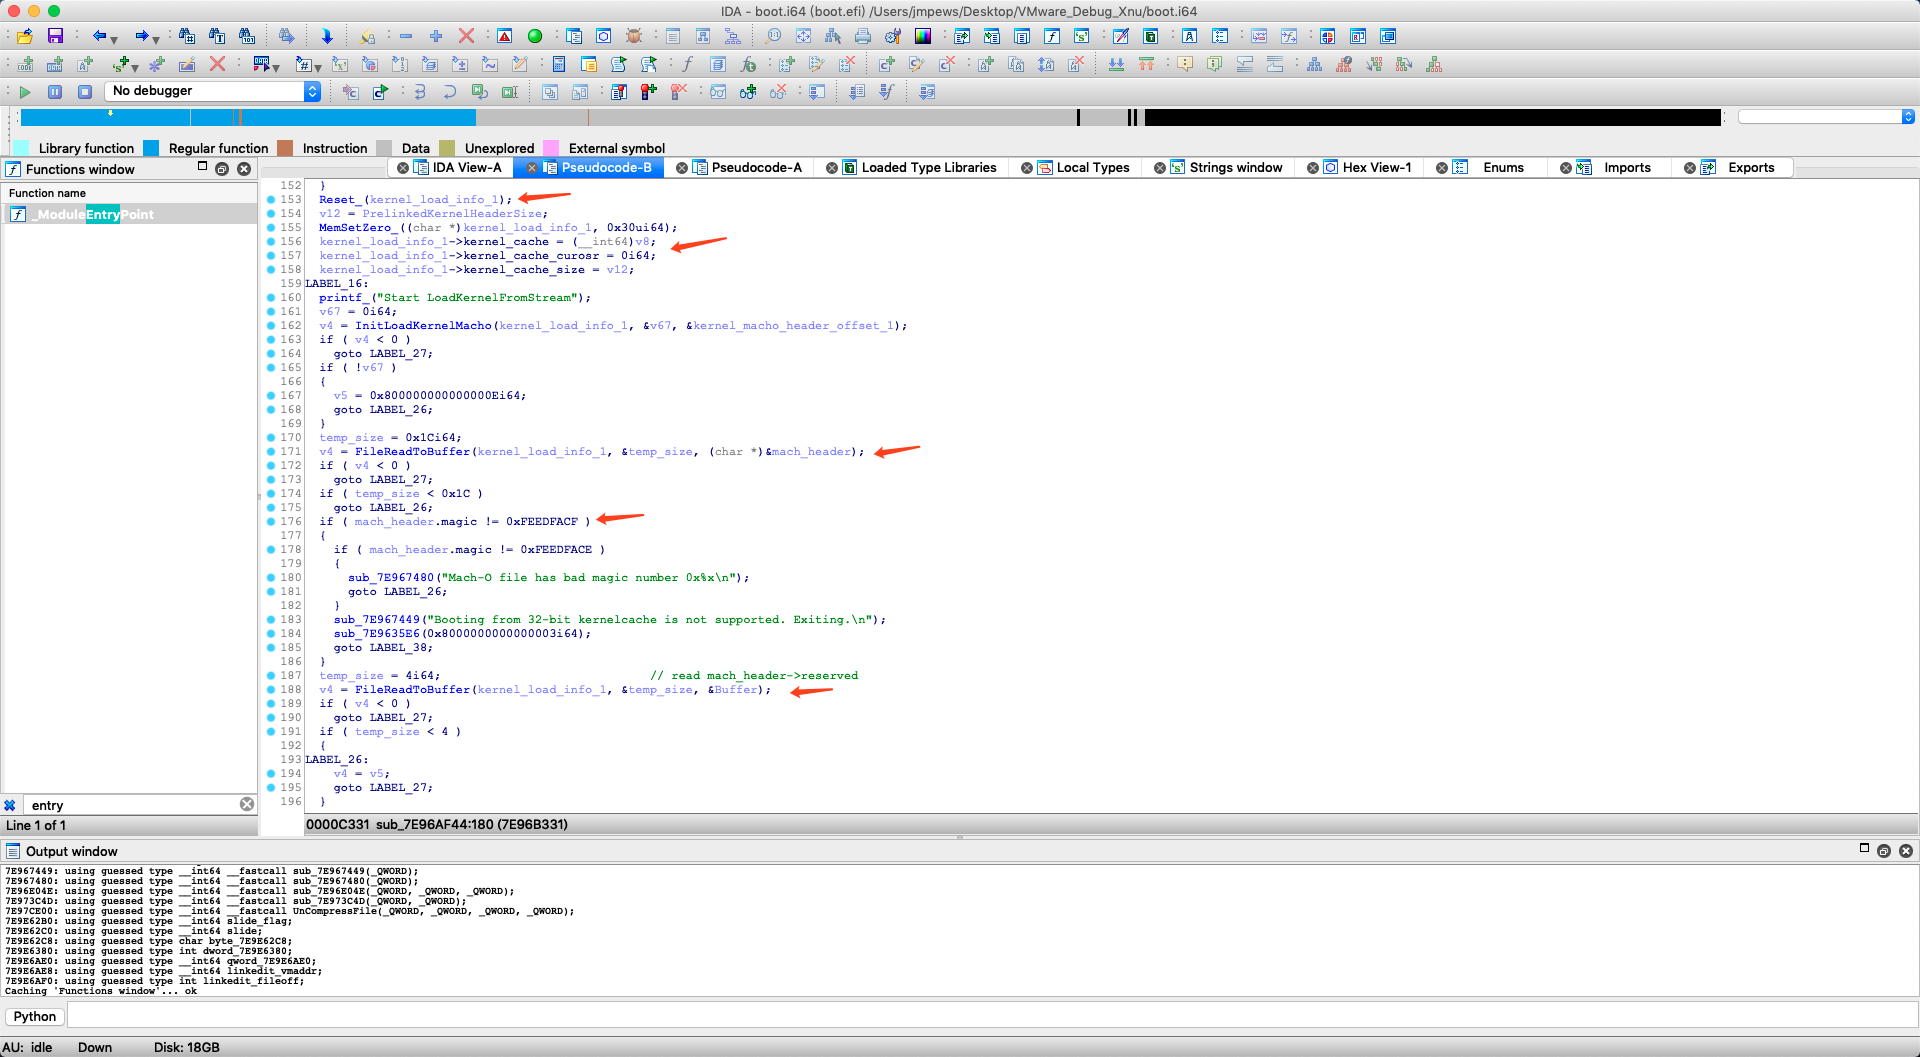
下面将对 kernel macho 的 segments, sections 进行遍历, 修正 slide.
LABEL_26:
    v4 = v5;
    goto LABEL_27;
  }
LABEL_38:
  if ( slide_flag & 0x4000 && !(mach_header.flags & 0x200000) )
  {
    slide = 0i64;
    slide_flag &= 0xFFFFFFFFFFFFBFFFui64;
  }
  temp_size = mach_header.sizeofcmds;
  v11 = (char *)AllocateBuffer_(mach_header.sizeofcmds);// v17 == 0x1300
  if ( !v11 )
    sub_7E9674BE((__int64)"Out of memory in LoadKernel\n");
  if ( FileReadToBuffer(kernel_load_info_1, &temp_size, v11) < 0 || temp_size < mach_header.sizeofcmds )
  {
    Free_((__int64)v11);
    goto LABEL_26;
  }
  kernel_info_2 = kernel_info_1;
  cmds_buffer = (__int64)v11;
  ncmds = mach_header.ncmds;
  ncmds_1 = mach_header.ncmds;
  v15 = 0;
  v4 = 0i64;
  if ( (signed int)mach_header.ncmds <= 0 )
    goto LABEL_124;
  v16 = (struct segment_command_64 *)v11;
  while ( 1 )
  {
    cmd = v16->cmd;
    cmdsize = v16->cmdsize;
    if ( cmd > 10 )
    {
      if ( cmd == 0xB )                         // LC_DYSYMTAB
      {
        if ( slide_flag & 0x4000 && v16[1].cmdsize )
        {
          v37 = qword_7E9E6AE0;
          if ( !qword_7E9E6AE0 || !linkedit_vmaddr )
            goto LABEL_123;
          v38 = (signed int *)(v16[1].cmd + linkedit_vmaddr - (unsigned int)linkedit_fileoff);
          v39 = (unsigned __int64)&v38[2 * v16[1].cmdsize];
          while ( (unsigned __int64)v38 < v39 )
          {
            if ( (v38[1] & 0xFF000000) != 100663296 )
              goto LABEL_123;
            *(_QWORD *)(v37 + *v38) += slide;
            v38 += 2;
          }
        }
        goto LABEL_120;
      }
      if ( cmd != 0x19 )                        // LC_SEGMENT_64
        goto LABEL_120;
      vmaddr_1 = v16->vmaddr;
      vmaddr_0 = v16->vmaddr;
      vm_size_0 = v16->vmsize;
      vm_size_1 = vm_size_0;
      v59 = v16->fileoff + kernel_macho_header_offset_1;
      filesize_0 = v16->filesize;
      temp_size_1 = v16->filesize;
      v27 = -1i64;
      v28 = 0i64;
      v4 = 0i64;
      if ( !vm_size_0 )
      {
LABEL_112:
        if ( v28 && v4 >= 0 )
        {
          if ( kernel_info_2->unknown_mem_2 - 1 >= v27 )
          {
            kernel_info_2->unknown_mem_2 = v27;
            ncmds_1 = ncmds;
            v42 = v15;
            v43 = (__int64)v16;
            v44 = cmdsize;
            v45 = v28;
            v46 = v27;
            v47 = (void *)sub_7E972E37(v27);
            v27 = v46;
            v28 = v45;
            cmdsize = v44;
            v16 = (struct segment_command_64 *)v43;
            v15 = v42;
            ncmds = ncmds_1;
            kernel_info_2->unknown_mem_0 = v47;
          }
          v48 = kernel_info_2->unknown_mem_3;
          v49 = v27 + v28;
          if ( !v48 || v48 < v49 )
          {
            kernel_info_2->unknown_mem_3 = v49;
            ncmds_1 = ncmds;
            v50 = v15;
            v51 = (__int64)v16;
            v52 = cmdsize;
            v53 = (_EFI_FILE_PROTOCOL *)sub_7E972E37(v49);
            cmdsize = v52;
            v16 = (struct segment_command_64 *)v51;
            v15 = v50;
            ncmds = ncmds_1;
            kernel_info_2->unknown_mem_1 = v53;
          }
        }
        if ( v4 )
          goto LABEL_124;
        goto LABEL_120;
      }
      if ( filesize_0 > vm_size_0 )
      {
        temp_size_1 = vm_size_0;
        filesize_0 = vm_size_0;
      }
      filesize_1 = filesize_0;
      cmdsize_1 = cmdsize;
      v58 = v15;
      if ( slide_flag & 0x4000 )
        vmaddr_0 = slide + vmaddr_1;
      seg_vmaddr = AllocateSegmentMemory(&vm_size_1, &vmaddr_0);
      if ( seg_vmaddr )
      {
        seg_vmaddr_1 = (char *)seg_vmaddr;
        v4 = SetPosition(kernel_load_info_1, v59);
        if ( v4 < 0 )
        {
          sub_7E967449("Set offset failed\n");
        }
        else
        {
          vm_size_2 = 0i64;
          seg_vmaddr_2 = (__int64)seg_vmaddr_1;
          if ( !filesize_1 )
          {
LABEL_74:
            if ( vm_size_1 != vm_size_2 )
              ((void (__fastcall *)(unsigned __int64, unsigned __int64, _QWORD))gBS->SetMem)(
                seg_vmaddr_2 + vm_size_2,
                vm_size_1 - vm_size_2,
                0i64);
            if ( slide_flag & 0x4000 )
            {
              if ( !qword_7E9E6AE0 && v16->initprot & 2 )
                qword_7E9E6AE0 = seg_vmaddr_2;
              if ( !linkedit_vmaddr && !(unsigned int)sub_7E973C4D(v16->segname, "__LINKEDIT") )
              {
                linkedit_vmaddr = seg_vmaddr_2;
                linkedit_fileoff = v16->fileoff;
              }
              if ( !(unsigned int)sub_7E973C4D(v16->segname, "__TEXT") )
              {
                for ( i = (struct segment_command_64 *)getFistSegment(seg_vmaddr_2);
                      ;
                      i = (struct segment_command_64 *)getNextSegment(seg_vmaddr_2, (signed __int64)v40) )
                {
                  v40 = i;
                  if ( !i )
                    break;
                  i->vmaddr += slide;
                  for ( j = (struct section_64 *)sub_7E961537((__int64)i);
                        j;
                        j = (struct section_64 *)sub_7E961553((__int64)v40, (__int64)j) )
                  {
                    j->addr += slide;
                  }
                }
              }
            }
            v27 = vmaddr_0;
            v28 = vm_size_1;
            v4 = 0i64;
            goto LABEL_111;
          }
          v4 = FileReadToBuffer(kernel_load_info_1, &temp_size_1, seg_vmaddr_1);
          vm_size_2 = temp_size_1;
          if ( v4 >= 0 )
          {
            seg_vmaddr_2 = (__int64)seg_vmaddr_1;
            goto LABEL_74;
          }
          sub_7E967449("Read file failed: status %d, buffer size 0x%x\n");
        }
      }
      else
      {
        v4 = -9223372036854775799i64;
      }
      v27 = 0i64;
      v28 = 0i64;
LABEL_111:
      ncmds = ncmds_1;
      v15 = v58;
      cmdsize = cmdsize_1;
      goto LABEL_112;
    }
    if ( cmd == 2 )                             // LC_SYMTAB
    {
      if ( slide_flag & 0x4000 )
      {
        v34 = *(unsigned int *)&v16->segname[4];
        if ( *(_DWORD *)&v16->segname[4] )
        {
          v35 = slide;
          v36 = (_QWORD *)(linkedit_vmaddr
                         + *(unsigned int *)v16->segname
                         - (unsigned __int64)(unsigned int)linkedit_fileoff
                         + 8);
          do
          {
            if ( *((unsigned __int8 *)v36 - 4) <= 0x1Fu )
              *v36 += v35;
            v36 += 2;
            --v34;
          }
          while ( v34 );
        }
      }
      goto LABEL_120;
    }
    if ( cmd == 5 )
      break;
LABEL_120:
    v16 = (struct segment_command_64 *)((char *)v16 + cmdsize);
    ++v15;
    v4 = 0i64;
    if ( v15 >= ncmds )
      goto LABEL_124;
  }
  if ( *(_DWORD *)v16->segname == 4 )
  {
    v19 = *(_QWORD *)&v16[2].cmd + (slide & (slide_flag << 49 >> 63));
    kernel_info_2->unknown_mem_4 = v19;
    v20 = v15;
    v21 = (__int64)v16;
    v22 = cmdsize;
    v23 = sub_7E972E37(v19);
    cmdsize = v22;
    v16 = (struct segment_command_64 *)v21;
    v15 = v20;
    ncmds = ncmds_1;
    kernel_info_2->LoadAddress = v23;
    goto LABEL_120;
  }
  sub_7E967449("Only 64-bit version of LC_UNIXTHREAD is supported\n");
  v5 = -9223372036854775805i64;
这里对上面的伪代码总结下.
- 读取
sizeofcmds大小的内容至Buffer - 遍历
load_command至v16(这里使用 IDA 设置不同的 type 比较好分析, 这里对v16暂时设置为segment_command_64type) - 遍历
LC_DYSYMTAB,LC_SEGMENT_64,LC_SYMTAB, 根据slide修复 vmaddr
上面的伪代码循环遍历的退出条件是 cmd == 5, 也就是 LC_UNIXTHREAD.
    if ( cmd == 5 )
      break;
这里关键的地方就是对于 LC_UNIXTHREAD 类型的 load_command 的处理, 在 mach-o/loader.h 并没有给出 struct thread_command 的完整表示, 但这里又涉及到 每一个非常重要的 kernel_info_2->LoadAddress.
struct thread_command {
	uint32_t	cmd;		/* LC_THREAD or  LC_UNIXTHREAD */
	uint32_t	cmdsize;	/* total size of this command */
	/* uint32_t flavor		   flavor of thread state */
	/* uint32_t count		   count of longs in thread state */
	/* struct XXX_thread_state state   thread state for this flavor */
	/* ... */
};
  if ( *(_DWORD *)(v16 + 8) == 4 )
  {
    v19 = *(_QWORD *)(v16 + 0x90) + (slide & (slide_flag << 49 >> 63));
    kernel_info_2->unknown_mem_4 = v19;
    v20 = v15;
    v21 = (struct segment_command_64 *)v16;
    v22 = cmdsize;
    v23 = sub_7E972E37(v19);
    cmdsize = v22;
    v16 = (__int64)v21;
    v15 = v20;
    ncmds = ncmds_1;
    kernel_info_2->LoadAddress = v23;
    goto LABEL_120;
  }
  sub_7E967449("Only 64-bit version of LC_UNIXTHREAD is supported\n");
这里直接去 xnu-3789.70.16 里找一下, 最终在 https://opensource.apple.com/source/xnu/xnu-3789.70.16/bsd/kern/mach_loader.c.auto.html 找到相关处理.
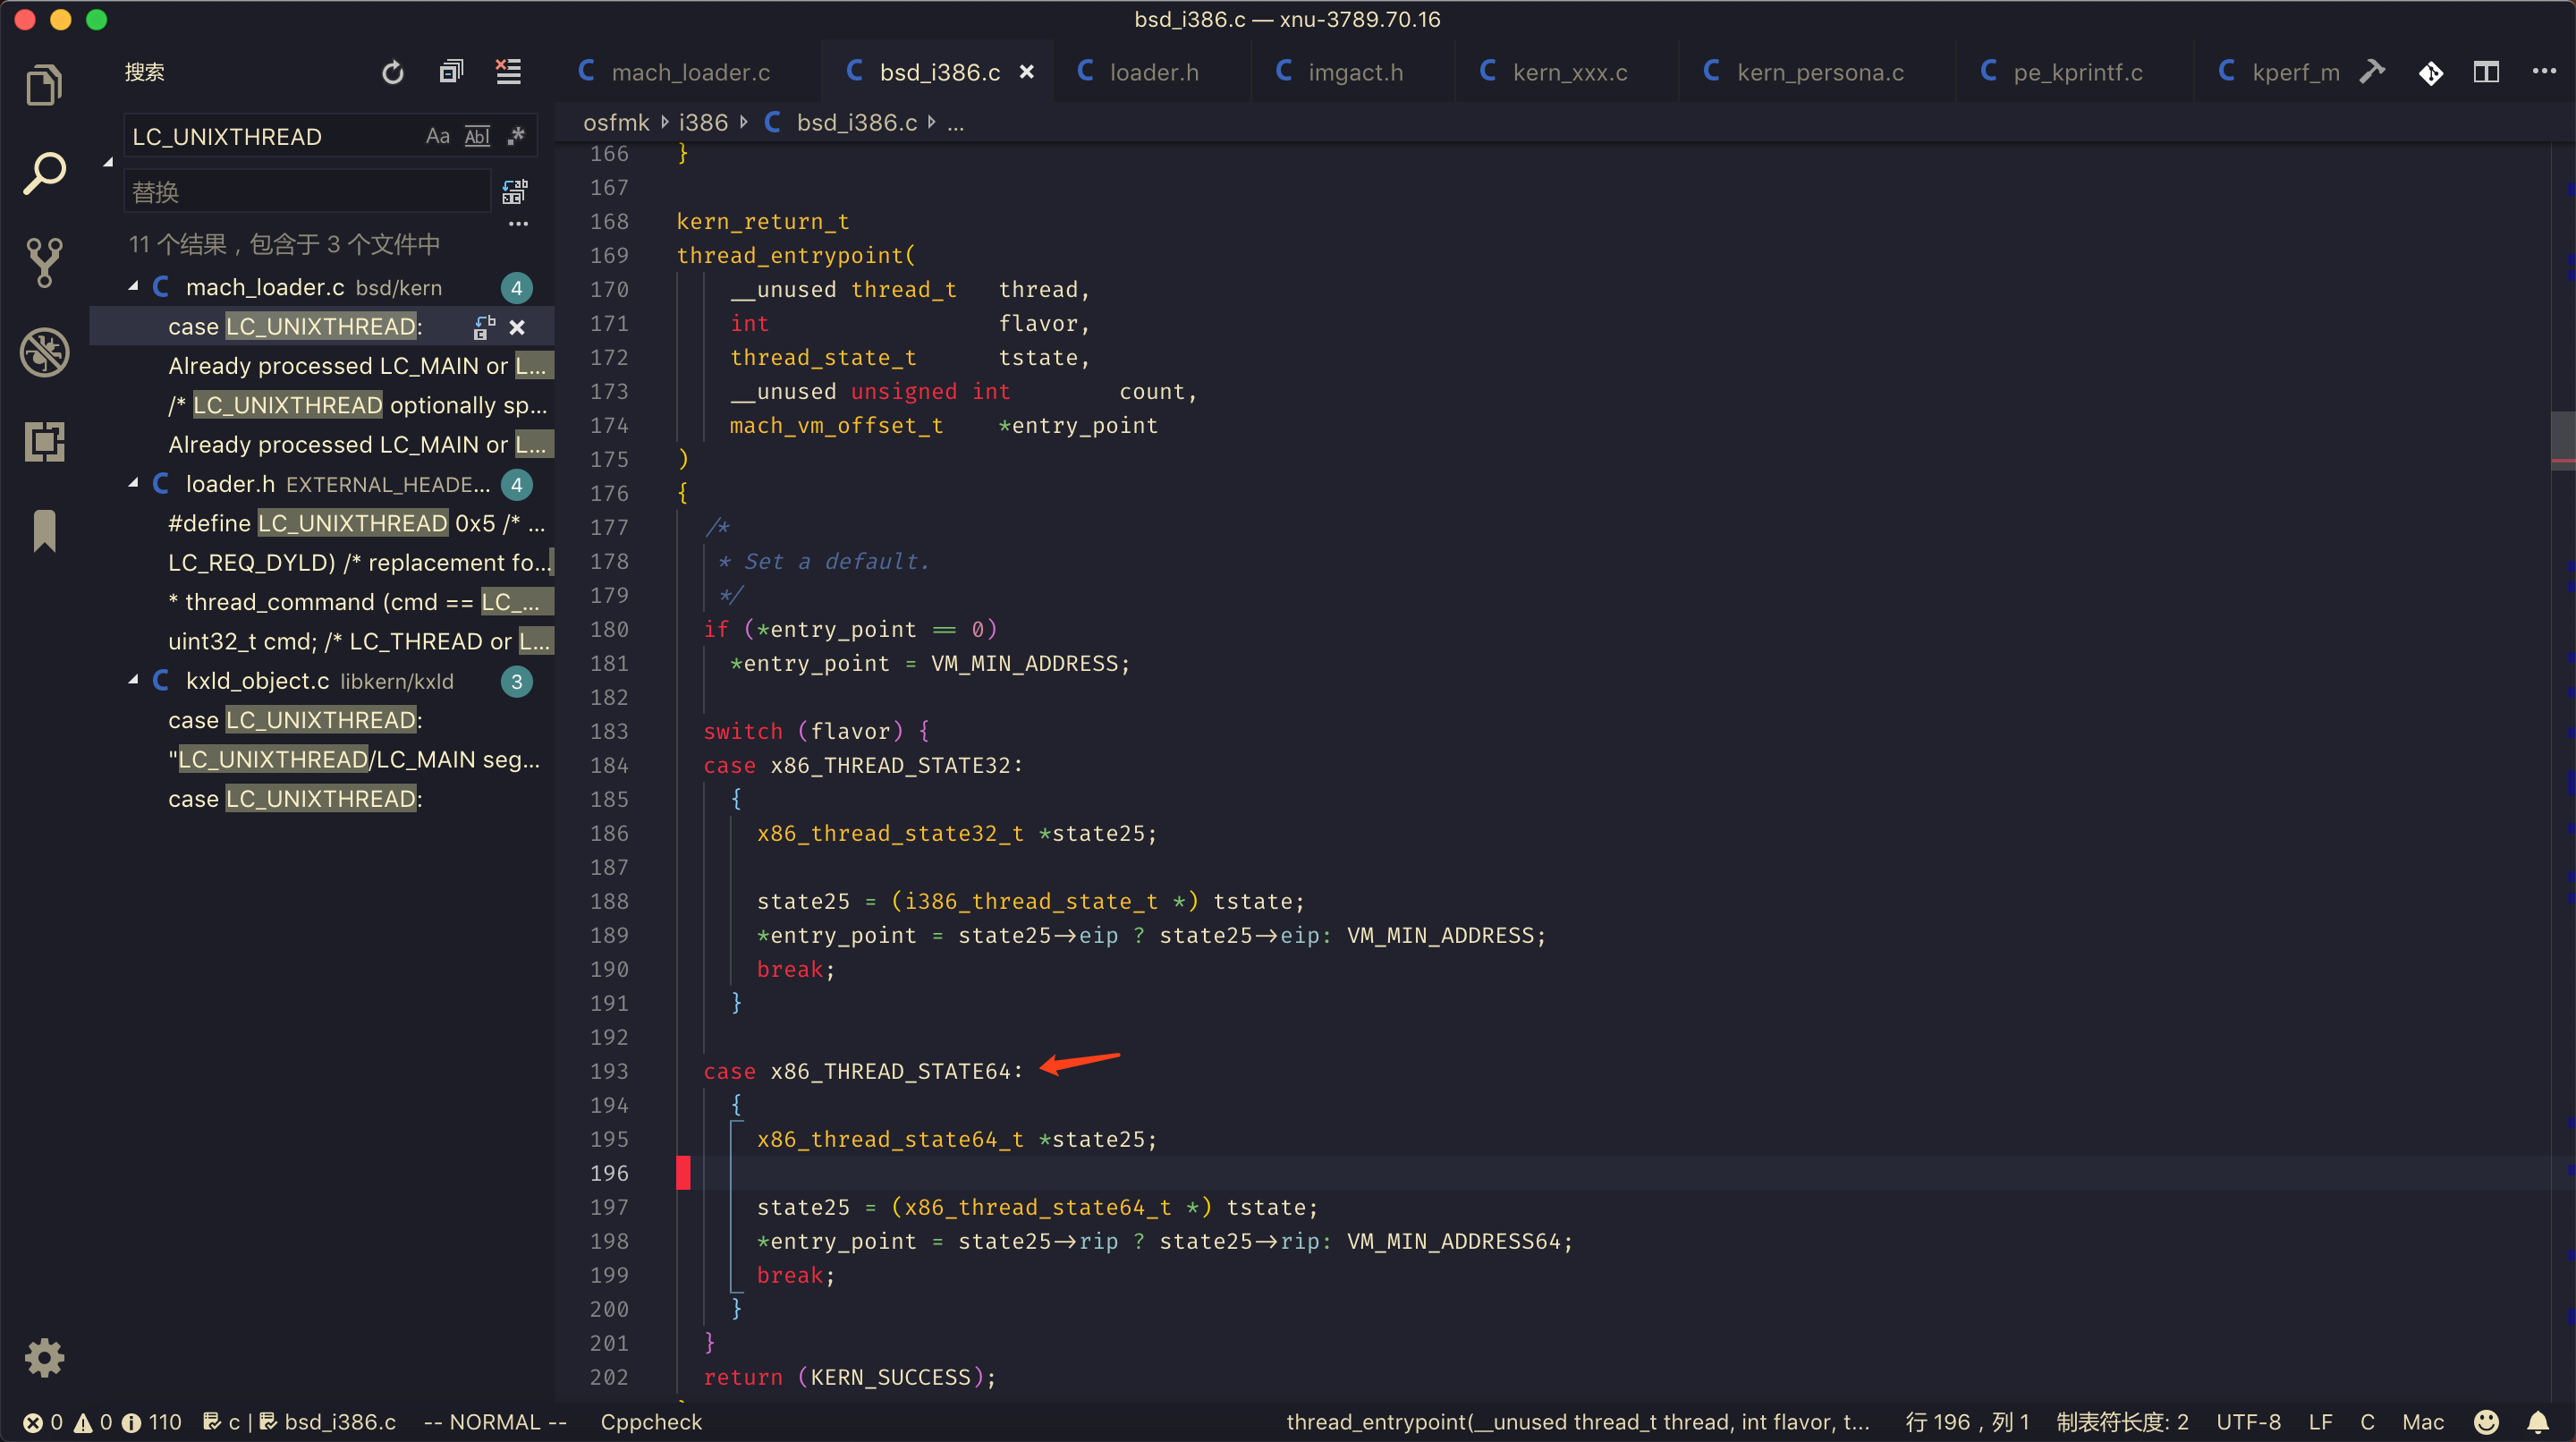
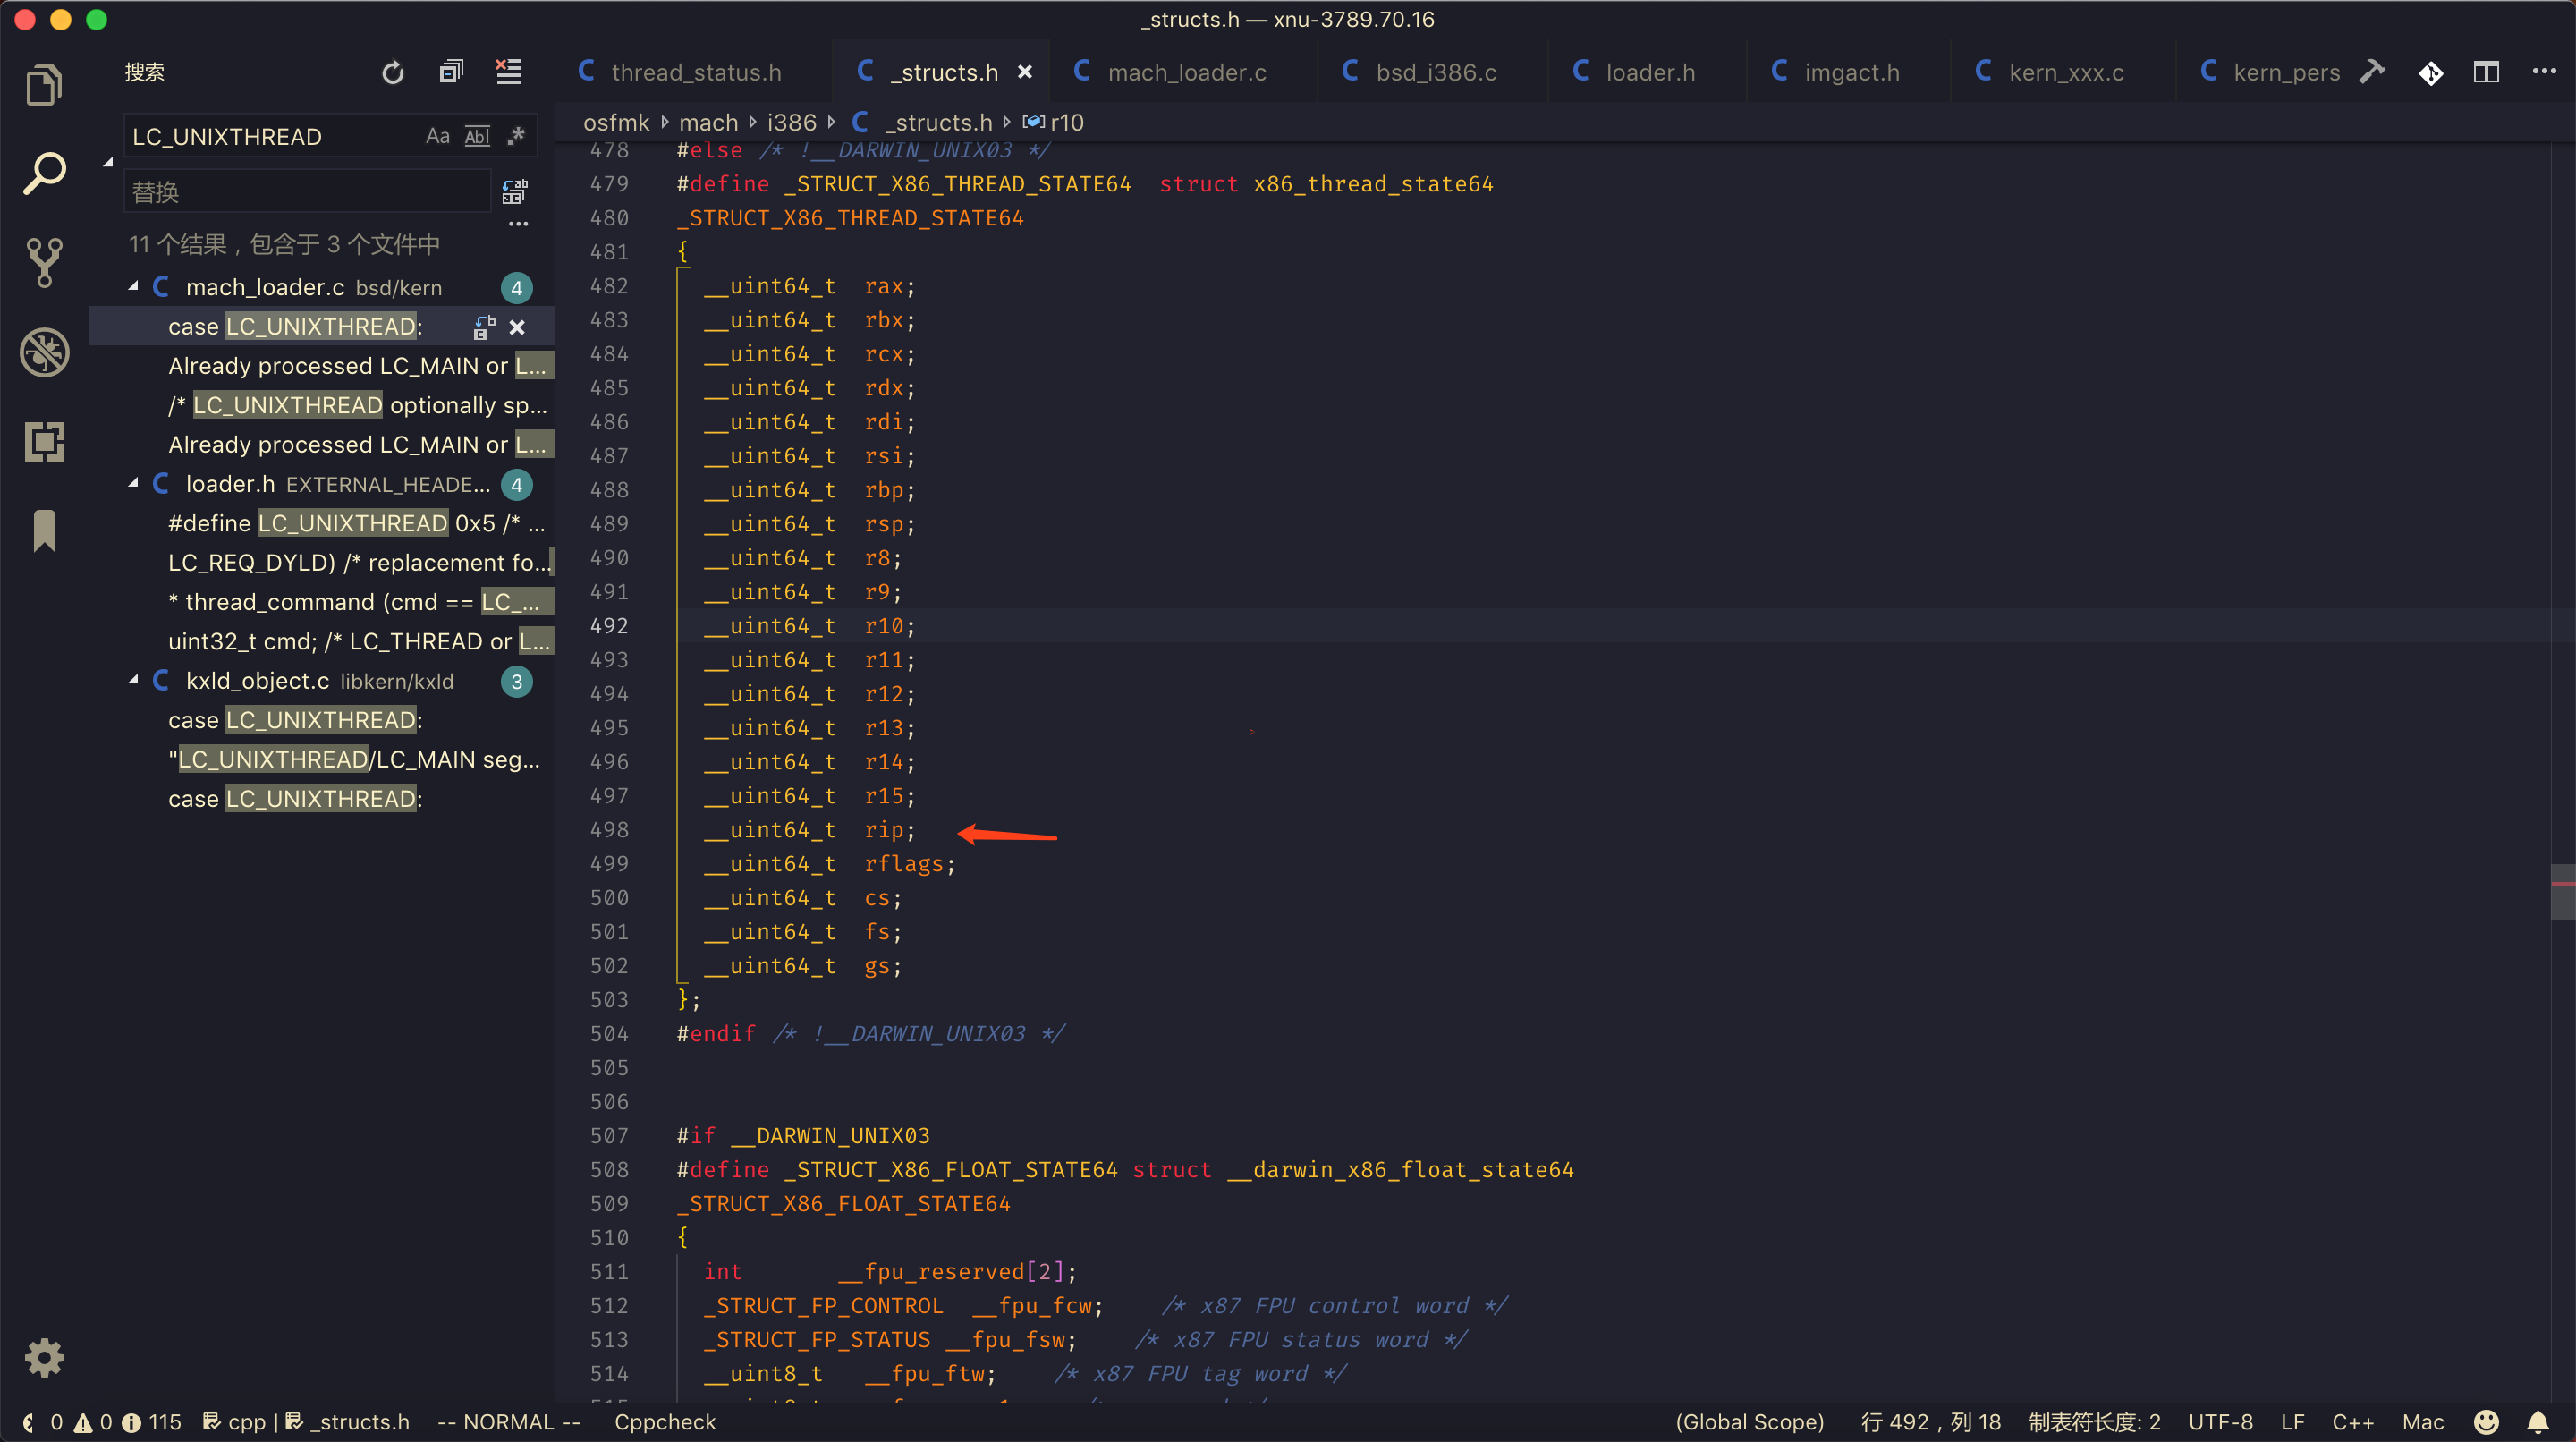
这里判断 entry_state 是否是 x86_THREAD_STATE64, 总结下, 对 LC_UNIXTHREAD 处理过程为 load_unixthread -> load_threadentry -> thread_entrypoint , 所以其实这里的 v16 + 0x90 == v16 + sizeof(struct load_command) + sizeof(__uin64_t) * 16 即 rip.
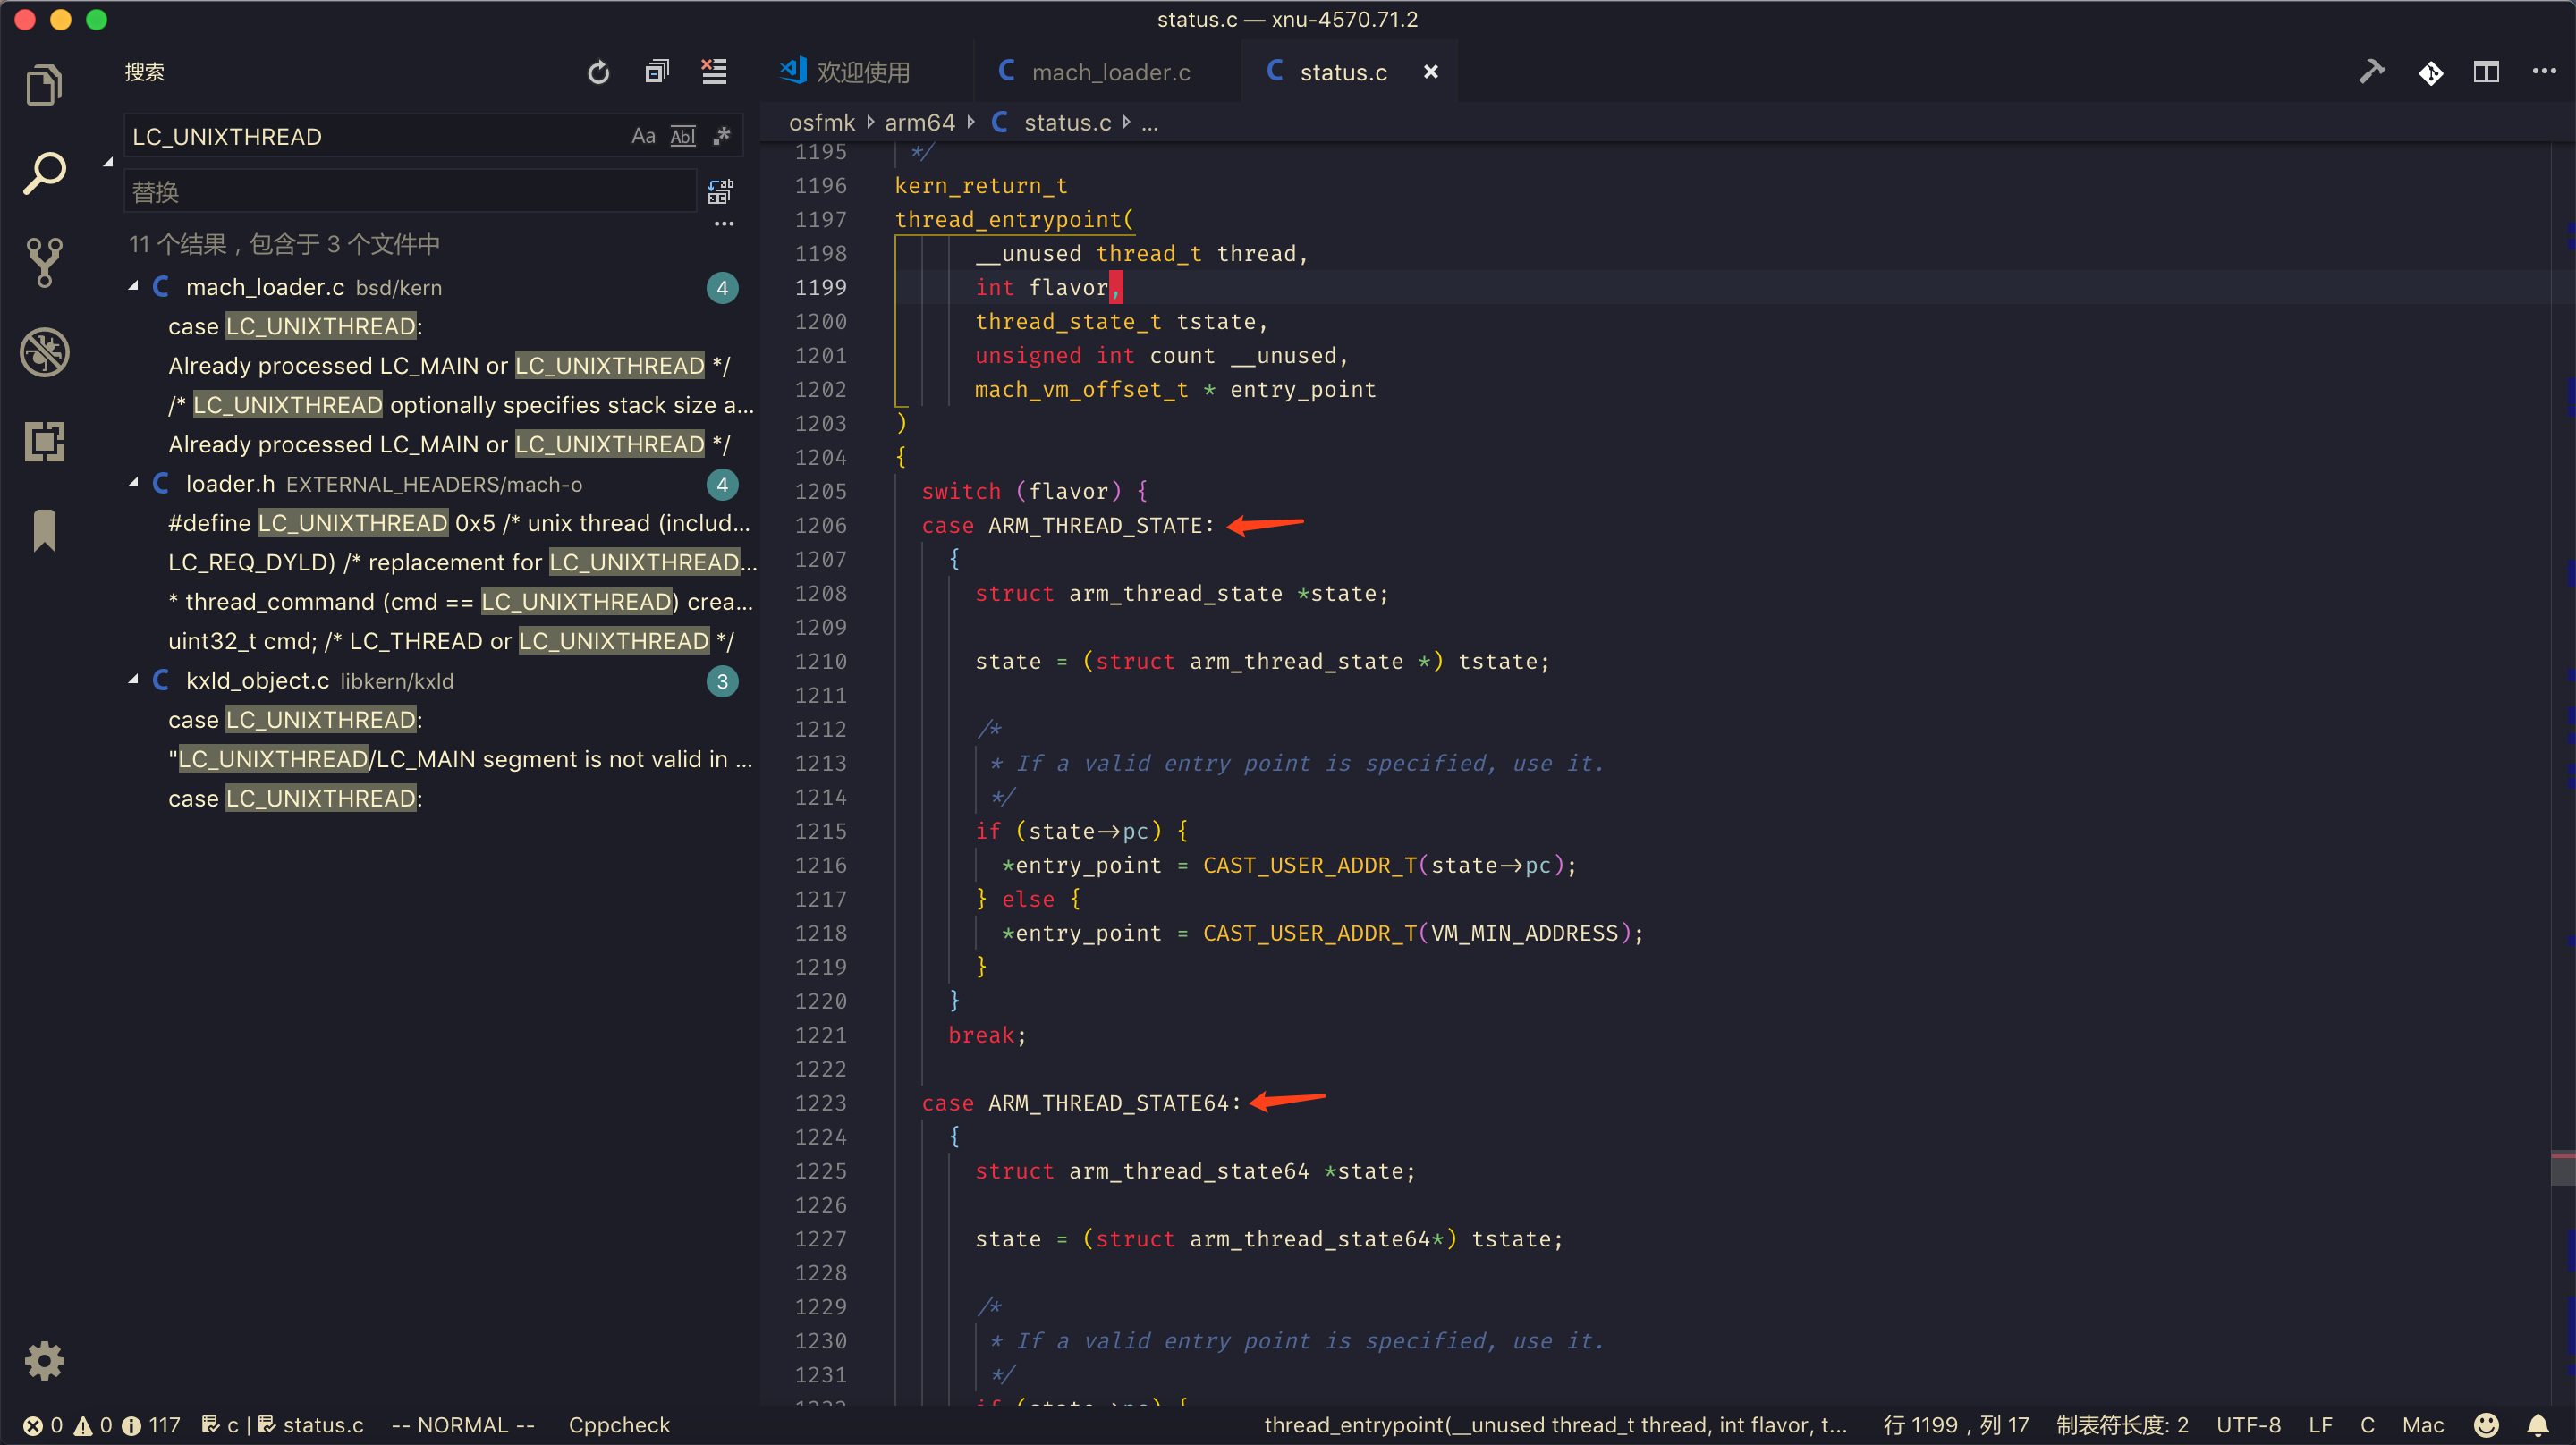
这里额外附加一张增加了 ARM/ARM64 Kernel Source 的 xnu-4570.71.2
0x4: Kernel LC_UNIXTHREAD
有的读者可能并不理解为什么使用 LC_UNIXTHREAD 作为跳转地址, 这里解释下.
读者可以从 MachOView 里发现, 其实 LC_UNIXTHREAD 的 entry_state 里的 rip 对应的是 __HIB, __text.
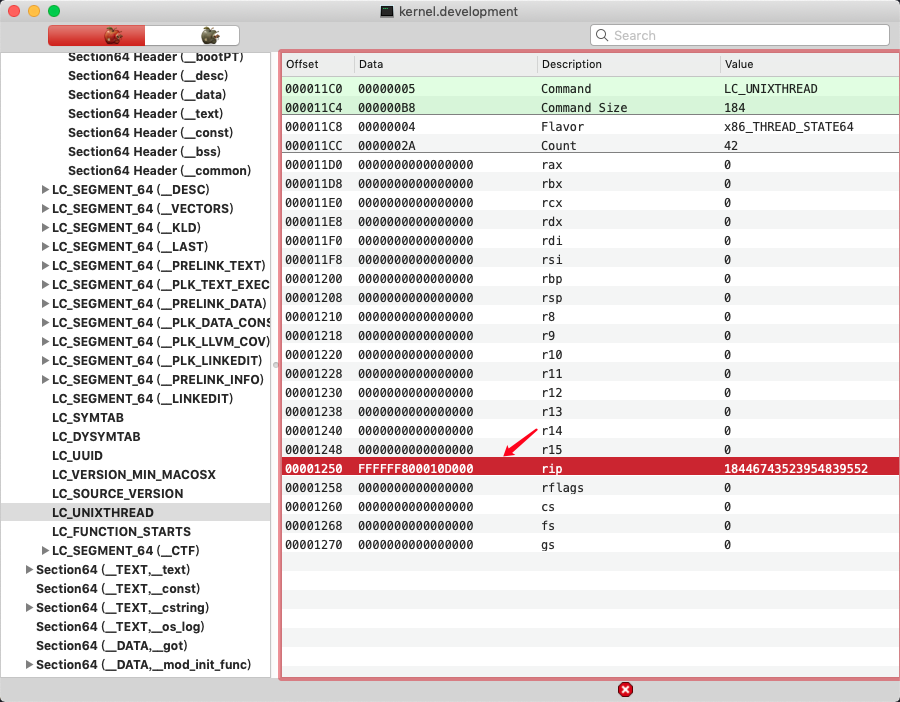
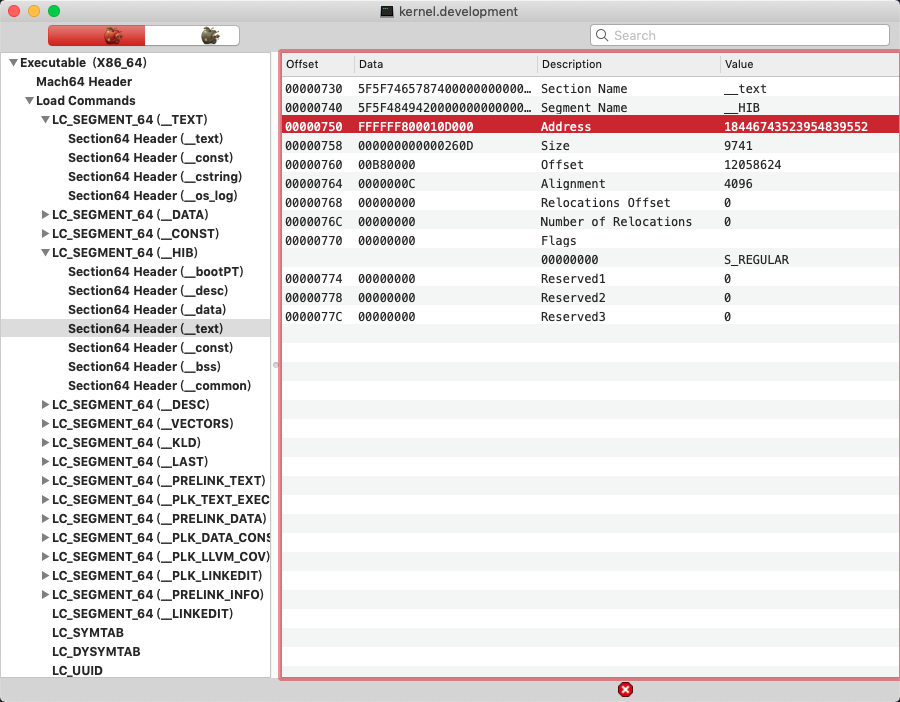
至于 __HIB,__text 的 vmaddr 则是在编译脚本里指定的.
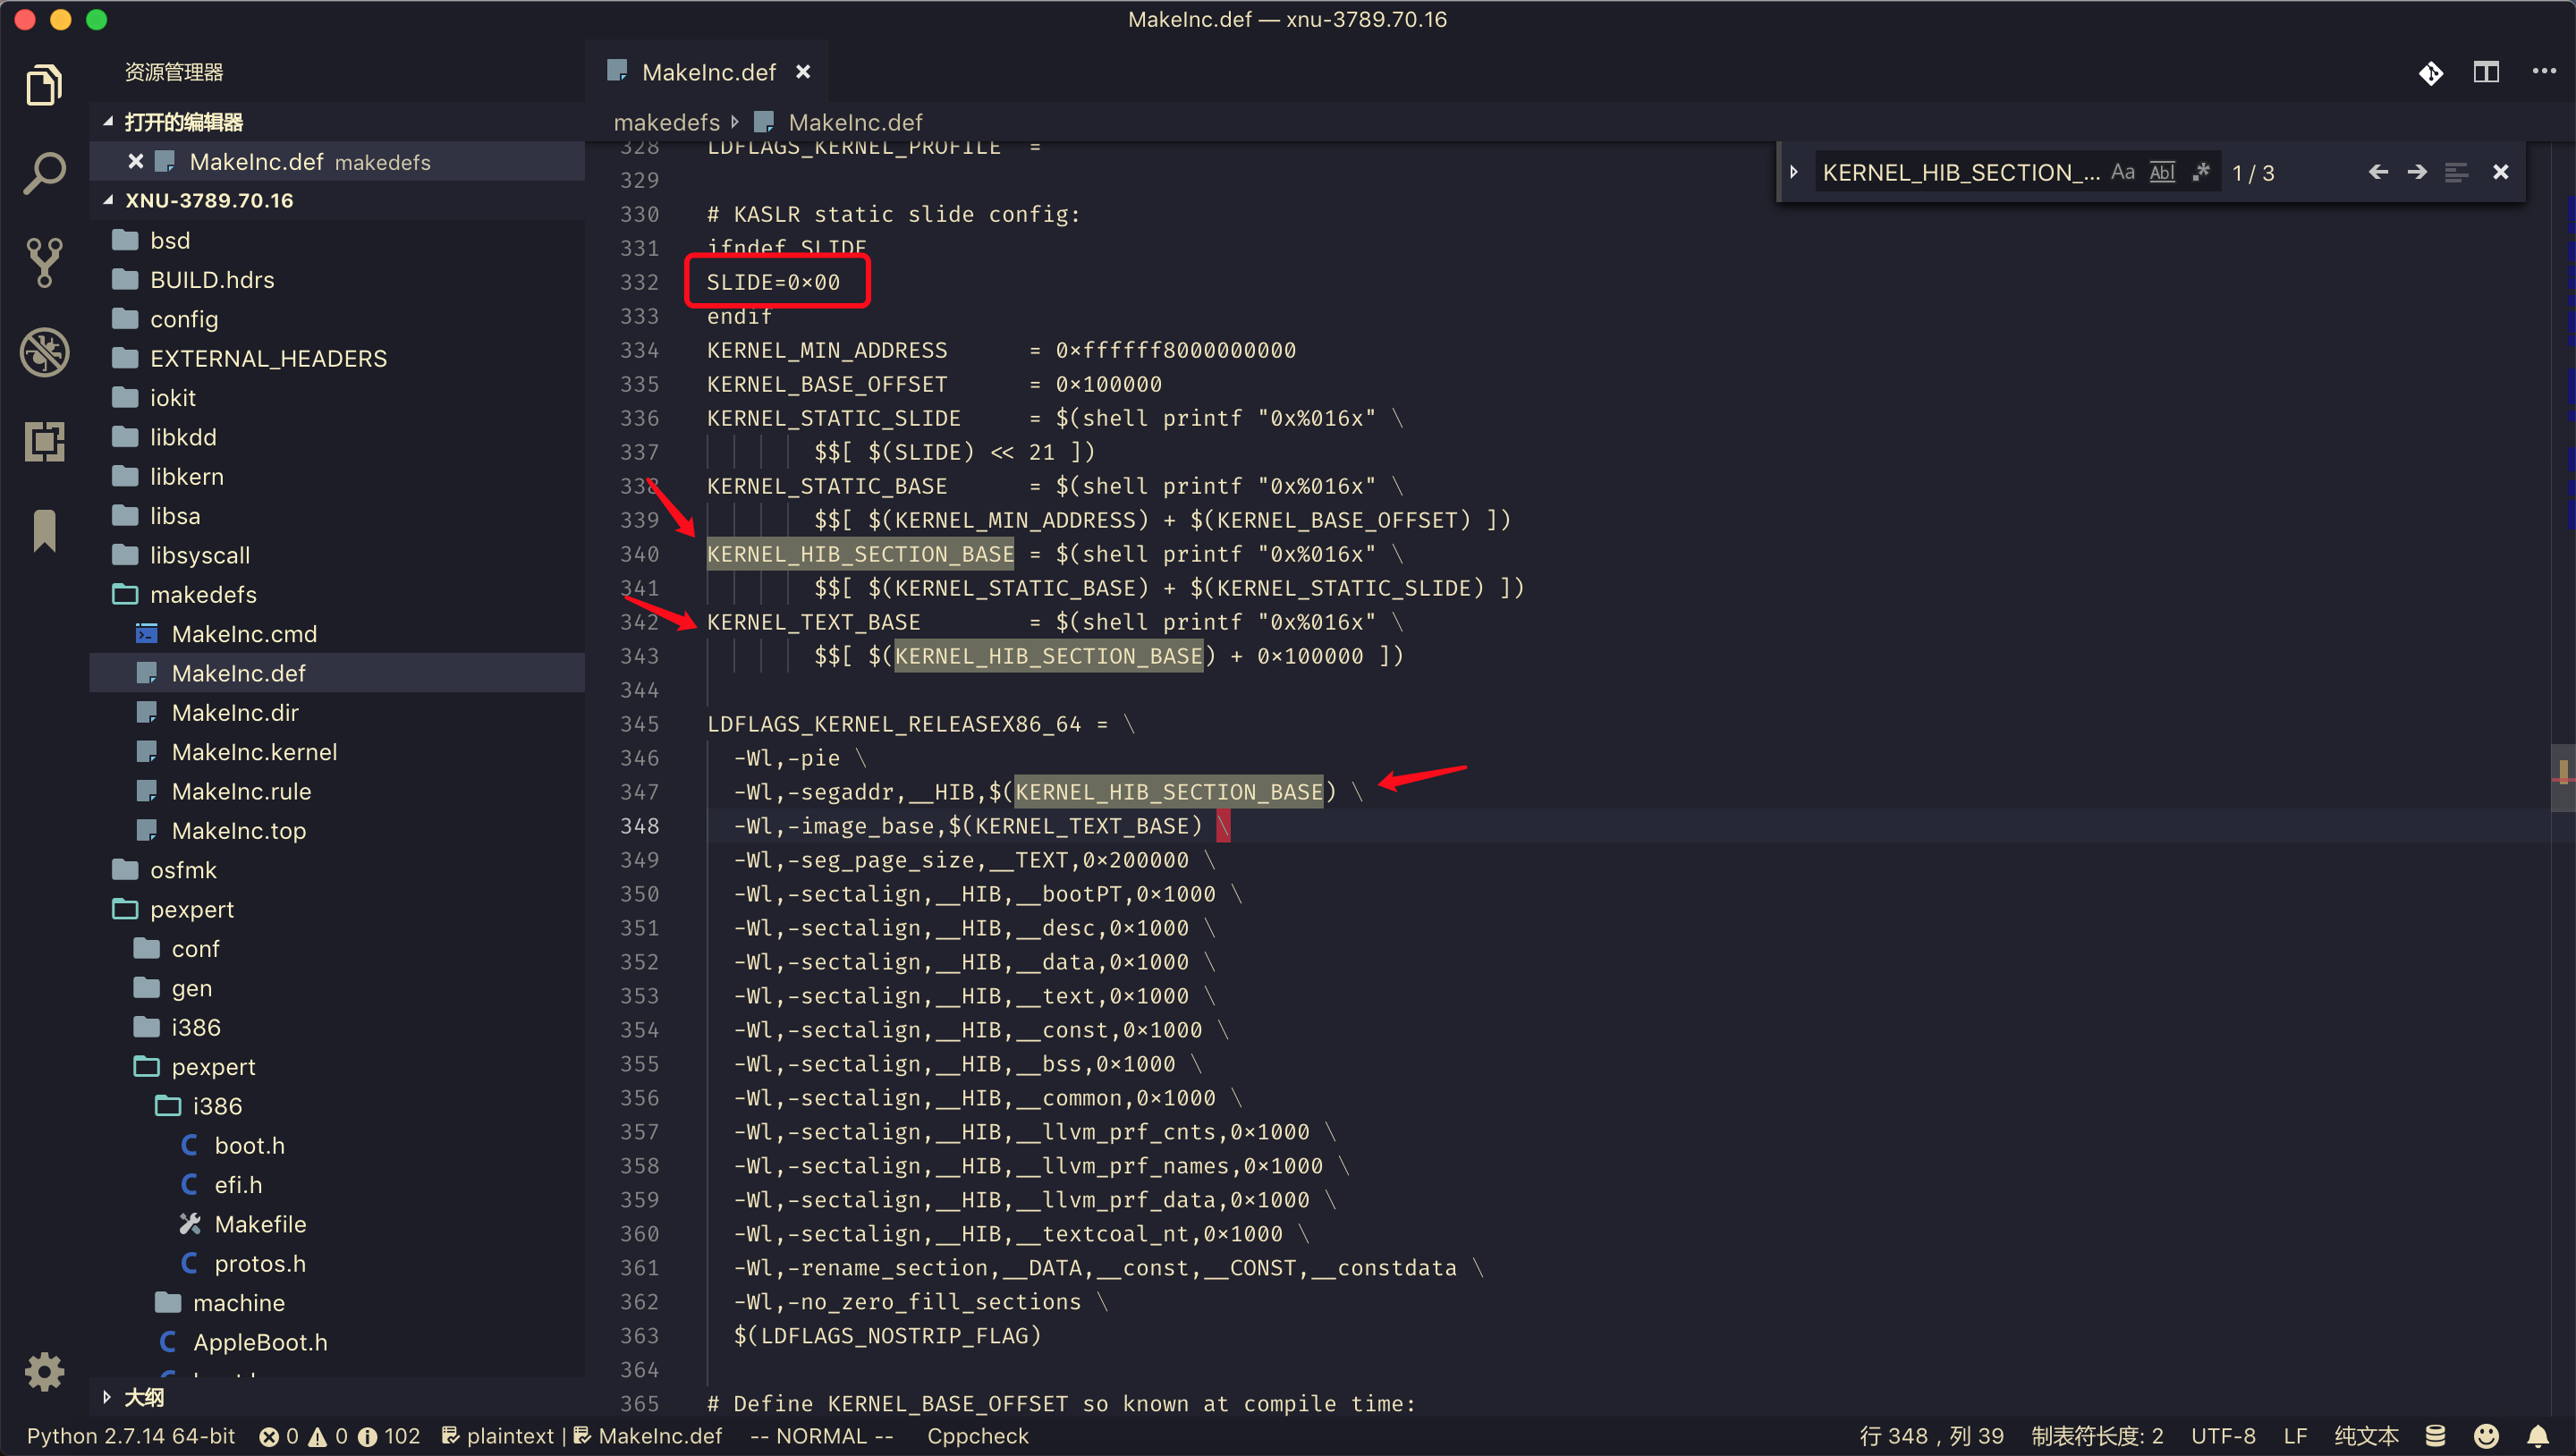
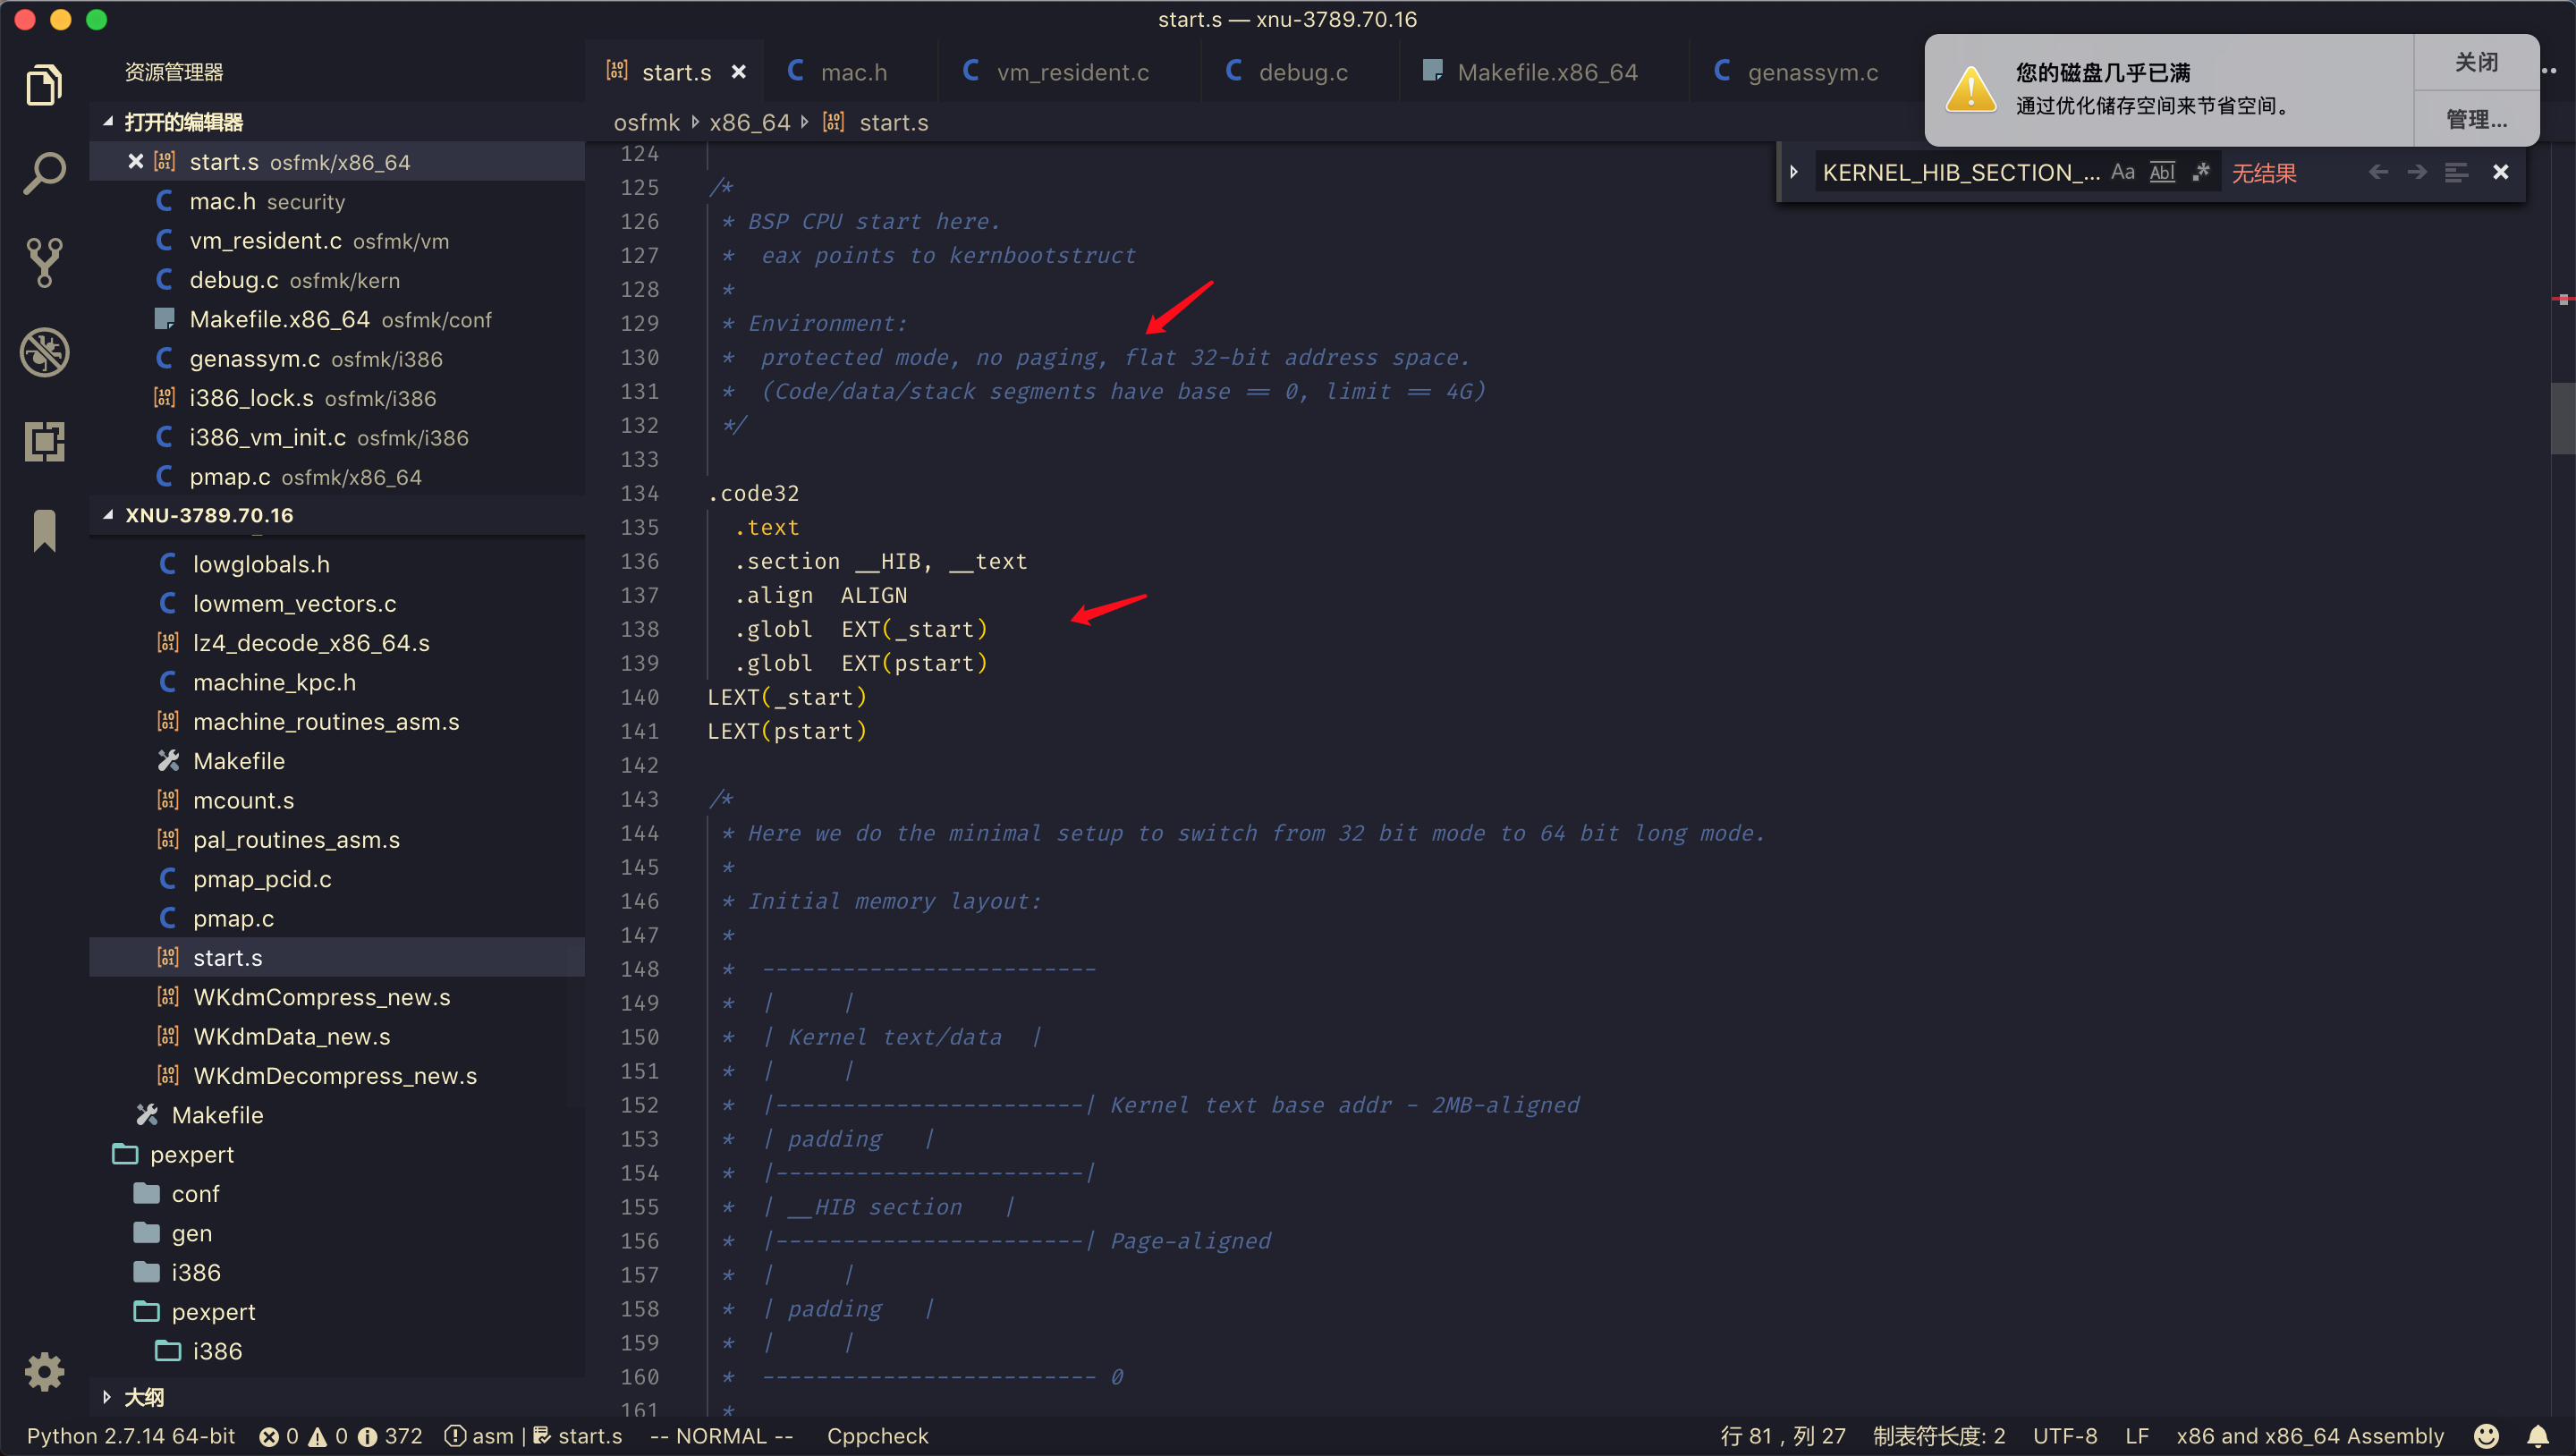
这里的 hibernate 的 __text 就是下文的即将要从 boot.efi 跳转的入口点.
经过上面很长一段的分析.
终于可以准备开始带着 boot-args 进入 "Kernel" 了.
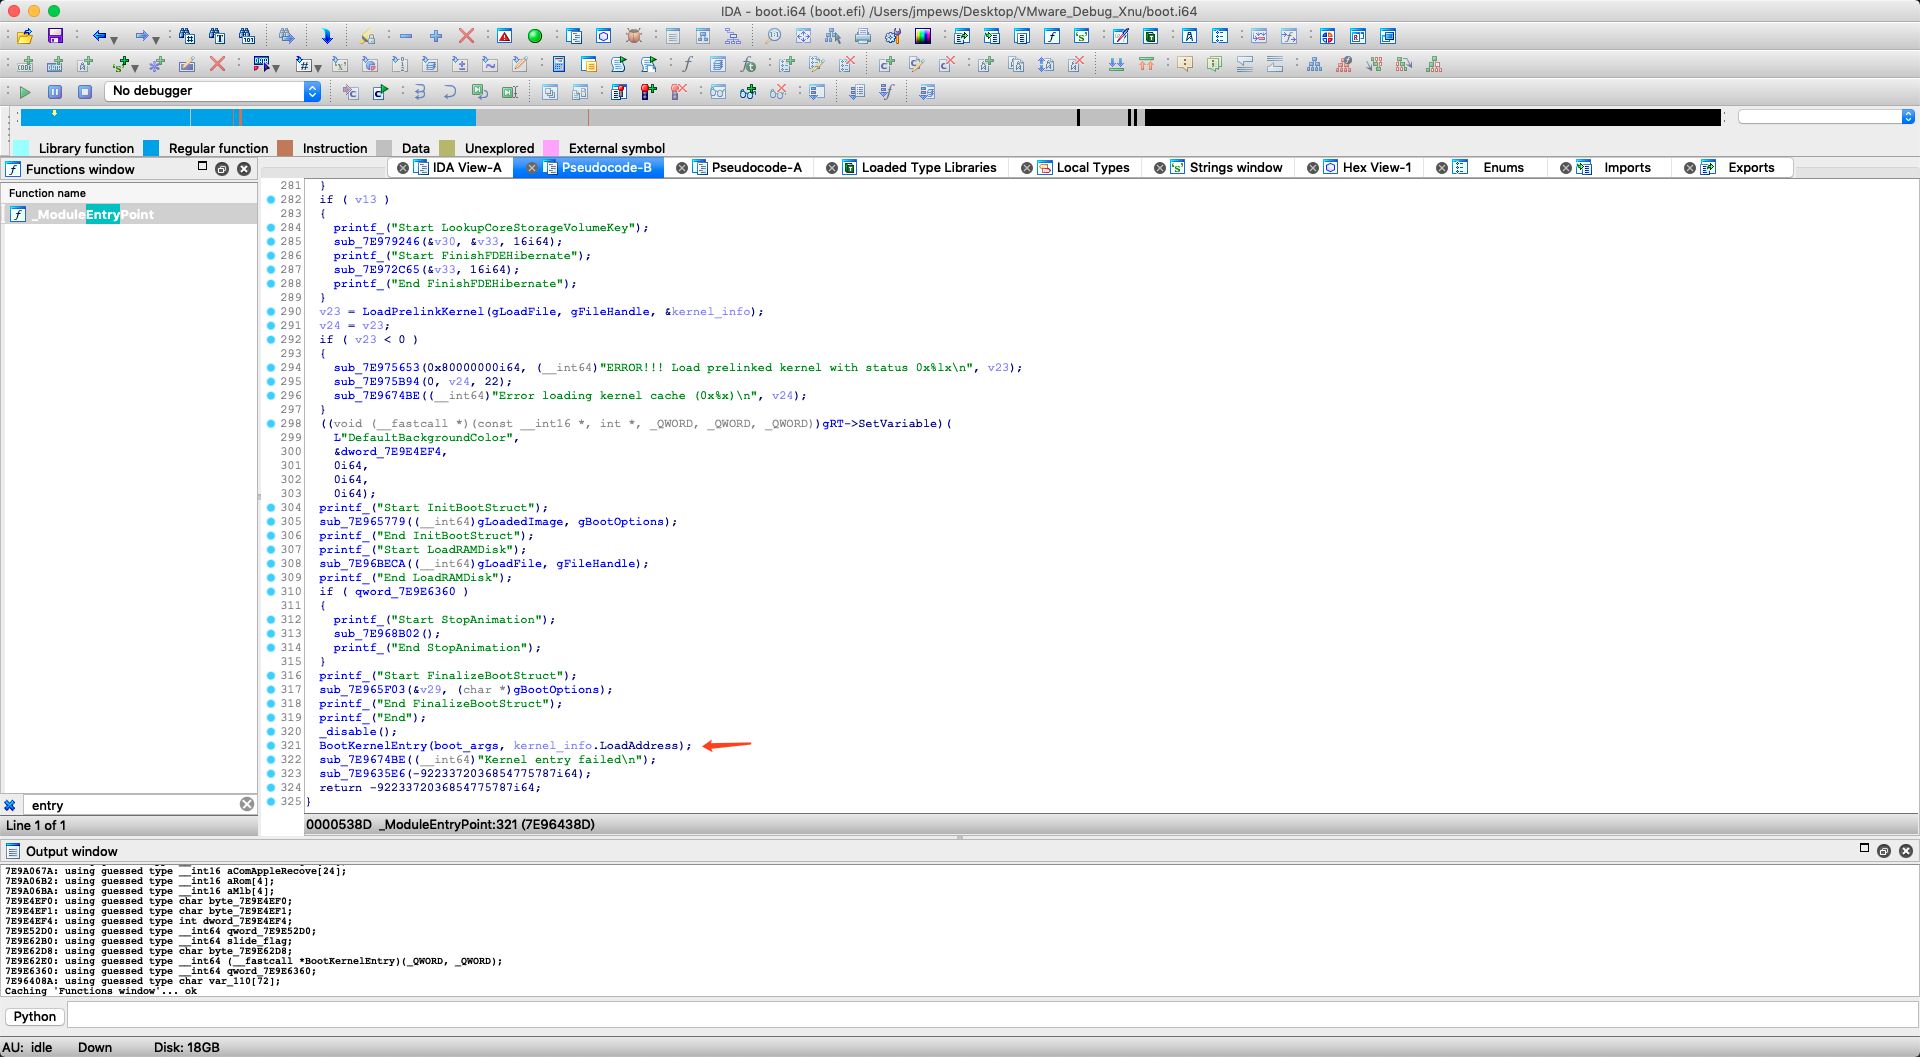
BootKernelEntry(boot_args, kernel_info.LoadAddress); 此时 rcx = boot_args, rdx = KernelEntry, 从这里开始进入 KernelCallGate.
0x5: Kernel Call Gate
通过 template-code-block, (复制)创建一个 thunk, 也就是一个内核调用门,

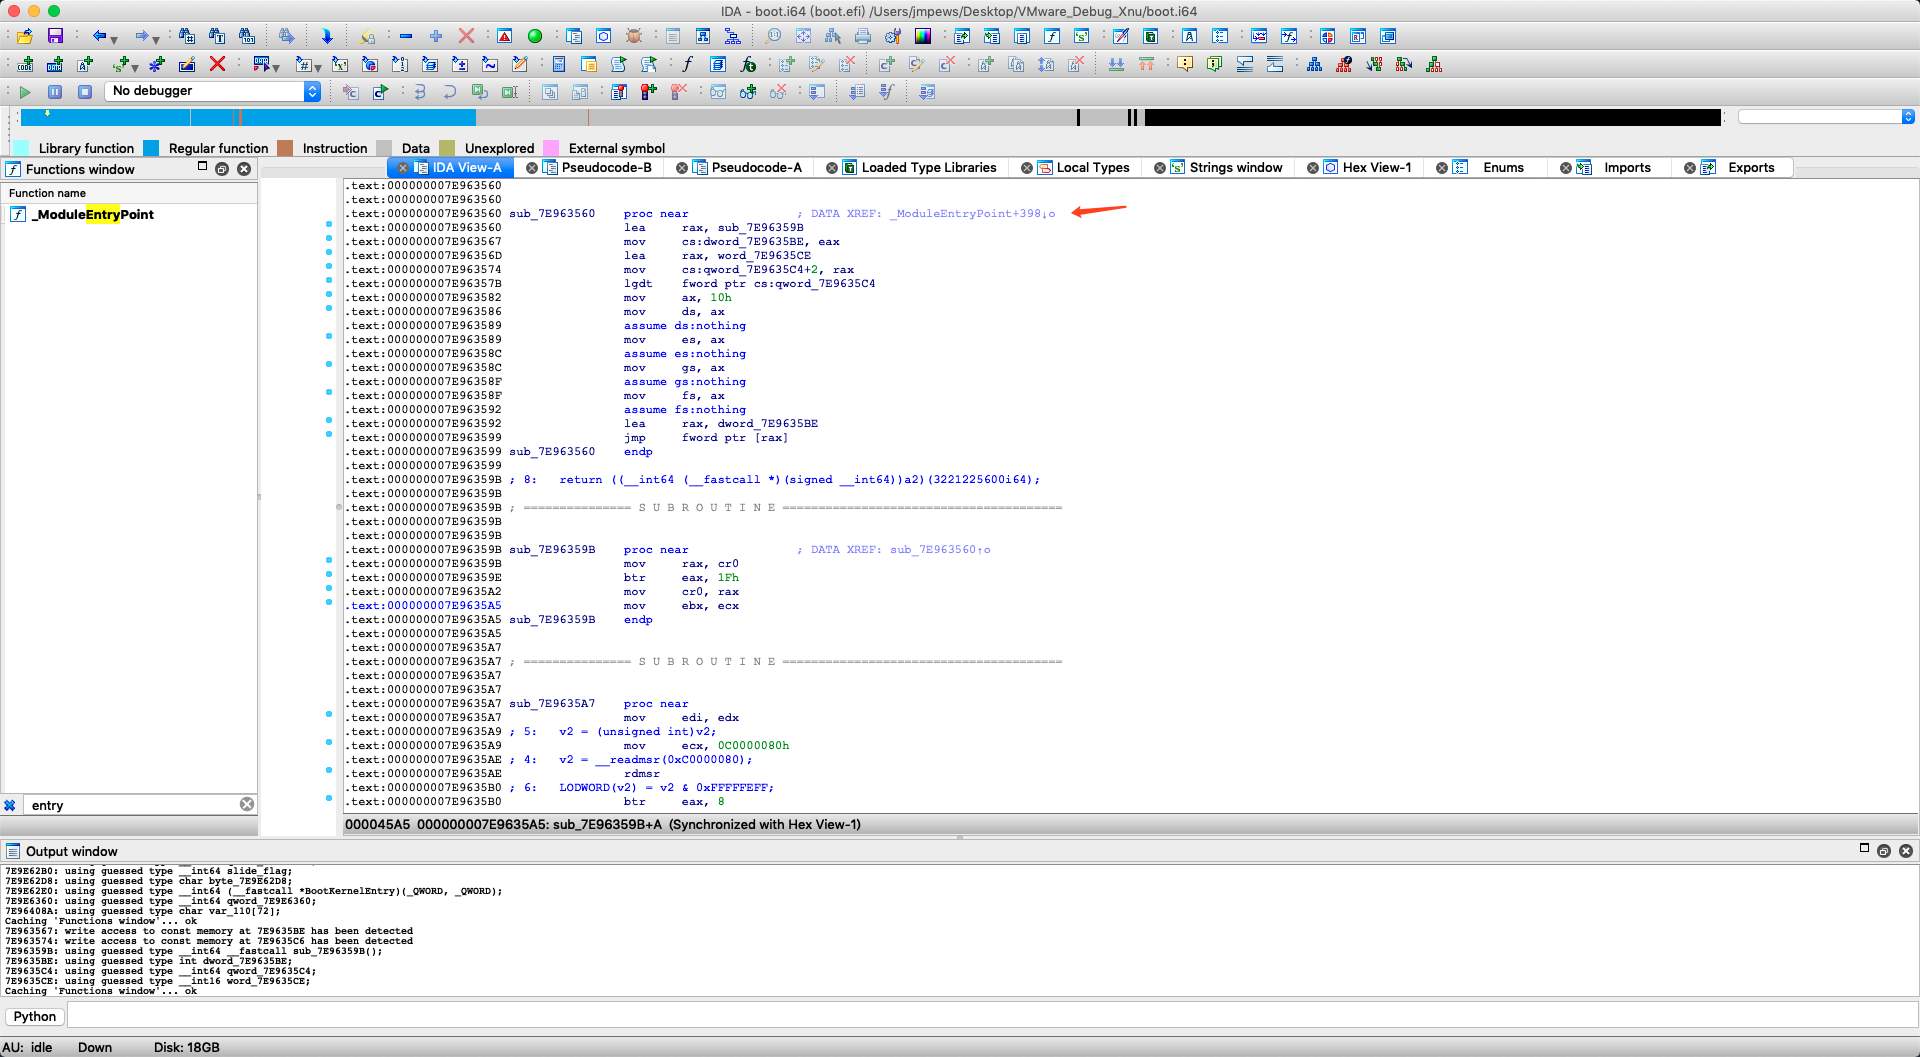
现在直接对 BootKernelEntry 进行断点, 进入 KernelCallGateThunk.
thunk_64:000000007EA77000 ; ---------------------------------------------------------------------------
thunk_64:000000007EA77000 ; ===========================================================================
thunk_64:000000007EA77000
thunk_64:000000007EA77000 ; Segment type: Regular
thunk_64:000000007EA77000 thunk_64 segment byte public '' use64
thunk_64:000000007EA77000 assume cs:thunk_64
thunk_64:000000007EA77000 ;org 7EA77000h
thunk_64:000000007EA77000 assume es:nothing, ss:nothing, ds:nothing, fs:nothing, gs:nothing
thunk_64:000000007EA77000 lea     rax, loc_7EA7703B
thunk_64:000000007EA77007 mov     cs:dword_7EA7705E, eax
thunk_64:000000007EA7700D lea     rax, dword_7EA7706E
thunk_64:000000007EA77014 mov     qword ptr cs:dword_7EA77066, rax
thunk_64:000000007EA7701B lgdt    fword ptr cs:word_7EA77064
thunk_64:000000007EA77022 mov     ax, 10h
thunk_64:000000007EA77026 mov     ds, ax
thunk_64:000000007EA77029 mov     es, ax
thunk_64:000000007EA7702C mov     gs, ax
thunk_64:000000007EA7702F mov     fs, ax
thunk_64:000000007EA77032 lea     rax, dword_7EA7705E
thunk_64:000000007EA77039 jmp     fword ptr [rax]
thunk_64:000000007EA77039 thunk_64 ends
thunk_64:000000007EA77039
thunk_32:7EA7703B ; ---------------------------------------------------------------------------
thunk_32:7EA7703B ; ===========================================================================
thunk_32:7EA7703B
thunk_32:7EA7703B ; Segment type: Regular
thunk_32:7EA7703B thunk_32 segment byte public '' use32
thunk_32:7EA7703B assume cs:thunk_32
thunk_32:7EA7703B ;org 7EA7703Bh
thunk_32:7EA7703B assume es:nothing, ss:nothing, ds:nothing, fs:nothing, gs:nothing
thunk_32:7EA7703B
thunk_32:7EA7703B loc_7EA7703B:                           ; DATA XREF: thunk_64:000000007EA77000↑o
thunk_32:7EA7703B mov     eax, cr0
thunk_32:7EA7703E btr     eax, 1Fh
thunk_32:7EA77042 mov     cr0, eax
thunk_32:7EA77045 mov     ebx, ecx
thunk_32:7EA77047 mov     edi, edx
thunk_32:7EA77049 mov     ecx, 0C0000080h
thunk_32:7EA7704E rdmsr
thunk_32:7EA77050 btr     eax, 8
thunk_32:7EA77054 wrmsr
thunk_32:7EA77056 jmp     short $+2
thunk_32:7EA77058 ; ---------------------------------------------------------------------------
thunk_32:7EA77058
thunk_32:7EA77058 loc_7EA77058:                           ; CODE XREF: thunk_32:7EA77056↑j
thunk_32:7EA77058 mov     eax, ebx
thunk_32:7EA7705A jmp     edi
thunk_32:7EA7705A ; ---------------------------------------------------------------------------
emmmm, 这段 assembly-code 总体上是一段 64-bit Paging Long-mode 切换到 32-bit protected-model 的 thunk code, 稍微详细一点解释.
thunk_64:000000007EA77000 lea rax, loc_7EA7703B
thunk_64:000000007EA77007 mov cs:dword_7EA7705E, eax
thunk_64:000000007EA7700D lea rax, dword_7EA7706E
thunk_64:000000007EA77014 mov qword ptr cs:dword_7EA77066, rax
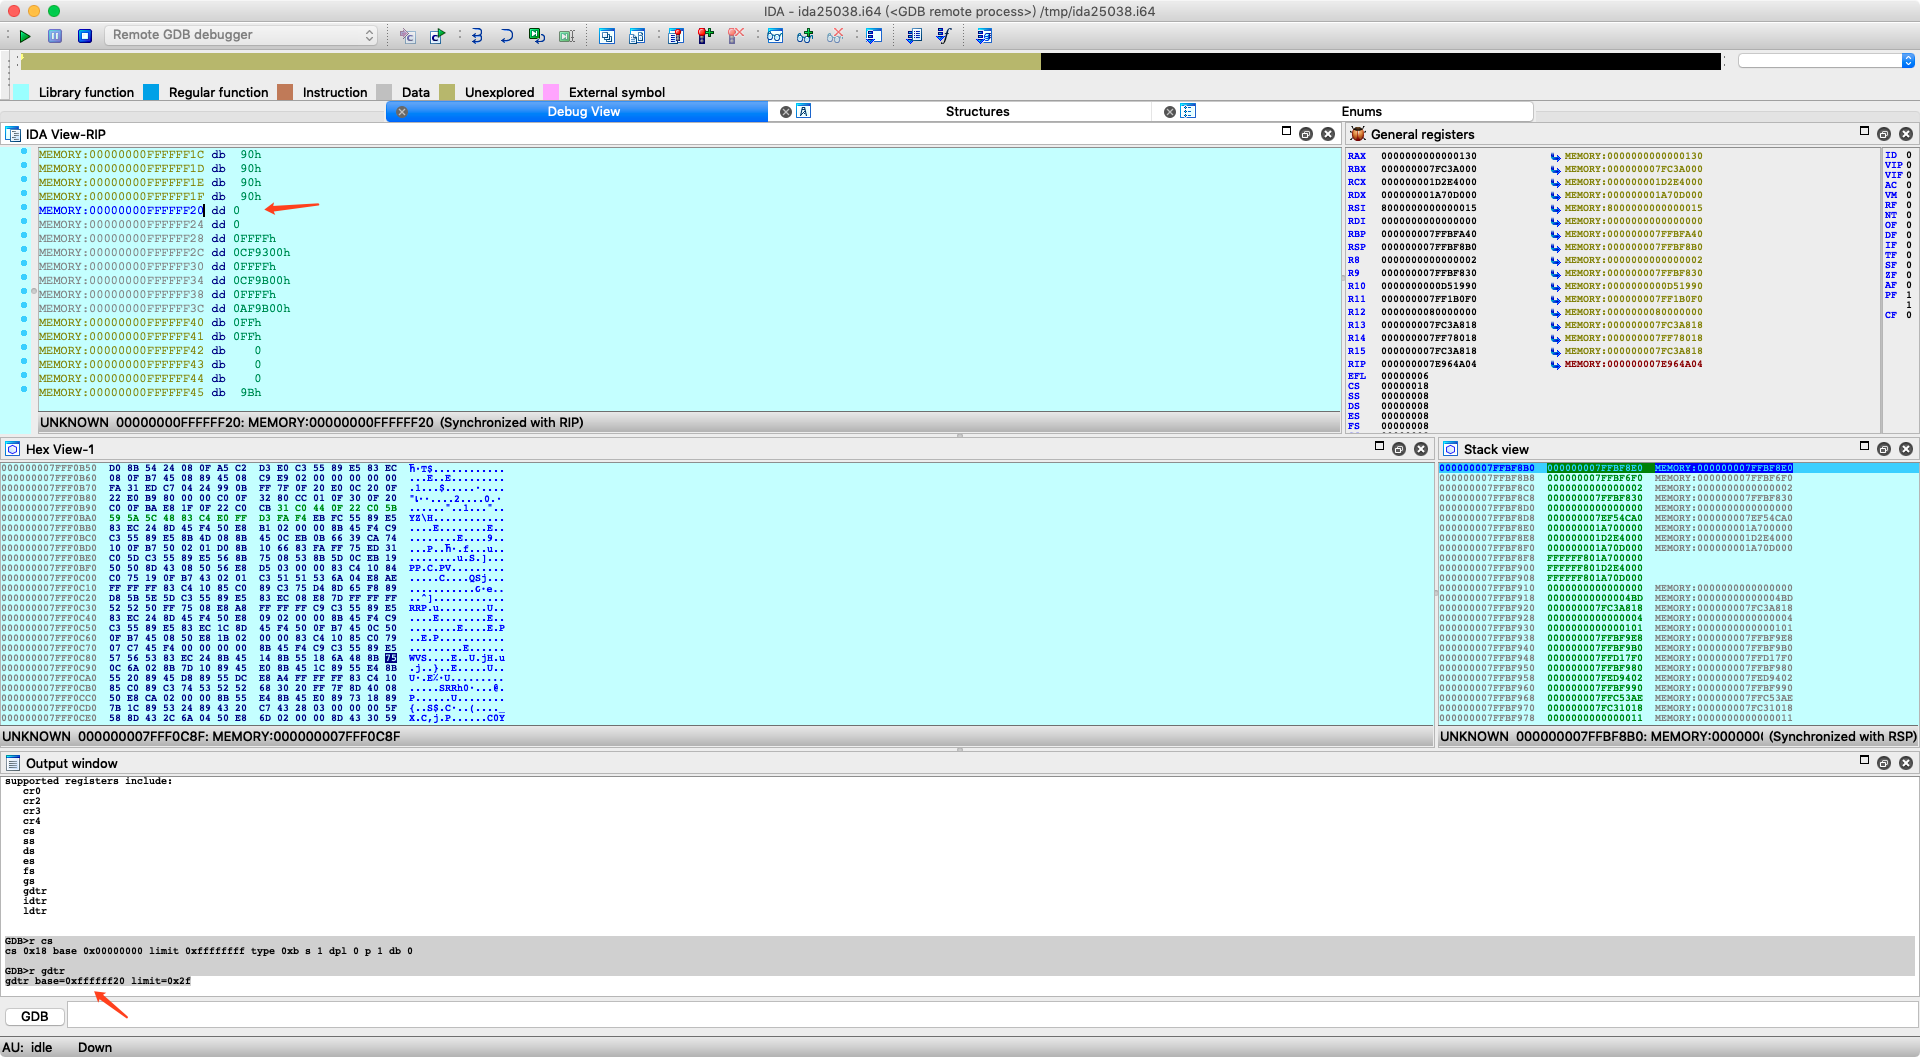
thunk_64:000000007EA7701B lgdt fword ptr cs:word_7EA77064
这段指令主要是把 loc_7EA7703B 的线性地址放到 cs:dword_7EA7705E 方便接下来进行切换 CS Segment selector. 这里 dword_7EA7706E 放的就是即将要重载的 GDT, 然后使用 lgdt 重载 GDT.
此时 GDT CS Segment:
MEMORY:00000000FFFFFF38 dd 0FFFFh
MEMORY:00000000FFFFFF3C dd 0AF9B00h // 对应 G, D/B, L, AVL
对应 CS segment selector: 0x18
重载后的 GDT CS Segment:
MEMORY:000000007EA77076 dd 0FFFFh
MEMORY:000000007EA7707A dd 0CF9E00h // 对应 G, D/B, L, AVL
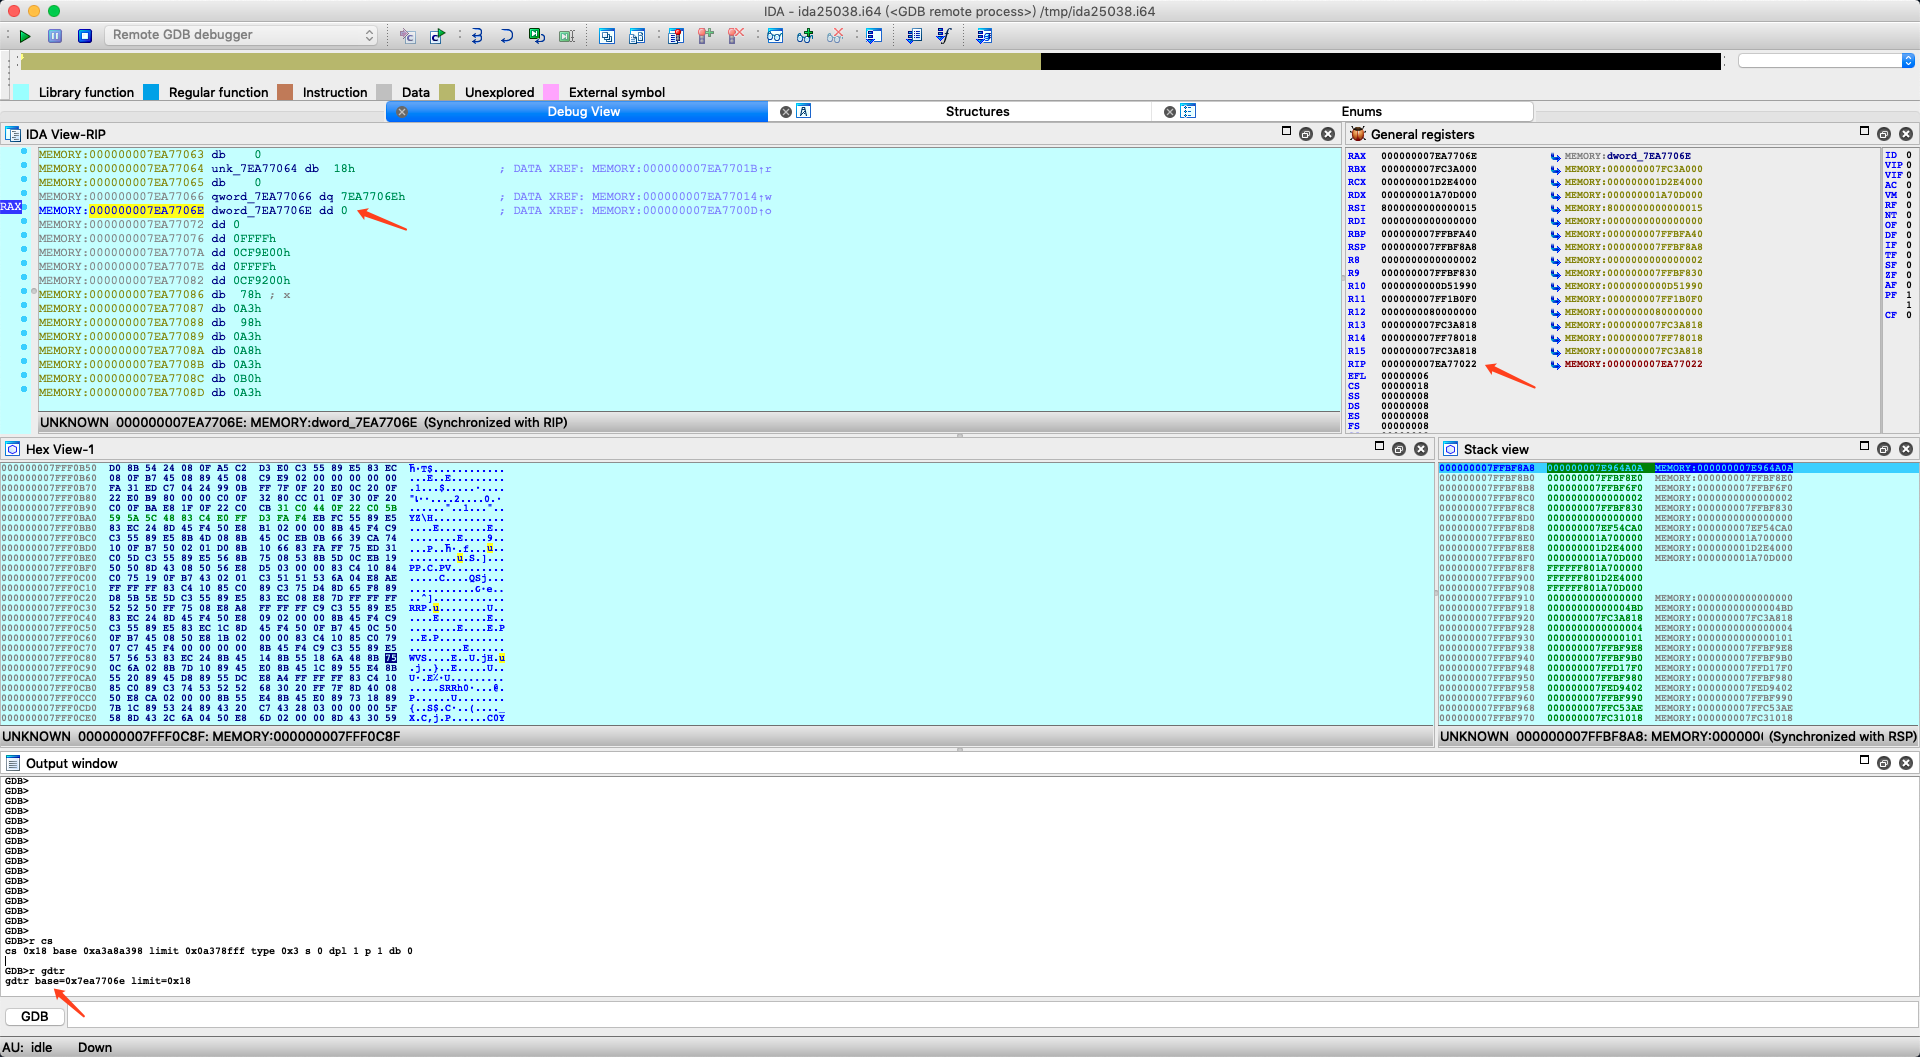
前后 GDT 的 CS Segment 的 base address 相同都是 0x0.
thunk_64:000000007EA77022 mov     ax, 10h
thunk_64:000000007EA77026 mov     ds, ax
thunk_64:000000007EA77029 mov     es, ax
thunk_64:000000007EA7702C mov     gs, ax
thunk_64:000000007EA7702F mov     fs, ax
thunk_64:000000007EA77032 lea     rax, dword_7EA7705E
thunk_64:000000007EA77039 jmp     fword ptr [rax]
这段指令将更新各个 Segment Registers 为新的 sesgment selector, 最后通过 jmp fword ptr [rax] 读取 cs selector + offset 利用 far jmp 更新 CS Segment selector(这里有一个前提, 重载前后的 GDT 的 base address 相同, 并且 dword_7EA7705E 存放的就是 jmp 后的下一条指令 7EA7703B)
从这里开始无法使用 单步 以及 硬断, 因为此时并没有 32-bit IDT. 这也是 VMware 在这里一个蛋疼的地方, 需要依赖于 Guest 的 IDT
可以认为: **如果后面 32-bit 的指令没有做重载 IDT 的操作, 那么都不能做任何中断/异常的事情, 或者只有等它再次切到 64-bit 后才可以下断点. **
所以这里先手动跟一下指令执行.
thunk_32:7EA7703B loc_7EA7703B:                           ; DATA XREF: thunk_64:000000007EA77000↑o
thunk_32:7EA7703B mov     eax, cr0
thunk_32:7EA7703E btr     eax, 1Fh
thunk_32:7EA77042 mov     cr0, eax
thunk_32:7EA77045 mov     ebx, ecx
thunk_32:7EA77047 mov     edi, edx
thunk_32:7EA77049 mov     ecx, 0C0000080h
thunk_32:7EA7704E rdmsr
thunk_32:7EA77050 btr     eax, 8
thunk_32:7EA77054 wrmsr
thunk_32:7EA77056 jmp     short $+2
thunk_32:7EA77058 ; ---------------------------------------------------------------------------
thunk_32:7EA77058
thunk_32:7EA77058 loc_7EA77058:                           ; CODE XREF: thunk_32:7EA77056↑j
thunk_32:7EA77058 mov     eax, ebx
thunk_32:7EA7705A jmp     edi
这段指令主要实现了, 将 CR0.PG 置零从而关闭 Paging Mode, 之后对 IA32_EFER.LME 置零从而关闭 IA-32e Mode 即 Long-Mode, 进入保护模式并跳转到 "Kernel" 加载地址.
0x6: Kernel Finally
此时 edi 是 "Kernel" 的地址, eax 是 struct boot_args. 并且这一段指令都不能进行任何断点操作, 所以手动跟着走一下先, 跟到 "Kernel" 地址.
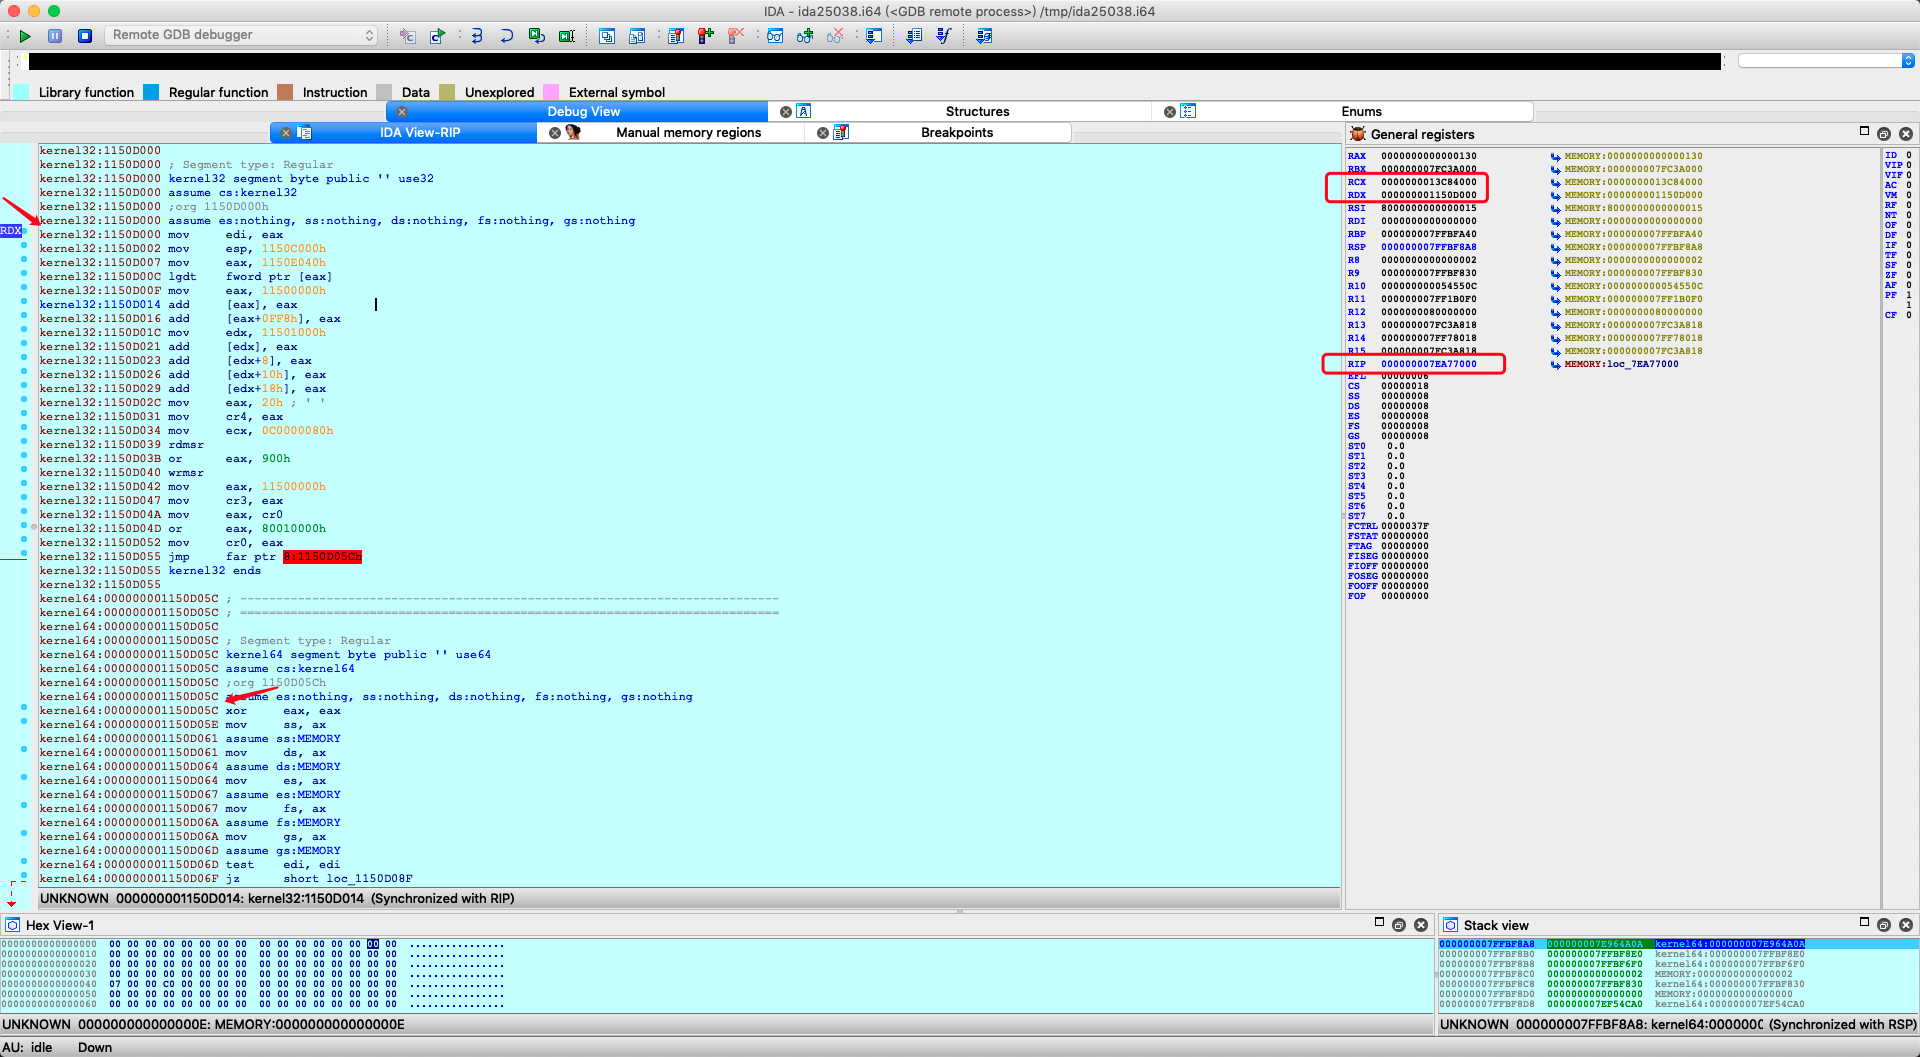
现在拿出来 xnu 里的 __HIB, __text 对照下, 终于走到了 _start(pstart) 函数, 赶紧找找哪里有切换到 64-bit 执行环境的地方, 下个硬断试试.
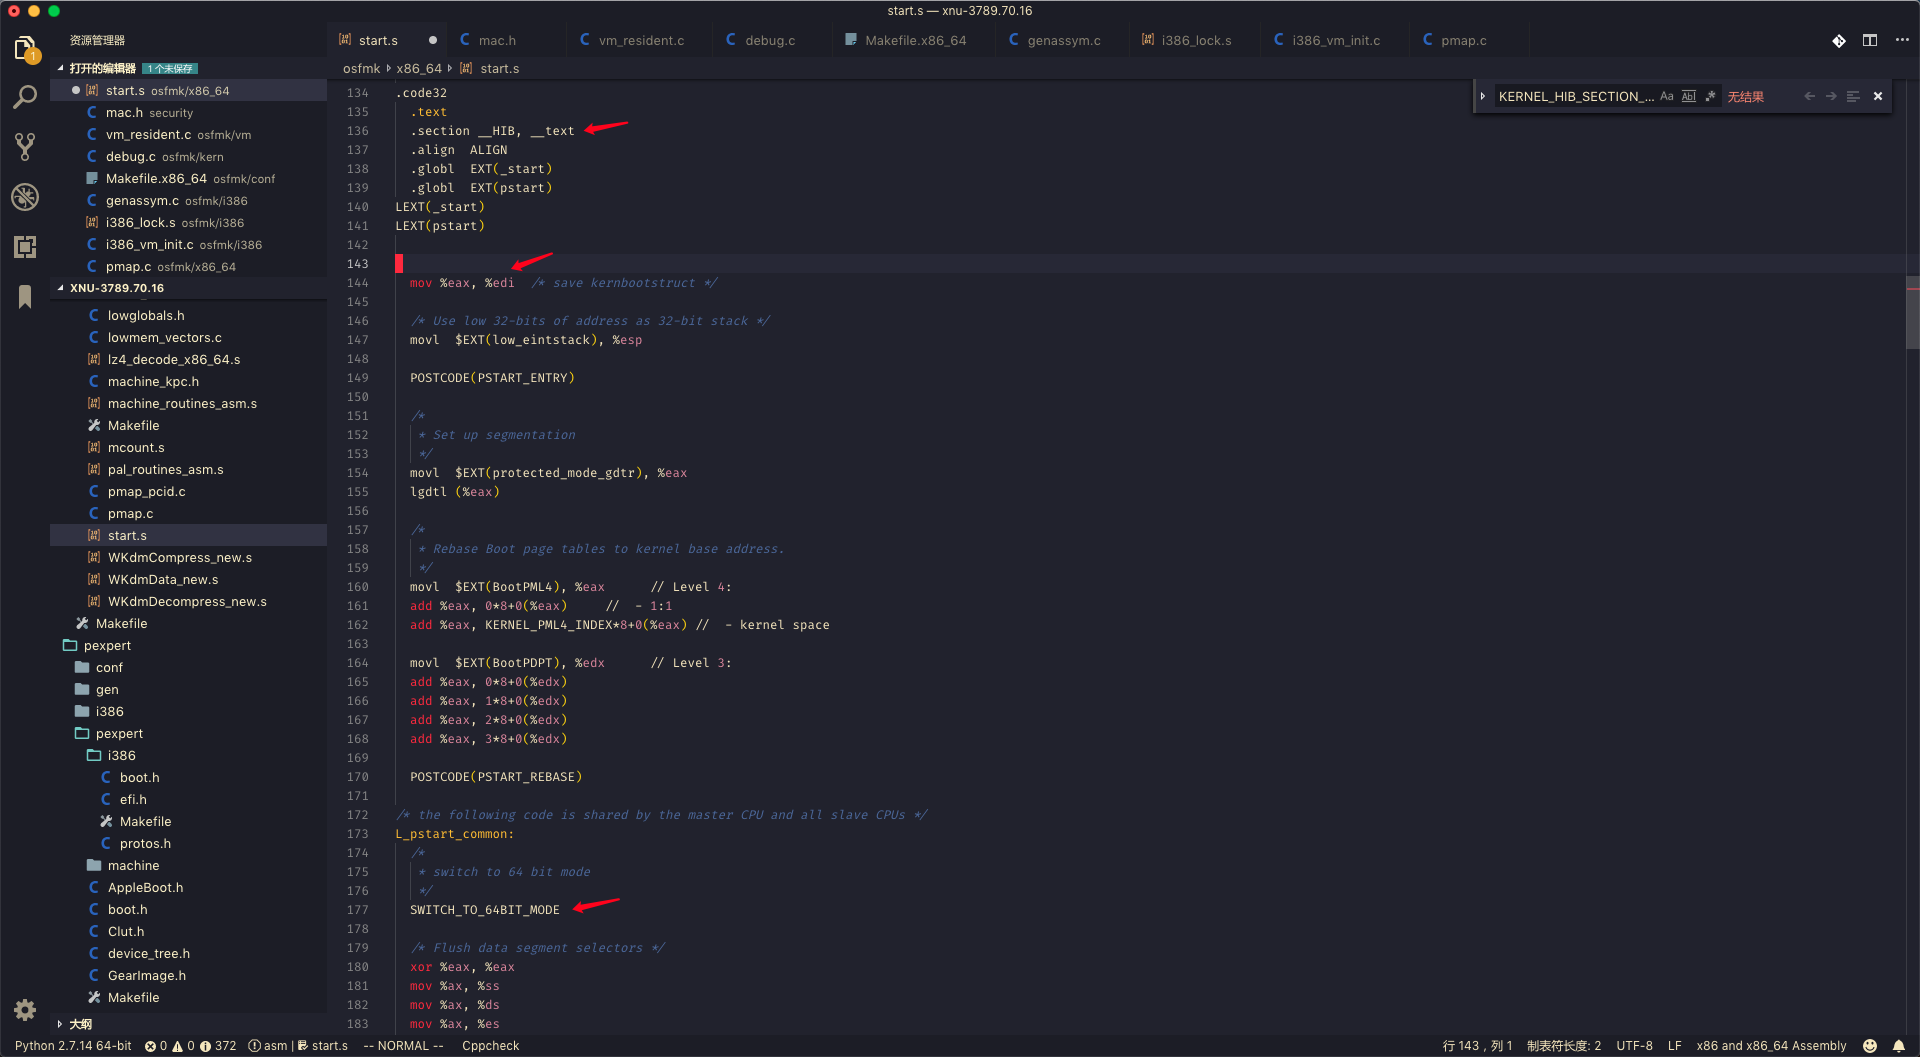
这里可以发现在经过 SWITCH_TO_64BIT_MODE 后, 终于可以正常的使用的硬断, 这也就是前文说的 "如果后面 32-bit 的指令没有做重载 IDT 的操作, 那么都不能做任何中断/异常的事情, 或者只有等它再次切到 64-bit 后才可以下断点. ".
(这里重启过虚拟机, 因为 slide 不同, 导致将 PrelinkedKernel 解压到不同的地址)
0x4: 总结
到这里, 第一阶段的分析结束, 总的来说穿透了UEFI 固件最终拦截到了 Kernel 入口点, Kernel 之后的具体初始化以及相关的之后会涉及到.
配图有点多, 接下来的一篇文章可能介绍 iOS 下的处理或者 Kernel 初始化.
Refer
0x0: boot.efi & EFI64.ROM
0x1: 参考链接
https://www.triplefault.io/2017/07/setup-vmm-debugging-using-vmwares-gdb_9.html
https://rednaga.io/2017/04/09/remote_kext_debugging/
https://wikileaks.org/ciav7p1/cms/page_14588660.html